mysql
DBeaver中建表 报错: Incorrect table definition; there can be ony one auto column and it must be
数据库 • 马化云 发表了文章 • 0 个评论 • 3422 次浏览 • 2022-10-26 10:00
在DBeaver中建表,建了一列主键,自增的,保存。报错。
错误原因:
Incorrect table definition; there can be only one auto column and it must be defined as a key
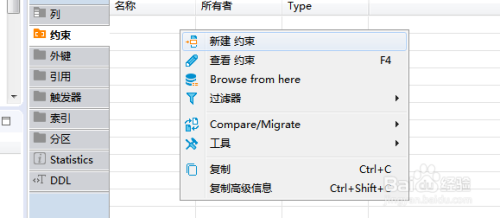
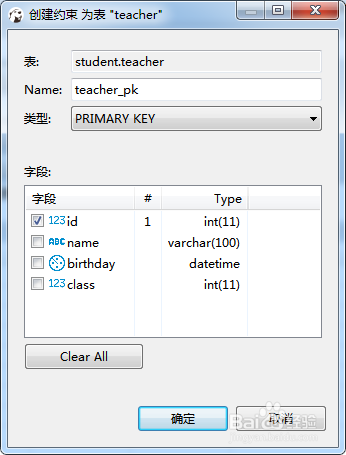
需要设置改为为主键。
设置地方:
在约束关系那里,选定一个主键即可!
查看全部
Django mysql SSL 证书配置
数据库 • 马化云 发表了文章 • 0 个评论 • 2711 次浏览 • 2022-10-13 15:35
具体配置如下:
ca_path = '/etc/ssl/certs/ca-certificates.crt' # 证书地址


DATABASES = {

    'default': {

        'ENGINE': 'django.db.backends.mysql',

        'NAME': 'wordpress',

        'USER': 'root',

        'PASSWORD': '123456',

        'HOST': '127.0.0.1`',

        'PORT': 3306,

        'OPTIONS': {'ssl':{'KEY': ca_path}}

    }

} 查看全部
具体配置如下:
ca_path = '/etc/ssl/certs/ca-certificates.crt' # 证书地址
DATABASES = {
'default': {
'ENGINE': 'django.db.backends.mysql',
'NAME': 'wordpress',
'USER': 'root',
'PASSWORD': '123456',
'HOST': '127.0.0.1`',
'PORT': 3306,
'OPTIONS': {'ssl':{'KEY': ca_path}}
}
}
SQLAlchemy python数据库实战 【勘误与电子书pdf下载】
书籍 • 马化云 发表了文章 • 0 个评论 • 2355 次浏览 • 2022-10-10 23:56
勘误:
P64 页:
backref = backref('orders',order_by=id) 应该改为 : backref = backref('orders',order_by=order_id)
P68页:
cookie= relationship('Cookie',uselist=False,order_by=id) 应该改为 : cookie= relationship('Cookie',uselist=False,order_by=order_id)
总体来说,动物书还是不错的。
需要pdf电子书的朋友,可以关注下面公众号,
后台回复:
SQLAlchemy python数据库实战
获取电子书下载链接。
查看全部

勘误:
P64 页:
backref = backref('orders',order_by=id) 应该改为 : backref = backref('orders',order_by=order_id)
P68页:
cookie= relationship('Cookie',uselist=False,order_by=id) 应该改为 : cookie= relationship('Cookie',uselist=False,order_by=order_id)
总体来说,动物书还是不错的。
需要pdf电子书的朋友,可以关注下面公众号,

后台回复:
SQLAlchemy python数据库实战
获取电子书下载链接。
SQLAlchemy mysql ssl证书 连接
数据库 • 马化云 发表了文章 • 0 个评论 • 2954 次浏览 • 2022-10-09 20:50
需要加上参数:
connect_args,加上ssl路径。
from sqlalchemy import create_engine

ca_path = '/etc/ssl/certs/ca-certificates.crt' # linux 证书路径

ssl_args = {'ssl_ca': ca_path}


engine = create_engine('mysql+pymysql://root:password@127.0.01:3306/wordpressdb?charset=utf8',

echo = True,

connect_args=ssl_args

) 查看全部
需要加上参数:
connect_args,加上ssl路径。
from sqlalchemy import create_engine
ca_path = '/etc/ssl/certs/ca-certificates.crt' # linux 证书路径
ssl_args = {'ssl_ca': ca_path}
engine = create_engine('mysql+pymysql://root:password@127.0.01:3306/wordpressdb?charset=utf8',
echo = True,
connect_args=ssl_args
)
控制pymysql的链接超时
python • 李魔佛 发表了文章 • 0 个评论 • 2780 次浏览 • 2022-06-14 23:39
conn = pymysql.connect(host=host, port=port, user=user, password=password, db=db, charset='utf8',timeout=3)
结果运行的时候直接报错的。好家伙。
难道都是东家抄西家,西家抄东家?
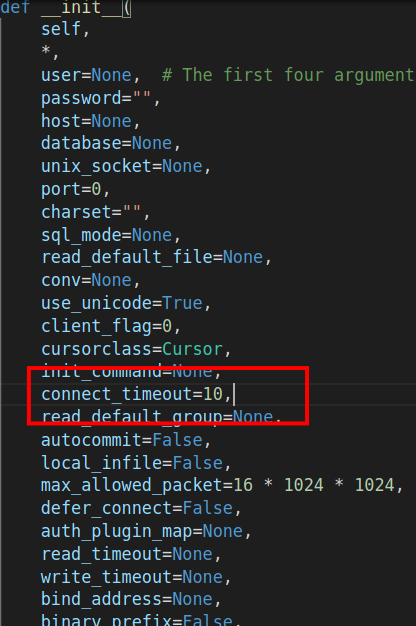
直接点进去源码:
这里直接有一个connect_timeout 的参数,这个才是最新的常数名。 查看全部
shell批量导入mysql数据库 附代码
Linux • 李魔佛 发表了文章 • 0 个评论 • 2850 次浏览 • 2022-05-19 17:52
restore_db=(db_bond_daily.sql db_bond_history.sql)
里面,比如这里的 db_bond_daily.sql db_bond_history.sql
#!/bin/bash


# 批量备份数据库

MYSQL_USER=root

MYSQL_PASSWORD=123456 # 改为你的mysql密码

HOST=127.0.0.1

restore_db=(db_bond_daily.sql db_bond_history.sql) # sql 文件列表


for i in ${restore_db[*]}

do

    name=(${i//./ }) # 切割名字


    mysql -h$HOST -u$MYSQL_USER -p$MYSQL_PASSWORD ${name[0]}<${i}


done
查看全部
restore_db=(db_bond_daily.sql db_bond_history.sql)
里面,比如这里的 db_bond_daily.sql db_bond_history.sql
#!/bin/bash
# 批量备份数据库
MYSQL_USER=root
MYSQL_PASSWORD=123456 # 改为你的mysql密码
HOST=127.0.0.1
restore_db=(db_bond_daily.sql db_bond_history.sql) # sql 文件列表
for i in ${restore_db[*]}
do
name=(${i//./ }) # 切割名字
mysql -h$HOST -u$MYSQL_USER -p$MYSQL_PASSWORD ${name[0]}<${i}
done
腾讯云轻量服务器使用mysqldump导出数据 导致进程被杀
数据库 • 李魔佛 发表了文章 • 0 个评论 • 2444 次浏览 • 2022-05-18 19:43
稍微密集一点,直接被杀掉。
在方面放mysql服务,简直就是煞笔行为。
稍微密集一点,直接被杀掉。
在方面放mysql服务,简直就是煞笔行为。
centos yum安装mysql client 客户端
数据库 • 马化云 发表了文章 • 0 个评论 • 3932 次浏览 • 2022-05-17 11:51
这时需要从官网下载
1.安装rpm源
rpm -ivh https://repo.mysql.com//mysql57-community-release-el7-11.noarch.rpm
2.安装客户端
#可以通过yum搜索yum search mysql
#若是64位的话直接安装yum install mysql-community-client.x86_64
结果报错
报以下密钥错误:The GPG keys listed for the "MySQL 5.7 Community Server" repository are already installed but they are not correct for this package.
Check that the correct key URLs are configured for this repository.
则先执行以下命令再安装:rpm --import https://repo.mysql.com/RPM-GPG-KEY-mysql-2022
wget -q -O - https://repo.mysql.com/RPM-GPG-KEY-mysql-2022|yum install然后重新安装 yum install mysql-community-client.x86_64
操作:
连到数据库:mysql -h 数据库地址 -u数据库用户名 -p数据库密码 -D 数据库名称
mysql -h 88.88.19.252 -utravelplat -pHdkj1234 -D etravel
数据库导出(表结构):mysqldump -h 数据库地址 -u数据库用户名 -p数据库密码 -d 数据库名称 > 文件名.sql
mysqldump -h 88.88.19.252 -utravelplat -pHdkj1234 -d etravel > db20190713.sql
数据库导出(表结构 + 表数据):mysqldump -h 数据库地址 -u数据库用户名 -p数据库密码 数据库名称 > 文件名.sql
mysqldump -h 88.88.19.252 -utravelplat -pHdkj1234 etravel > db20190713.sql
数据库表导出(表结构 + 表数据):
mysqldump -h 88.88.19.252 -utravelplat -pHdkj1234 etravel doc > doc.sql
导入到数据库:source 文件名.sql
source db20190713.sql
查看全部
这时需要从官网下载
1.安装rpm源
rpm -ivh https://repo.mysql.com//mysql57-community-release-el7-11.noarch.rpm
2.安装客户端
#可以通过yum搜索
yum search mysql
#若是64位的话直接安装
yum install mysql-community-client.x86_64
结果报错
报以下密钥错误:
The GPG keys listed for the "MySQL 5.7 Community Server" repository are already installed but they are not correct for this package.

Check that the correct key URLs are configured for this repository.
则先执行以下命令再安装:
rpm --import https://repo.mysql.com/RPM-GPG-KEY-mysql-2022然后重新安装 yum install mysql-community-client.x86_64
wget -q -O - https://repo.mysql.com/RPM-GPG-KEY-mysql-2022|yum install
操作:
连到数据库:mysql -h 数据库地址 -u数据库用户名 -p数据库密码 -D 数据库名称
mysql -h 88.88.19.252 -utravelplat -pHdkj1234 -D etravel
数据库导出(表结构):mysqldump -h 数据库地址 -u数据库用户名 -p数据库密码 -d 数据库名称 > 文件名.sql
mysqldump -h 88.88.19.252 -utravelplat -pHdkj1234 -d etravel > db20190713.sql
数据库导出(表结构 + 表数据):mysqldump -h 数据库地址 -u数据库用户名 -p数据库密码 数据库名称 > 文件名.sql
mysqldump -h 88.88.19.252 -utravelplat -pHdkj1234 etravel > db20190713.sql
数据库表导出(表结构 + 表数据):
mysqldump -h 88.88.19.252 -utravelplat -pHdkj1234 etravel doc > doc.sql
导入到数据库:source 文件名.sql
source db20190713.sql
mysql存储过程学习
数据库 • 李魔佛 发表了文章 • 0 个评论 • 3684 次浏览 • 2020-10-18 16:38
环境 : MySQL8 + Navicat
1 .创建一个存储过程:
在navicat的查询窗口执行:
delimiter $$

create procedure hello_procedure ()

begin

select 'hello world';

END $$


call hello_procedure();
查看全部
环境 : MySQL8 + Navicat
1 .创建一个存储过程:
在navicat的查询窗口执行:
delimiter $$
create procedure hello_procedure ()
begin
select 'hello world';
END $$
call hello_procedure();
DBeaver中建表 报错: Incorrect table definition; there can be ony one auto column and it must be
数据库 • 马化云 发表了文章 • 0 个评论 • 3422 次浏览 • 2022-10-26 10:00
在DBeaver中建表,建了一列主键,自增的,保存。报错。
错误原因:
Incorrect table definition; there can be only one auto column and it must be defined as a key
需要设置改为为主键。
设置地方:
在约束关系那里,选定一个主键即可!
查看全部
Django mysql SSL 证书配置
数据库 • 马化云 发表了文章 • 0 个评论 • 2711 次浏览 • 2022-10-13 15:35
具体配置如下:
ca_path = '/etc/ssl/certs/ca-certificates.crt' # 证书地址


DATABASES = {

    'default': {

        'ENGINE': 'django.db.backends.mysql',

        'NAME': 'wordpress',

        'USER': 'root',

        'PASSWORD': '123456',

        'HOST': '127.0.0.1`',

        'PORT': 3306,

        'OPTIONS': {'ssl':{'KEY': ca_path}}

    }

} 查看全部
具体配置如下:
ca_path = '/etc/ssl/certs/ca-certificates.crt' # 证书地址
DATABASES = {
'default': {
'ENGINE': 'django.db.backends.mysql',
'NAME': 'wordpress',
'USER': 'root',
'PASSWORD': '123456',
'HOST': '127.0.0.1`',
'PORT': 3306,
'OPTIONS': {'ssl':{'KEY': ca_path}}
}
}
SQLAlchemy python数据库实战 【勘误与电子书pdf下载】
书籍 • 马化云 发表了文章 • 0 个评论 • 2355 次浏览 • 2022-10-10 23:56
勘误:
P64 页:
backref = backref('orders',order_by=id) 应该改为 : backref = backref('orders',order_by=order_id)
P68页:
cookie= relationship('Cookie',uselist=False,order_by=id) 应该改为 : cookie= relationship('Cookie',uselist=False,order_by=order_id)
总体来说,动物书还是不错的。
需要pdf电子书的朋友,可以关注下面公众号,
后台回复:
SQLAlchemy python数据库实战
获取电子书下载链接。
查看全部

勘误:
P64 页:
backref = backref('orders',order_by=id) 应该改为 : backref = backref('orders',order_by=order_id)
P68页:
cookie= relationship('Cookie',uselist=False,order_by=id) 应该改为 : cookie= relationship('Cookie',uselist=False,order_by=order_id)
总体来说,动物书还是不错的。
需要pdf电子书的朋友,可以关注下面公众号,

后台回复:
SQLAlchemy python数据库实战
获取电子书下载链接。
SQLAlchemy mysql ssl证书 连接
数据库 • 马化云 发表了文章 • 0 个评论 • 2954 次浏览 • 2022-10-09 20:50
需要加上参数:
connect_args,加上ssl路径。
from sqlalchemy import create_engine

ca_path = '/etc/ssl/certs/ca-certificates.crt' # linux 证书路径

ssl_args = {'ssl_ca': ca_path}


engine = create_engine('mysql+pymysql://root:password@127.0.01:3306/wordpressdb?charset=utf8',

echo = True,

connect_args=ssl_args

) 查看全部
需要加上参数:
connect_args,加上ssl路径。
from sqlalchemy import create_engine
ca_path = '/etc/ssl/certs/ca-certificates.crt' # linux 证书路径
ssl_args = {'ssl_ca': ca_path}
engine = create_engine('mysql+pymysql://root:password@127.0.01:3306/wordpressdb?charset=utf8',
echo = True,
connect_args=ssl_args
)
控制pymysql的链接超时
python • 李魔佛 发表了文章 • 0 个评论 • 2780 次浏览 • 2022-06-14 23:39
conn = pymysql.connect(host=host, port=port, user=user, password=password, db=db, charset='utf8',timeout=3)
结果运行的时候直接报错的。好家伙。
难道都是东家抄西家,西家抄东家?
直接点进去源码:
这里直接有一个connect_timeout 的参数,这个才是最新的常数名。 查看全部
shell批量导入mysql数据库 附代码
Linux • 李魔佛 发表了文章 • 0 个评论 • 2850 次浏览 • 2022-05-19 17:52
restore_db=(db_bond_daily.sql db_bond_history.sql)
里面,比如这里的 db_bond_daily.sql db_bond_history.sql
#!/bin/bash


# 批量备份数据库

MYSQL_USER=root

MYSQL_PASSWORD=123456 # 改为你的mysql密码

HOST=127.0.0.1

restore_db=(db_bond_daily.sql db_bond_history.sql) # sql 文件列表


for i in ${restore_db[*]}

do

    name=(${i//./ }) # 切割名字


    mysql -h$HOST -u$MYSQL_USER -p$MYSQL_PASSWORD ${name[0]}<${i}


done
查看全部
restore_db=(db_bond_daily.sql db_bond_history.sql)
里面,比如这里的 db_bond_daily.sql db_bond_history.sql
#!/bin/bash
# 批量备份数据库
MYSQL_USER=root
MYSQL_PASSWORD=123456 # 改为你的mysql密码
HOST=127.0.0.1
restore_db=(db_bond_daily.sql db_bond_history.sql) # sql 文件列表
for i in ${restore_db[*]}
do
name=(${i//./ }) # 切割名字
mysql -h$HOST -u$MYSQL_USER -p$MYSQL_PASSWORD ${name[0]}<${i}
done
腾讯云轻量服务器使用mysqldump导出数据 导致进程被杀
数据库 • 李魔佛 发表了文章 • 0 个评论 • 2444 次浏览 • 2022-05-18 19:43
稍微密集一点,直接被杀掉。
在方面放mysql服务,简直就是煞笔行为。
稍微密集一点,直接被杀掉。
在方面放mysql服务,简直就是煞笔行为。
centos yum安装mysql client 客户端
数据库 • 马化云 发表了文章 • 0 个评论 • 3932 次浏览 • 2022-05-17 11:51
这时需要从官网下载
1.安装rpm源
rpm -ivh https://repo.mysql.com//mysql57-community-release-el7-11.noarch.rpm
2.安装客户端
#可以通过yum搜索yum search mysql
#若是64位的话直接安装yum install mysql-community-client.x86_64
结果报错
报以下密钥错误:The GPG keys listed for the "MySQL 5.7 Community Server" repository are already installed but they are not correct for this package.
Check that the correct key URLs are configured for this repository.
则先执行以下命令再安装:rpm --import https://repo.mysql.com/RPM-GPG-KEY-mysql-2022
wget -q -O - https://repo.mysql.com/RPM-GPG-KEY-mysql-2022|yum install然后重新安装 yum install mysql-community-client.x86_64
操作:
连到数据库:mysql -h 数据库地址 -u数据库用户名 -p数据库密码 -D 数据库名称
mysql -h 88.88.19.252 -utravelplat -pHdkj1234 -D etravel
数据库导出(表结构):mysqldump -h 数据库地址 -u数据库用户名 -p数据库密码 -d 数据库名称 > 文件名.sql
mysqldump -h 88.88.19.252 -utravelplat -pHdkj1234 -d etravel > db20190713.sql
数据库导出(表结构 + 表数据):mysqldump -h 数据库地址 -u数据库用户名 -p数据库密码 数据库名称 > 文件名.sql
mysqldump -h 88.88.19.252 -utravelplat -pHdkj1234 etravel > db20190713.sql
数据库表导出(表结构 + 表数据):
mysqldump -h 88.88.19.252 -utravelplat -pHdkj1234 etravel doc > doc.sql
导入到数据库:source 文件名.sql
source db20190713.sql
查看全部
这时需要从官网下载
1.安装rpm源
rpm -ivh https://repo.mysql.com//mysql57-community-release-el7-11.noarch.rpm
2.安装客户端
#可以通过yum搜索
yum search mysql
#若是64位的话直接安装
yum install mysql-community-client.x86_64
结果报错
报以下密钥错误:
The GPG keys listed for the "MySQL 5.7 Community Server" repository are already installed but they are not correct for this package.

Check that the correct key URLs are configured for this repository.
则先执行以下命令再安装:
rpm --import https://repo.mysql.com/RPM-GPG-KEY-mysql-2022然后重新安装 yum install mysql-community-client.x86_64
wget -q -O - https://repo.mysql.com/RPM-GPG-KEY-mysql-2022|yum install
操作:
连到数据库:mysql -h 数据库地址 -u数据库用户名 -p数据库密码 -D 数据库名称
mysql -h 88.88.19.252 -utravelplat -pHdkj1234 -D etravel
数据库导出(表结构):mysqldump -h 数据库地址 -u数据库用户名 -p数据库密码 -d 数据库名称 > 文件名.sql
mysqldump -h 88.88.19.252 -utravelplat -pHdkj1234 -d etravel > db20190713.sql
数据库导出(表结构 + 表数据):mysqldump -h 数据库地址 -u数据库用户名 -p数据库密码 数据库名称 > 文件名.sql
mysqldump -h 88.88.19.252 -utravelplat -pHdkj1234 etravel > db20190713.sql
数据库表导出(表结构 + 表数据):
mysqldump -h 88.88.19.252 -utravelplat -pHdkj1234 etravel doc > doc.sql
导入到数据库:source 文件名.sql
source db20190713.sql
mysql存储过程学习
数据库 • 李魔佛 发表了文章 • 0 个评论 • 3684 次浏览 • 2020-10-18 16:38
环境 : MySQL8 + Navicat
1 .创建一个存储过程:
在navicat的查询窗口执行:
delimiter $$

create procedure hello_procedure ()

begin

select 'hello world';

END $$


call hello_procedure();
查看全部
环境 : MySQL8 + Navicat
1 .创建一个存储过程:
在navicat的查询窗口执行:
delimiter $$
create procedure hello_procedure ()
begin
select 'hello world';
END $$
call hello_procedure();


