
通知设置 新通知
ubuntu24.04的内置的ibus中文智能输入法好垃圾
李魔佛 发表了文章 • 0 个评论 • 1126 次浏览 • 2025-11-22 23:34
搜狗输入法不知道ubuntu24.04的wayland桌面, 因为ubuntu240.4默认桌面不再是xorg.
如果需要用搜狗输入法,就必须是切换到xorg.
但是切换到xorg,系统里的chrome直接打不开, 需要对chrome进行降级...
无语了.
只能切换回去,用内置的智能中文输入法.
这输入法过于脑残.... 不太适合长句子, 不适合经常打错拼音的人...
查看全部
搜狗输入法不知道ubuntu24.04的wayland桌面, 因为ubuntu240.4默认桌面不再是xorg.
如果需要用搜狗输入法,就必须是切换到xorg.
但是切换到xorg,系统里的chrome直接打不开, 需要对chrome进行降级...
无语了.
只能切换回去,用内置的智能中文输入法.

这输入法过于脑残.... 不太适合长句子, 不适合经常打错拼音的人...
oracle免费主机 忘记用户账户和密码,没有ssh private key 怎么恢复登录?
李魔佛 发表了文章 • 0 个评论 • 2491 次浏览 • 2024-11-02 00:38
现在已经很难申请到的了,且行且珍惜。
因为太久没有登录oracle的网站,导致账户邮箱都忘记了。不知道是不是被账户被清理了,还是什么原因了。
但云主机的实例还在的。
因为很早之前在本地的电脑上,我一直都是用本地的私钥自动登录的,也不需要用密码。
但,目前也只能在这个电脑上做到自动登录。
以前申请的private key也不知道放到哪里去了。
按照教程因为是
ssh -i /path/to/your/private_key.key ubuntu@your_instance_public_ip
这样导进来的。
关键现在的private_key.key 文件不见了。。。
悲催
于是在本地可以登录oracle的主机上,先登录进去oracle主机上,进入 .ssh 目录,查看 里面的authorized_keys 文件,
里面有一条记录, 就是 但是记录的免密码登录的sha256的记录。
记住这个sha256的值,然后到本地的电脑上的.ssh 里面,找到对应 idXXXX 和 idXXXX.pub 里面的内容要和oracle主机上的sha256
如果找到了,那就恭喜你,你直接复制idXXXX 和 idXXXX.pub 到其他主机 的 .ssh/ 目录 上,然后直接ssh opc@IP,就可以不用任何密码登录oracle的主机了。实现多个本地主机连接到oracle的免费主机上了。
查看全部
现在已经很难申请到的了,且行且珍惜。
因为太久没有登录oracle的网站,导致账户邮箱都忘记了。不知道是不是被账户被清理了,还是什么原因了。
但云主机的实例还在的。
因为很早之前在本地的电脑上,我一直都是用本地的私钥自动登录的,也不需要用密码。
但,目前也只能在这个电脑上做到自动登录。
以前申请的private key也不知道放到哪里去了。
按照教程因为是
ssh -i /path/to/your/private_key.key ubuntu@your_instance_public_ip
这样导进来的。
关键现在的private_key.key 文件不见了。。。
悲催
于是在本地可以登录oracle的主机上,先登录进去oracle主机上,进入 .ssh 目录,查看 里面的authorized_keys 文件,
里面有一条记录, 就是 但是记录的免密码登录的sha256的记录。
记住这个sha256的值,然后到本地的电脑上的.ssh 里面,找到对应 idXXXX 和 idXXXX.pub 里面的内容要和oracle主机上的sha256
如果找到了,那就恭喜你,你直接复制idXXXX 和 idXXXX.pub 到其他主机 的 .ssh/ 目录 上,然后直接ssh opc@IP,就可以不用任何密码登录oracle的主机了。实现多个本地主机连接到oracle的免费主机上了。
高效操作!linux在终端里快速跳转到文件管理器对应的目录下
马化云 发表了文章 • 0 个评论 • 2749 次浏览 • 2023-06-15 19:34
然后你想用chrome打开这个html文件,那么你可能需要打开文件管理器,切换到上述路径,选中上述修改的html文件。
(具体可以参考vs code的打开方式, cd 到某个目录, 然后运行: "code . " 然后就可以直接用vs code打开当前目录 )
你可以使用以下命令在Linux终端中打开文件浏览器并将其设置为当前目录:
- GNOME桌面环境:在终端中输入 `nautilus .`,即可在当前目录下打开Nautilus文件管理器。
- KDE桌面环境:在终端中输入 `dolphin .`,即可在当前目录下打开Dolphin文件管理器。
- Xfce桌面环境:在终端中输入 `thunar .`,即可在当前目录下打开Thunar文件管理器。
- LXDE桌面环境:在终端中输入 `pcmanfm .`,即可在当前目录下打开PCManFM文件管理器。
这些命令都会在当前目录下启动相应的文件管理器,以便您进行文件操作。
当然,手动敲那么多字也是挺累的。
### 如何自动化?
可以做成别名写到启动环境里面vim ~/.bashrc在这个文件里面的最后一行
加入对应的语句alias here="nautilus ."
以后只要你在终端下面输入 here
那么就会自动打开文件管理器,然后文件管理器的路径和你的终端路径一样。这样很方便吧? 查看全部
然后你想用chrome打开这个html文件,那么你可能需要打开文件管理器,切换到上述路径,选中上述修改的html文件。
(具体可以参考vs code的打开方式, cd 到某个目录, 然后运行: "code . " 然后就可以直接用vs code打开当前目录 )
你可以使用以下命令在Linux终端中打开文件浏览器并将其设置为当前目录:
- GNOME桌面环境:在终端中输入 `nautilus .`,即可在当前目录下打开Nautilus文件管理器。
- KDE桌面环境:在终端中输入 `dolphin .`,即可在当前目录下打开Dolphin文件管理器。
- Xfce桌面环境:在终端中输入 `thunar .`,即可在当前目录下打开Thunar文件管理器。
- LXDE桌面环境:在终端中输入 `pcmanfm .`,即可在当前目录下打开PCManFM文件管理器。
这些命令都会在当前目录下启动相应的文件管理器,以便您进行文件操作。
当然,手动敲那么多字也是挺累的。
### 如何自动化?
可以做成别名写到启动环境里面
vim ~/.bashrc在这个文件里面的最后一行
加入对应的语句
alias here="nautilus ."
以后只要你在终端下面输入
here
那么就会自动打开文件管理器,然后文件管理器的路径和你的终端路径一样。这样很方便吧?
vim配置运行node.js快捷键
马化云 发表了文章 • 0 个评论 • 2584 次浏览 • 2023-05-17 11:55
这样的方式来运行nodejs程序,这样就可以不用再开一个窗口去输入命令,运行。
不过手动输入那么多,显然是不符合vim的用法的。
那么我们使用一个快捷键定义,把按键次数减少。
打开.vimrc
加入一行
nnoremap nr :!node %<CR>
这样就是设置一个快捷键 nr
每次在命令行模式下,按下nr,
就可以运行当前的node文件了。快捷不?
查看全部
这样的方式来运行nodejs程序,这样就可以不用再开一个窗口去输入命令,运行。
不过手动输入那么多,显然是不符合vim的用法的。
那么我们使用一个快捷键定义,把按键次数减少。
打开.vimrc
加入一行
nnoremap nr :!node %<CR>
这样就是设置一个快捷键 nr
每次在命令行模式下,按下nr,
就可以运行当前的node文件了。快捷不?
拼多多上的台式主机坑真多
李魔佛 发表了文章 • 0 个评论 • 6584 次浏览 • 2023-05-10 16:49
(pdd上面的价格虽然价格很低,但是要相信一分价钱一分货)
首先是CPU
比如常见的i7 11800H , 11代的i7, 可能性能很炸裂。
可是H后缀的CPU,不是给台式机的! 它是属于笔记本系列的弱鸡CPU! 性能上比同样台式机的要秒飞不少。
比如下面的这张图:
什么i5 12500H,i7 11800H,都是笔记本CPU。
比如11代的i7.
正常上京东的主板+cpu。
价格要3000多。
而带H后缀的CPU+主板
1500不到,价格比台式机的要腰斩一半哦。
然后还有显卡。
有些显卡带有Laptop后缀的。
比如这样的。
这个显卡的核心 GPU,是Laptop的, 不懂英文的可以百度词典一下, 这个是笔记本的意思,
也就是说这个显卡的核心,也是给笔记本的。
同样,京东或者pdd上也有卖这样的移动端核心的显卡。3060的laptop版本的显卡,只要1000多。
而台式机版本的要2000多。
我就说,我在京东上用京东装机,自己搞下来了,无论怎么搞,价格都无法比拼多多的要低,主要是他们的价格还低很多,低到让人怀疑。
查看全部
(pdd上面的价格虽然价格很低,但是要相信一分价钱一分货)
首先是CPU
比如常见的i7 11800H , 11代的i7, 可能性能很炸裂。
可是H后缀的CPU,不是给台式机的! 它是属于笔记本系列的弱鸡CPU! 性能上比同样台式机的要秒飞不少。
比如下面的这张图:

什么i5 12500H,i7 11800H,都是笔记本CPU。
比如11代的i7.
正常上京东的主板+cpu。

价格要3000多。
而带H后缀的CPU+主板

1500不到,价格比台式机的要腰斩一半哦。
然后还有显卡。
有些显卡带有Laptop后缀的。
比如这样的。

这个显卡的核心 GPU,是Laptop的, 不懂英文的可以百度词典一下, 这个是笔记本的意思,
也就是说这个显卡的核心,也是给笔记本的。
同样,京东或者pdd上也有卖这样的移动端核心的显卡。3060的laptop版本的显卡,只要1000多。
而台式机版本的要2000多。
我就说,我在京东上用京东装机,自己搞下来了,无论怎么搞,价格都无法比拼多多的要低,主要是他们的价格还低很多,低到让人怀疑。
修改正在运行的docker容器,禁用重启自动启动
马化云 发表了文章 • 0 个评论 • 3319 次浏览 • 2023-03-26 11:17
可以使用 docker update 命令修改容器的配置,示例命令如下:docker update --restart=no <容器ID或名称>
这条命令会将容器的重启策略设置为不重启,即禁用重启自动启动。如果需要启用自动启动,只需要将 --restart 参数的值改为 always 或 on-failure 等相应的选项即可。
需要注意的是,修改容器的配置并不会立即生效,需要重启容器才能使修改生效。可以使用 docker restart 命令重启容器,示例命令如下:
docker restart <容器ID或名称>
执行这条命令后,容器会被重启并应用新的配置。 查看全部
可以使用 docker update 命令修改容器的配置,示例命令如下:
docker update --restart=no <容器ID或名称>
这条命令会将容器的重启策略设置为不重启,即禁用重启自动启动。如果需要启用自动启动,只需要将 --restart 参数的值改为 always 或 on-failure 等相应的选项即可。
需要注意的是,修改容器的配置并不会立即生效,需要重启容器才能使修改生效。可以使用 docker restart 命令重启容器,示例命令如下:
docker restart <容器ID或名称>
执行这条命令后,容器会被重启并应用新的配置。
ubuntu snap 配置不更新新软件
马化云 发表了文章 • 0 个评论 • 3009 次浏览 • 2022-12-17 14:20
网上的禁用方法
$ snap refresh --hold

error: unknown flag `hold'
在ubuntu20.04上是没有用的。因为它的snap不是最新的。要在ubuntu22.04上才可以。
在ubuntu 20.04上,
$ sudo snap set system refresh.hold="2030-01-01T01:00:00-01:00"
$ sudo snap set system refresh.metered=hold
网上说 snap最多只能设置60天内不更新,所以还需要配合crontab,在计划任务里面设置时间。
查看全部
网上的禁用方法
$ snap refresh --hold
error: unknown flag `hold'
在ubuntu20.04上是没有用的。因为它的snap不是最新的。要在ubuntu22.04上才可以。
在ubuntu 20.04上,
$ sudo snap set system refresh.hold="2030-01-01T01:00:00-01:00"
$ sudo snap set system refresh.metered=hold
网上说 snap最多只能设置60天内不更新,所以还需要配合crontab,在计划任务里面设置时间。
ubuntu snap 下载指定版本的pycharm goland
李魔佛 发表了文章 • 0 个评论 • 3517 次浏览 • 2022-12-17 13:24
所以只好回滚到指定的pycharm版本。
使用snap可以下载指定版本的pycharm和goland
sudo snap install pycharm-professional --channel=2021.2/stable --classic
上面的命令下载 2021.2/stable的版本的pycharm
那么怎么查看pycharm的版本?snap info pycharm-professionalname: pycharm-professional
summary: PyCharm Professional Edition
publisher: jetbrains✓
store-url: https://snapcraft.io/pycharm-professional
contact: https://www.jetbrains.com/pycharm/documentation/
license: unset
description: |
Python IDE for professional developers. Save time while PyCharm takes care of the r
on bigger things and embrace the keyboard-centric approach to get the most of PyCha
productivity features.
commands:
- pycharm-professional
snap-id: Uqpw0ZWqy6Wh4mgaWE0rxgM5tAGCwf4D
tracking: latest/stable
refresh-date: 15 days ago, at 09:57 CST
channels:
latest/stable: 2022.3 2022-12-01 (314) 779MB classic
latest/candidate: 2022.3.1-RC 2022-12-12 (315) 793MB classic
latest/beta: 2022.3.1-RC 2022-12-12 (315) 793MB classic
latest/edge: 2022.3.1-RC 2022-12-12 (315) 793MB classic
2022.3/stable: 2022.3 2022-12-01 (314) 779MB classic
2022.3/candidate: 2022.3.1-RC 2022-12-12 (315) 793MB classic
2022.3/beta: 2022.3.1-RC 2022-12-12 (315) 793MB classic
2022.3/edge: 2022.3.1-RC 2022-12-12 (315) 793MB classic
2022.2/stable: 2022.2.4 2022-11-17 (311) 764MB classic
2022.2/candidate: 2022.2.4 2022-11-17 (311) 764MB classic
2022.2/beta: 2022.2.4 2022-11-17 (311) 764MB classic
2022.2/edge: 2022.2.4 2022-11-17 (311) 764MB classic
2022.1/stable: 2022.1.4 2022-07-21 (295) 759MB classic
2022.1/candidate: 2022.1.4 2022-07-21 (295) 759MB classic
2022.1/beta: 2022.1.4 2022-07-21 (295) 759MB classic
2022.1/edge: 2022.1.4 2022-07-21 (295) 759MB classic
2021.3/stable: 2021.3.3 2022-03-17 (278) 702MB classic
2021.3/candidate: 2021.3.3 2022-03-17 (278) 702MB classic
2021.3/beta: 2021.3.3 2022-03-17 (278) 702MB classic
2021.3/edge: 2021.3.3 2022-03-17 (278) 702MB classic
2021.2/stable: 2021.2.4 2021-12-22 (268) 565MB classic
2021.2/candidate: 2021.2.4 2021-12-22 (268) 565MB classic
2021.2/beta: 2021.2.4 2021-12-22 (268) 565MB classic
2021.2/edge: 2021.2.4 2021-12-22 (268) 565MB classic
2021.1/stable: 2021.1.3 2021-06-30 (248) 530MB classic
2021.1/candidate: 2021.1.3 2021-06-30 (248) 530MB classic
2021.1/beta: 2021.1.3 2021-06-30 (248) 530MB classic
2021.1/edge: 2021.1.3 2021-06-30 (248) 530MB classic
2020.3/stable: 2020.3.5 2021-03-26 (237) 559MB classic
2020.3/candidate: 2020.3.5 2021-03-26 (237) 559MB classic
2020.3/beta: 2020.3.5 2021-03-26 (237) 559MB classic
2020.3/edge: 2020.3.5 2021-03-26 (237) 559MB classic
2020.2/stable: 2020.2.5 2020-12-02 (225) 479MB classic
2020.2/candidate: 2020.2.5 2020-12-02 (225) 479MB classic
2020.2/beta: 2020.2.5 2020-12-02 (225) 479MB classic
2020.2/edge: 2020.2.5 2020-12-02 (225) 479MB classic
2020.1/stable: 2020.1.5 2020-12-02 (224) 465MB classic
2020.1/candidate: 2020.1.5 2020-12-02 (224) 465MB classic
2020.1/beta: 2020.1.5 2020-12-02 (224) 465MB classic
2020.1/edge: 2020.1.5 2020-12-02 (224) 465MB classic
2019.3/stable: 2019.3.5 2020-05-08 (199) 473MB classic
2019.3/candidate: ↑
2019.3/beta: ↑
2019.3/edge: ↑
2019.2/stable: 2019.2.6 2020-02-10 (184) 445MB classic
2019.2/candidate: ↑
2019.2/beta: ↑
2019.2/edge: ↑
2019.1/stable: 2019.1.4 2019-07-30 (148) 394MB classic
2019.1/candidate: ↑
2019.1/beta: ↑
2019.1/edge: ↑
2018.3/stable: 2018.3.7 2019-07-10 (142) 355MB classic
2018.3/candidate: ↑
2018.3/beta: ↑
2018.3/edge: ↑
2018.2/stable: 2018.2.8 2019-04-12 (128) 313MB classic
2018.2/candidate: ↑
2018.2/beta: ↑
2018.2/edge: ↑
2018.1/stable: 2018.1.6 2018-11-15 (101) 314MB classic
2018.1/candidate: ↑
2018.1/beta: ↑
2018.1/edge: ↑
2017.3/stable: 2017.3.7 2018-11-15 (100) 344MB classic
2017.3/candidate: ↑
2017.3/beta: ↑
2017.3/edge: ↑
installed: 2022.3 (314) 779MB classic
只要在里面挑一个好一点的版本就好了。
查看全部
所以只好回滚到指定的pycharm版本。
使用snap可以下载指定版本的pycharm和goland
sudo snap install pycharm-professional --channel=2021.2/stable --classic
上面的命令下载 2021.2/stable的版本的pycharm
那么怎么查看pycharm的版本?
snap info pycharm-professional
name:      pycharm-professional

summary:   PyCharm Professional Edition

publisher: jetbrains✓

store-url: https://snapcraft.io/pycharm-professional

contact:   https://www.jetbrains.com/pycharm/documentation/

license:   unset

description: |

  Python IDE for professional developers. Save time while PyCharm takes care of the r

  on bigger things and embrace the keyboard-centric approach to get the most of PyCha

  productivity features.

commands:

  - pycharm-professional

snap-id:      Uqpw0ZWqy6Wh4mgaWE0rxgM5tAGCwf4D

tracking:     latest/stable

refresh-date: 15 days ago, at 09:57 CST

channels:

  latest/stable:    2022.3      2022-12-01 (314) 779MB classic

  latest/candidate: 2022.3.1-RC 2022-12-12 (315) 793MB classic

  latest/beta:      2022.3.1-RC 2022-12-12 (315) 793MB classic

  latest/edge:      2022.3.1-RC 2022-12-12 (315) 793MB classic

  2022.3/stable:    2022.3      2022-12-01 (314) 779MB classic

  2022.3/candidate: 2022.3.1-RC 2022-12-12 (315) 793MB classic

  2022.3/beta:      2022.3.1-RC 2022-12-12 (315) 793MB classic

  2022.3/edge:      2022.3.1-RC 2022-12-12 (315) 793MB classic

  2022.2/stable:    2022.2.4    2022-11-17 (311) 764MB classic

  2022.2/candidate: 2022.2.4    2022-11-17 (311) 764MB classic

  2022.2/beta:      2022.2.4    2022-11-17 (311) 764MB classic

  2022.2/edge:      2022.2.4    2022-11-17 (311) 764MB classic

  2022.1/stable:    2022.1.4    2022-07-21 (295) 759MB classic

  2022.1/candidate: 2022.1.4    2022-07-21 (295) 759MB classic

  2022.1/beta:      2022.1.4    2022-07-21 (295) 759MB classic

  2022.1/edge:      2022.1.4    2022-07-21 (295) 759MB classic

  2021.3/stable:    2021.3.3    2022-03-17 (278) 702MB classic

  2021.3/candidate: 2021.3.3    2022-03-17 (278) 702MB classic

  2021.3/beta:      2021.3.3    2022-03-17 (278) 702MB classic

  2021.3/edge:      2021.3.3    2022-03-17 (278) 702MB classic

  2021.2/stable:    2021.2.4    2021-12-22 (268) 565MB classic

  2021.2/candidate: 2021.2.4    2021-12-22 (268) 565MB classic

  2021.2/beta:      2021.2.4    2021-12-22 (268) 565MB classic

  2021.2/edge:      2021.2.4    2021-12-22 (268) 565MB classic

  2021.1/stable:    2021.1.3    2021-06-30 (248) 530MB classic

  2021.1/candidate: 2021.1.3    2021-06-30 (248) 530MB classic

  2021.1/beta:      2021.1.3    2021-06-30 (248) 530MB classic

  2021.1/edge:      2021.1.3    2021-06-30 (248) 530MB classic

  2020.3/stable:    2020.3.5    2021-03-26 (237) 559MB classic

  2020.3/candidate: 2020.3.5    2021-03-26 (237) 559MB classic

  2020.3/beta:      2020.3.5    2021-03-26 (237) 559MB classic

  2020.3/edge:      2020.3.5    2021-03-26 (237) 559MB classic

  2020.2/stable:    2020.2.5    2020-12-02 (225) 479MB classic

  2020.2/candidate: 2020.2.5    2020-12-02 (225) 479MB classic

  2020.2/beta:      2020.2.5    2020-12-02 (225) 479MB classic

  2020.2/edge:      2020.2.5    2020-12-02 (225) 479MB classic

  2020.1/stable:    2020.1.5    2020-12-02 (224) 465MB classic

  2020.1/candidate: 2020.1.5    2020-12-02 (224) 465MB classic

  2020.1/beta:      2020.1.5    2020-12-02 (224) 465MB classic

  2020.1/edge:      2020.1.5    2020-12-02 (224) 465MB classic

  2019.3/stable:    2019.3.5    2020-05-08 (199) 473MB classic

  2019.3/candidate: ↑

  2019.3/beta:      ↑

  2019.3/edge:      ↑

  2019.2/stable:    2019.2.6    2020-02-10 (184) 445MB classic

  2019.2/candidate: ↑

  2019.2/beta:      ↑

  2019.2/edge:      ↑

  2019.1/stable:    2019.1.4    2019-07-30 (148) 394MB classic

  2019.1/candidate: ↑

  2019.1/beta:      ↑

  2019.1/edge:      ↑

  2018.3/stable:    2018.3.7    2019-07-10 (142) 355MB classic

  2018.3/candidate: ↑

  2018.3/beta:      ↑

  2018.3/edge:      ↑

  2018.2/stable:    2018.2.8    2019-04-12 (128) 313MB classic

  2018.2/candidate: ↑

  2018.2/beta:      ↑

  2018.2/edge:      ↑

  2018.1/stable:    2018.1.6    2018-11-15 (101) 314MB classic

  2018.1/candidate: ↑

  2018.1/beta:      ↑

  2018.1/edge:      ↑

  2017.3/stable:    2017.3.7    2018-11-15 (100) 344MB classic

  2017.3/candidate: ↑

  2017.3/beta:      ↑

  2017.3/edge:      ↑

installed:          2022.3                 (314) 779MB classic
只要在里面挑一个好一点的版本就好了。
Linux 运行resilio (一个跨平台的资源共享类软件)【附pro license】
马化云 发表了文章 • 0 个评论 • 5090 次浏览 • 2022-11-27 18:38
只需要知道一个分享密钥key,即可同步整个文件夹了,不需要第三方服务器,不受存储空间和流量限制,Resilio Sync的数据不在云端,而是存储在本地,传输速度基本上只受用户网络带宽的制约,它可以支持多人同时同步,而且,越多人对文件夹进行同步,则同步速度越快,没有审查,不过现在已经属于404 的产品了,不过如果找到神key,资源还是蛮丰富的。
安装过程:
1、打开官网下载安装Resilio Sync,国内用户需要自备网络环境。
对于linux , ubuntu,解压后实际只有一个可执行文件,猜测这个很可能是golang写的。因为大部分golang的程序都可以编译成一个文件。 $ ./rslsync
By using this application, you agree to our Privacy Policy, Terms of Use and End User License Agreement.
https://www.resilio.com/legal/privacy
https://www.resilio.com/legal/terms-of-use
https://www.resilio.com/legal/eula
运行后rslsync是在后台运行的。 不会返回访问界面,当然linux下也不会有界面。 需要你打开浏览器, 输入 http://127.0.0.1:8888
就可以看到resilio的内容了。
2、下载Resilio Sync授权文件:ResilioSyncPro.btskey. 附件里面
3、然后解压,解压后文件后缀是btskey,打开安装好的Resilio Sync,打开设置的License界面,点击Apply License
这个时候页面是空的,没有任何空的内容。 这个时候就需要一些神key。因为上面也说了,resilio是通过分享key,来获取资源的。
比如zlibrary,有人共享了不少电子书在某个文件夹里面。 只要找到一个key,你就可以找到一个资源分享的组织。
需要电子书的key,可以关注公众号:
回复:电子书key
可以获取zibibrary 几个T的电子书。
查看全部
只需要知道一个分享密钥key,即可同步整个文件夹了,不需要第三方服务器,不受存储空间和流量限制,Resilio Sync的数据不在云端,而是存储在本地,传输速度基本上只受用户网络带宽的制约,它可以支持多人同时同步,而且,越多人对文件夹进行同步,则同步速度越快,没有审查,不过现在已经属于404 的产品了,不过如果找到神key,资源还是蛮丰富的。
安装过程:
1、打开官网下载安装Resilio Sync,国内用户需要自备网络环境。
对于linux , ubuntu,解压后实际只有一个可执行文件,猜测这个很可能是golang写的。因为大部分golang的程序都可以编译成一个文件。
 $ ./rslsync

By using this application, you agree to our Privacy Policy, Terms of Use and End User License Agreement.

https://www.resilio.com/legal/privacy

https://www.resilio.com/legal/terms-of-use

https://www.resilio.com/legal/eula
运行后rslsync是在后台运行的。 不会返回访问界面,当然linux下也不会有界面。 需要你打开浏览器, 输入 http://127.0.0.1:8888
就可以看到resilio的内容了。

2、下载Resilio Sync授权文件:ResilioSyncPro.btskey. 附件里面
3、然后解压,解压后文件后缀是btskey,打开安装好的Resilio Sync,打开设置的License界面,点击Apply License
这个时候页面是空的,没有任何空的内容。 这个时候就需要一些神key。因为上面也说了,resilio是通过分享key,来获取资源的。
比如zlibrary,有人共享了不少电子书在某个文件夹里面。 只要找到一个key,你就可以找到一个资源分享的组织。

需要电子书的key,可以关注公众号:

回复:电子书key
可以获取zibibrary 几个T的电子书。
macbook m1版本 兼容性问题
马化云 发表了文章 • 0 个评论 • 2995 次浏览 • 2022-10-18 11:36
比如你有个软件依赖旧版本的postgresql,那么就没有办法在m1上搞个旧版本的postgresql了,不过新版的postgresql是支持的。
这种向前兼容性很差的问题,如果对于项目,日常高频使用软件里有旧版应用,应该会挺难受,只能早一些替代方案。
查看全部
比如你有个软件依赖旧版本的postgresql,那么就没有办法在m1上搞个旧版本的postgresql了,不过新版的postgresql是支持的。
这种向前兼容性很差的问题,如果对于项目,日常高频使用软件里有旧版应用,应该会挺难受,只能早一些替代方案。

ubuntu安装z.lua 路径跳转工具
马化云 发表了文章 • 0 个评论 • 3690 次浏览 • 2022-10-15 17:06
正则将按顺序进行匹配,"z foo bar" 可以匹配到 /foo/bar ,但是不能匹配 /bar/foo。
性能:
性能比 z.sh 快三倍,比 fasd / autojump 快十倍以上。
支持 Posix Shell:bash, zsh, dash, sh, ash, busybox 等等。
支持 Fish Shell,Power Shell 和 Windows cmd。
使用增强匹配算法,更准确的带你去到你想去的地方。
低占用,能够仅在当前路径改变时才更新数据库(将 $_ZL_ADD_ONCE 设成 1)。
交互选择模式,如果有多个匹配结果的话,跳转前允许你进行选择。
集成 fzf (可选),可以用来做可视化选择或者参数补全。
快速跳转到父目录,或者项目根目录,代替反复 “cd ../../.." 。
兼容 lua 5.1, 5.2 和 5.3 以上版本。
自包含且无额外依赖,单个 z.lua 文件完成所有工作。
安装步骤:
官网太蛋疼,没有写好。
下面是个人的安装步骤,在ubuntu20上测试的。
1. 安装lua
sudo apt install lua5.3
2. 下载z.lua脚本
git clone [url]https://github.com/skywind3000/z.lua.git[/url]
你也可以直接到文末下载。 关注公众号,回复 z.lua即可
下载后记录它的 目录:
比如:
/home/root/tool/z.lua
3. 然后配置bash shell
首先,确定你是哪个shell, 不同shell的初始化命令参数不一样:
bash:
在 .bashrc 文件最后加上这一行
eval "$(lua /path/to/z.lua --init bash)"
zsh:
在 .zshrc 文件最后加上这一行
eval "$(lua /path/to/z.lua --init zsh)"
Posix Shells:
在.profile 文件最后一行加入这一行
eval "$(lua /path/to/z.lua --init posix)"
4. 重启shell ,注销系统或者 source ~/.zshrc 激活新的shell
z.lua 要经过cd 进入不同的目录才会生效的。一开始如果输入 z 回车,是没有任何反应的。
查看缓存的目录
z -l
如果没有显示目录,要么你的配置出问题,要么还是你还没有用cd 切换足够多的目录 让lua 保存记录
关注公众号,回复 z.lua 获取 z.lua 安装包
查看全部
z.lua 是一个快速路径切换工具,它会跟踪你在 shell 下访问过的路径,通过一套称为 Frecent 的机制(源自 FireFox),经过一段简短的学习之后,z.lua 会帮你跳转到所有匹配正则关键字的路径里 Frecent 值最高的那条路径去。


正则将按顺序进行匹配,"z foo bar" 可以匹配到 /foo/bar ,但是不能匹配 /bar/foo。
性能:
性能比 z.sh 快三倍,比 fasd / autojump 快十倍以上。

支持 Posix Shell:bash, zsh, dash, sh, ash, busybox 等等。

支持 Fish Shell,Power Shell 和 Windows cmd。

使用增强匹配算法,更准确的带你去到你想去的地方。

低占用,能够仅在当前路径改变时才更新数据库(将 $_ZL_ADD_ONCE 设成 1)。

交互选择模式,如果有多个匹配结果的话,跳转前允许你进行选择。

集成 fzf (可选),可以用来做可视化选择或者参数补全。

快速跳转到父目录,或者项目根目录,代替反复 “cd ../../.." 。

兼容 lua 5.1, 5.2 和 5.3 以上版本。

自包含且无额外依赖,单个 z.lua 文件完成所有工作。
安装步骤:
官网太蛋疼,没有写好。
下面是个人的安装步骤,在ubuntu20上测试的。
1. 安装lua
sudo apt install lua5.3
2. 下载z.lua脚本
git clone [url]https://github.com/skywind3000/z.lua.git[/url]
你也可以直接到文末下载。 关注公众号,回复 z.lua即可
下载后记录它的 目录:
比如:
/home/root/tool/z.lua
3. 然后配置bash shell
首先,确定你是哪个shell, 不同shell的初始化命令参数不一样:
bash:
在 .bashrc 文件最后加上这一行
eval "$(lua /path/to/z.lua --init bash)"
zsh:
在 .zshrc 文件最后加上这一行
eval "$(lua /path/to/z.lua --init zsh)"
Posix Shells:
在.profile 文件最后一行加入这一行
eval "$(lua /path/to/z.lua --init posix)"
4. 重启shell ,注销系统或者 source ~/.zshrc 激活新的shell
z.lua 要经过cd 进入不同的目录才会生效的。一开始如果输入 z 回车,是没有任何反应的。
查看缓存的目录
z -l

如果没有显示目录,要么你的配置出问题,要么还是你还没有用cd 切换足够多的目录 让lua 保存记录
关注公众号,回复 z.lua 获取 z.lua 安装包
ubuntu 一键安装微信小程序开发工具
马化云 发表了文章 • 0 个评论 • 3792 次浏览 • 2022-09-19 00:17
有个人开发者在github上做了linux下的微信小程序开发工具。
试了下还可以,不用再开个虚拟机跑windows,然后就为了使用微信小程序的开发工具。
安装方法:
sudo snap install wechat-devtools
前提是ubuntu版本大于14.04, 或者已经内置了snap商店。
查看全部
有个人开发者在github上做了linux下的微信小程序开发工具。
试了下还可以,不用再开个虚拟机跑windows,然后就为了使用微信小程序的开发工具。
安装方法:
sudo snap install wechat-devtools
前提是ubuntu版本大于14.04, 或者已经内置了snap商店。

程序员是怎样删除安卓手机的垃圾文件?
李魔佛 发表了文章 • 0 个评论 • 3346 次浏览 • 2022-09-14 12:08
以至于手机的的可用空间越来越少,内置的清理垃圾的功能越来越鸡肋。而第三方的垃圾清理应用只会引来更多的垃圾文件。
身为一名程序员,就得用geek一点的方法彻底删除垃圾文件,尽可能地释放系统的空间。
由于平时使用的开发环境是Linux,所以下面环境是在Linux下操作,windows的用户应该也可以在git bash下操作。
手机usb 连接电脑
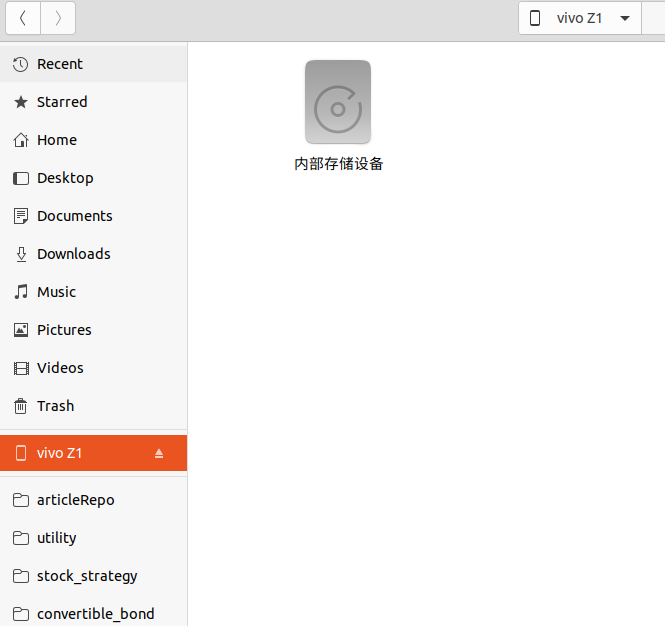
使用usb线连接linux电脑,不一定要adb的功能,但需要电脑能够识别手机的内部存储即可。
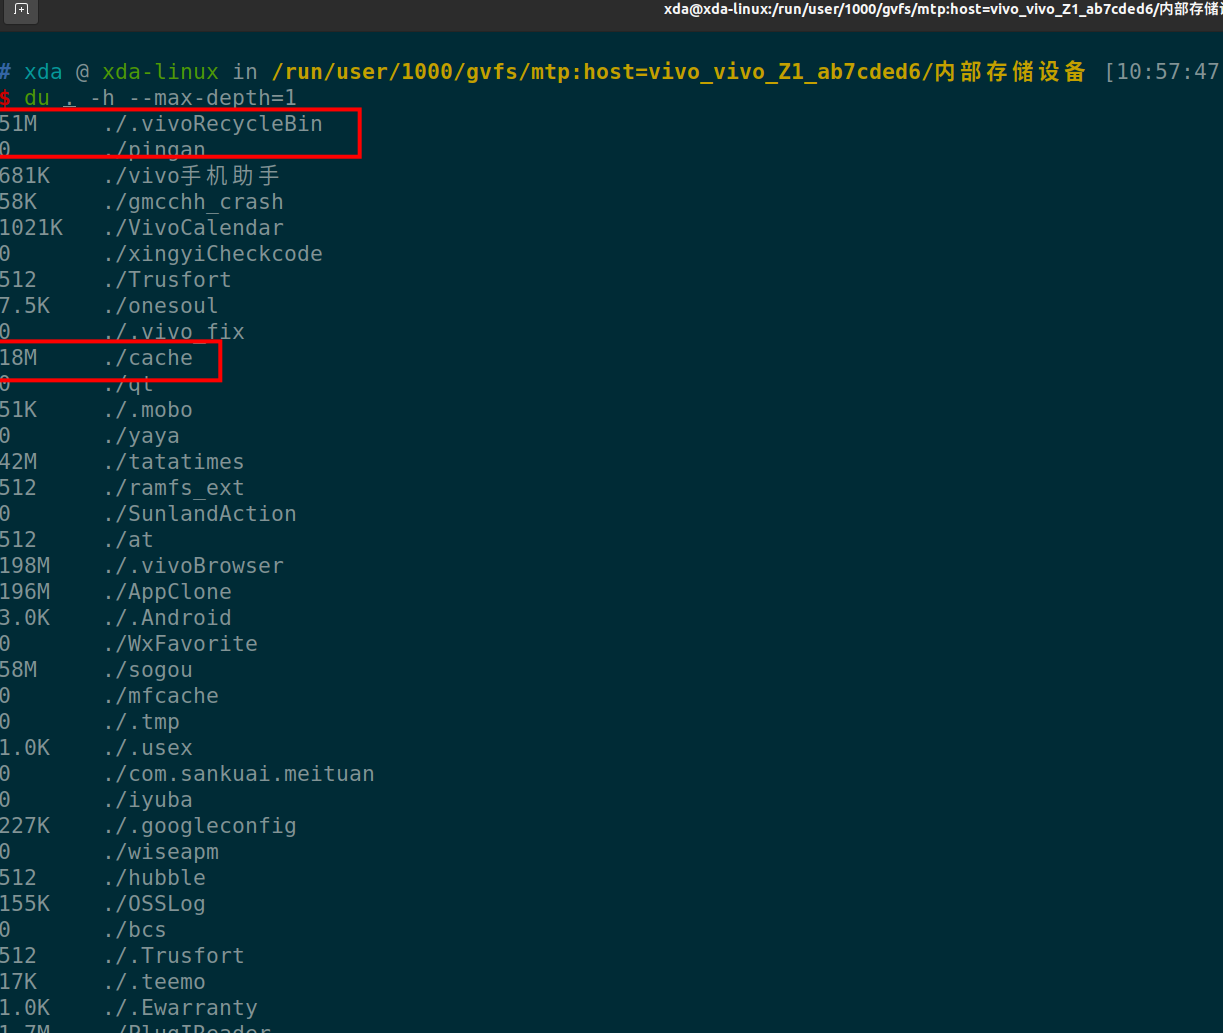
然后点击“内部存储设备”, 在文件内右键,进入Terminal 终端。
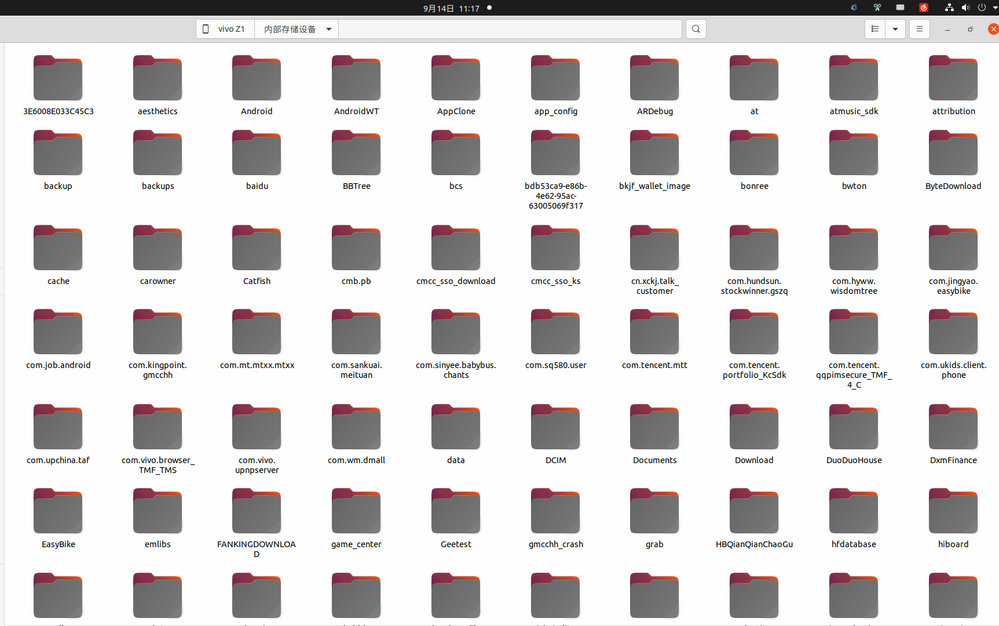
执行命令
du . -h --max-depth=1
简单解释一下这个语句。 就是显示当前目录下,第一层目录的占用存储大小情况。-h, human效果,人性化,自动转换文件大小单位。
--max-depth 是显示目录层级数目,如果选择2-3-4等目录,则会把子目录,子子目录的存储大小都显示出来,不过运行数据也会随之变慢。
上面命令一下子就把手机根目录下所有的目录的占用大小都列出来了。可以看到上面红框的地方,是一些缓存没用的东西,我们直接用命令 rm -rf 删除。
或者也可以在文件管理器里面直接删除。
如果有些目录底下有多层目录,那么就是把--max-depth 的值调大一些。 这样就知道他子目录的占用空间情况。
如果只想看看微信文件夹下的空间占用,可以指定目录:
du /Weixin/ -h --max-depth=3
这样就知道哪个目录占用的空间最大,然后点击进去,把没用的目录逐个删除。
经过笔者的测试,使用上述操作后,手机可用存储空间释放了40%的空间。主要是一些app下载的内容,由于app被清理了,结果这些下载内容成了孤立的文件,没有索引到对应的app,一直残留在手机内存。
查看全部
以至于手机的的可用空间越来越少,内置的清理垃圾的功能越来越鸡肋。而第三方的垃圾清理应用只会引来更多的垃圾文件。
身为一名程序员,就得用geek一点的方法彻底删除垃圾文件,尽可能地释放系统的空间。
由于平时使用的开发环境是Linux,所以下面环境是在Linux下操作,windows的用户应该也可以在git bash下操作。
手机usb 连接电脑
使用usb线连接linux电脑,不一定要adb的功能,但需要电脑能够识别手机的内部存储即可。
然后点击“内部存储设备”, 在文件内右键,进入Terminal 终端。
执行命令
du . -h --max-depth=1
简单解释一下这个语句。 就是显示当前目录下,第一层目录的占用存储大小情况。-h, human效果,人性化,自动转换文件大小单位。
--max-depth 是显示目录层级数目,如果选择2-3-4等目录,则会把子目录,子子目录的存储大小都显示出来,不过运行数据也会随之变慢。
上面命令一下子就把手机根目录下所有的目录的占用大小都列出来了。可以看到上面红框的地方,是一些缓存没用的东西,我们直接用命令 rm -rf 删除。
或者也可以在文件管理器里面直接删除。
如果有些目录底下有多层目录,那么就是把--max-depth 的值调大一些。 这样就知道他子目录的占用空间情况。
如果只想看看微信文件夹下的空间占用,可以指定目录:
du /Weixin/ -h --max-depth=3
这样就知道哪个目录占用的空间最大,然后点击进去,把没用的目录逐个删除。
经过笔者的测试,使用上述操作后,手机可用存储空间释放了40%的空间。主要是一些app下载的内容,由于app被清理了,结果这些下载内容成了孤立的文件,没有索引到对应的app,一直残留在手机内存。
ubuntu/linux 64位 安装 kdb+ (需要证书授权)附下载地址
李魔佛 发表了文章 • 0 个评论 • 3572 次浏览 • 2022-09-04 12:14
64位的版本需要申请授权证书。
申请后得到邮件,里面会有证书。
还有64位软件下载地址。文件还是小巧,几百k。没想到一个排名第二的时序数据库,体积居然不到1M。
需要kdb+ 64位安装文件,可以到文末获取。
下载下来解压。
比如解压到目录:
~/tool/l64/
目录下有一个文件夹 l64和一个q.k的文件
l64子文件夹下只有一个文件q , 他是一个可执行文件。在linux下的命令行可以直接运行 ./q$ ./q
KDB+ 4.0 2022.05.11 Copyright (C) 1993-2022 Kx Systems
l64/ 4()core 23934MB xda xda-linux 127.0.1.1
'licence error: k4.lic提示缺失证书。
然后把证书文件拷贝到目录 ~/tool/l64/
这时如果直接运行 ./q 但是会报错.$ ./q -p 5001
KDB+ 4.0 2022.05.11 Copyright (C) 1993-2022 Kx Systems
l64/ 4(24)core 23934MB xda xda-linux 127.0.1.1 EXPIRE 2023.07.18 xxxxx@126.com KXCE #
'2022.09.04T11:34:18.272 couldn't connect to license daemon -- exiting
这是因为没有设置环境变量。
windows下也需要设置环境部,linux同理也需要。
linux:
export QHOME="/home/root/tool/l64/"
或者放到bashrc文件里面。
正常运行,会显示 q)
kdb+ 64位安装文件获取方式:
关注后 回复 kdb+
查看全部
64位的版本需要申请授权证书。
申请后得到邮件,里面会有证书。

还有64位软件下载地址。文件还是小巧,几百k。没想到一个排名第二的时序数据库,体积居然不到1M。
需要kdb+ 64位安装文件,可以到文末获取。
下载下来解压。
比如解压到目录:
~/tool/l64/
目录下有一个文件夹 l64和一个q.k的文件
l64子文件夹下只有一个文件q , 他是一个可执行文件。在linux下的命令行可以直接运行 ./q
$ ./q提示缺失证书。
KDB+ 4.0 2022.05.11 Copyright (C) 1993-2022 Kx Systems
l64/ 4()core 23934MB xda xda-linux 127.0.1.1
'licence error: k4.lic
然后把证书文件拷贝到目录 ~/tool/l64/
这时如果直接运行 ./q 但是会报错.
$ ./q -p 5001

KDB+ 4.0 2022.05.11 Copyright (C) 1993-2022 Kx Systems

l64/ 4(24)core 23934MB xda xda-linux 127.0.1.1 EXPIRE 2023.07.18 xxxxx@126.com KXCE #


'2022.09.04T11:34:18.272 couldn't connect to license daemon -- exiting
这是因为没有设置环境变量。
windows下也需要设置环境部,linux同理也需要。
linux:
export QHOME="/home/root/tool/l64/"
或者放到bashrc文件里面。
正常运行,会显示 q)

kdb+ 64位安装文件获取方式:
关注后 回复 kdb+

ubuntu 安装ciso8601库 失败, 已解决
李魔佛 发表了文章 • 0 个评论 • 4122 次浏览 • 2022-07-22 12:01
WARNING: Retrying (Retry(total=4, connect=None, read=None, redirect=None, status=None)) after connection broken by 'ReadTimeoutError("HTTPSConnectionPool(host='files.pythonhosted.org', port=443): Read timed out. (read timeout=15)")': /packages/a4/53/bfc6409447ca024558b8b19d055de94c813c3e32c0296c48a0873a161cf5/setuptools-63.2.0-py3-none-any.whl
Downloading setuptools-63.2.0-py3-none-any.whl (1.2 MB)
━━━━╸ 0.1/1.2 MB 102.5 kB/s eta 0:00:11
ERROR: Exception:
Traceback (most recent call last):
File "/tmp/pip-standalone-pip-oas0cddc/__env_pip__.zip/pip/_vendor/urllib3/response.py", line 435, in _error_catcher
yield
File "/tmp/pip-standalone-pip-oas0cddc/__env_pip__.zip/pip/_vendor/urllib3/response.py", line 516, in read
data = self._fp.read(amt) if not fp_closed else b""
File "/tmp/pip-standalone-pip-oas0cddc/__env_pip__.zip/pip/_vendor/cachecontrol/filewrapper.py", line 90, in read
data = self.__fp.read(amt)
File "/home/xda/miniconda3/envs/cpy/lib/python3.9/http/client.py", line 462, in read
n = self.readinto(b)
File "/home/xda/miniconda3/envs/cpy/lib/python3.9/http/client.py", line 506, in readinto
n = self.fp.readinto(b)
File "/home/xda/miniconda3/envs/cpy/lib/python3.9/socket.py", line 704, in readinto
return self._sock.recv_into(b)
File "/home/xda/miniconda3/envs/cpy/lib/python3.9/ssl.py", line 1241, in recv_into
return self.read(nbytes, buffer)
File "/home/xda/miniconda3/envs/cpy/lib/python3.9/ssl.py", line 1099, in read
return self._sslobj.read(len, buffer)
socket.timeout: The read operation timed out
During handling of the above exception, another exception occurred:
Traceback (most recent call last):
File "/tmp/pip-standalone-pip-oas0cddc/__env_pip__.zip/pip/_internal/cli/base_command.py", line 167, in exc_logging_wrapper
status = run_func(*args)
File "/tmp/pip-standalone-pip-oas0cddc/__env_pip__.zip/pip/_internal/cli/req_command.py", line 205, in wrapper
return func(self, options, args)
File "/tmp/pip-standalone-pip-oas0cddc/__env_pip__.zip/pip/_internal/commands/install.py", line 341, in run
requirement_set = resolver.resolve(
File "/tmp/pip-standalone-pip-oas0cddc/__env_pip__.zip/pip/_internal/resolution/resolvelib/resolver.py", line 94, in resolve
result = self._result = resolver.resolve(
File "/tmp/pip-standalone-pip-oas0cddc/__env_pip__.zip/pip/_vendor/resolvelib/resolvers.py", line 481, in resolve
state = resolution.resolve(requirements, max_rounds=max_rounds)
File "/tmp/pip-standalone-pip-oas0cddc/__env_pip__.zip/pip/_vendor/resolvelib/resolvers.py", line 348, in resolve
self._add_to_criteria(self.state.criteria, r, parent=None)
File "/tmp/pip-standalone-pip-oas0cddc/__env_pip__.zip/pip/_vendor/resolvelib/resolvers.py", line 172, in _add_to_criteria
if not criterion.candidates:
File "/tmp/pip-standalone-pip-oas0cddc/__env_pip__.zip/pip/_vendor/resolvelib/structs.py", line 151, in __bool__
return bool(self._sequence)
File "/tmp/pip-standalone-pip-oas0cddc/__env_pip__.zip/pip/_internal/resolution/resolvelib/found_candidates.py", line 155, in __bool__
return any(self)
File "/tmp/pip-standalone-pip-oas0cddc/__env_pip__.zip/pip/_internal/resolution/resolvelib/found_candidates.py", line 143, in <genexpr>
return (c for c in iterator if id(c) not in self._incompatible_ids)
File "/tmp/pip-standalone-pip-oas0cddc/__env_pip__.zip/pip/_internal/resolution/resolvelib/found_candidates.py", line 47, in _iter_built
candidate = func()
File "/tmp/pip-standalone-pip-oas0cddc/__env_pip__.zip/pip/_internal/resolution/resolvelib/factory.py", line 215, in _make_candidate_from_link
self._link_candidate_cache[link] = LinkCandidate(
File "/tmp/pip-standalone-pip-oas0cddc/__env_pip__.zip/pip/_internal/resolution/resolvelib/candidates.py", line 291, in __init__
super().__init__(
File "/tmp/pip-standalone-pip-oas0cddc/__env_pip__.zip/pip/_internal/resolution/resolvelib/candidates.py", line 161, in __init__
self.dist = self._prepare()
File "/tmp/pip-standalone-pip-oas0cddc/__env_pip__.zip/pip/_internal/resolution/resolvelib/candidates.py", line 230, in _prepare
dist = self._prepare_distribution()
File "/tmp/pip-standalone-pip-oas0cddc/__env_pip__.zip/pip/_internal/resolution/resolvelib/candidates.py", line 302, in _prepare_distribution
return preparer.prepare_linked_requirement(self._ireq, parallel_builds=True)
File "/tmp/pip-standalone-pip-oas0cddc/__env_pip__.zip/pip/_internal/operations/prepare.py", line 428, in prepare_linked_requirement
return self._prepare_linked_requirement(req, parallel_builds)
File "/tmp/pip-standalone-pip-oas0cddc/__env_pip__.zip/pip/_internal/operations/prepare.py", line 473, in _prepare_linked_requirement
local_file = unpack_url(
File "/tmp/pip-standalone-pip-oas0cddc/__env_pip__.zip/pip/_internal/operations/prepare.py", line 155, in unpack_url
file = get_http_url(
File "/tmp/pip-standalone-pip-oas0cddc/__env_pip__.zip/pip/_internal/operations/prepare.py", line 96, in get_http_url
from_path, content_type = download(link, temp_dir.path)
File "/tmp/pip-standalone-pip-oas0cddc/__env_pip__.zip/pip/_internal/network/download.py", line 146, in __call__
for chunk in chunks:
File "/tmp/pip-standalone-pip-oas0cddc/__env_pip__.zip/pip/_internal/cli/progress_bars.py", line 53, in _rich_progress_bar
for chunk in iterable:
File "/tmp/pip-standalone-pip-oas0cddc/__env_pip__.zip/pip/_internal/network/utils.py", line 63, in response_chunks
for chunk in response.raw.stream(
File "/tmp/pip-standalone-pip-oas0cddc/__env_pip__.zip/pip/_vendor/urllib3/response.py", line 573, in stream
data = self.read(amt=amt, decode_content=decode_content)
File "/tmp/pip-standalone-pip-oas0cddc/__env_pip__.zip/pip/_vendor/urllib3/response.py", line 538, in read
raise IncompleteRead(self._fp_bytes_read, self.length_remaining)
File "/home/xda/miniconda3/envs/cpy/lib/python3.9/contextlib.py", line 137, in __exit__
self.gen.throw(typ, value, traceback)
File "/tmp/pip-standalone-pip-oas0cddc/__env_pip__.zip/pip/_vendor/urllib3/response.py", line 440, in _error_catcher
raise ReadTimeoutError(self._pool, None, "Read timed out.")
pip._vendor.urllib3.exceptions.ReadTimeoutError: HTTPSConnectionPool(host='files.pythonhosted.org', port=443): Read timed out.
[end of output]
note: This error originates from a subprocess, and is likely not a problem with pip.
error: subprocess-exited-with-error
看样子,是setuptool的问题。 为了避免动这个默认库,可以安装降级版本的ciso。
pip install ciso8601==1.0.7
查看全部
      Collecting setuptools>=40.8.0

        WARNING: Retrying (Retry(total=4, connect=None, read=None, redirect=None, status=None)) after connection broken by 'ReadTimeoutError("HTTPSConnectionPool(host='files.pythonhosted.org', port=443): Read timed out. (read timeout=15)")': /packages/a4/53/bfc6409447ca024558b8b19d055de94c813c3e32c0296c48a0873a161cf5/setuptools-63.2.0-py3-none-any.whl

        Downloading setuptools-63.2.0-py3-none-any.whl (1.2 MB)

           ━━━━╸                                    0.1/1.2 MB 102.5 kB/s eta 0:00:11

      ERROR: Exception:

      Traceback (most recent call last):

        File "/tmp/pip-standalone-pip-oas0cddc/__env_pip__.zip/pip/_vendor/urllib3/response.py", line 435, in _error_catcher

          yield

        File "/tmp/pip-standalone-pip-oas0cddc/__env_pip__.zip/pip/_vendor/urllib3/response.py", line 516, in read

          data = self._fp.read(amt) if not fp_closed else b""

        File "/tmp/pip-standalone-pip-oas0cddc/__env_pip__.zip/pip/_vendor/cachecontrol/filewrapper.py", line 90, in read

          data = self.__fp.read(amt)

        File "/home/xda/miniconda3/envs/cpy/lib/python3.9/http/client.py", line 462, in read

          n = self.readinto(b)

        File "/home/xda/miniconda3/envs/cpy/lib/python3.9/http/client.py", line 506, in readinto

          n = self.fp.readinto(b)

        File "/home/xda/miniconda3/envs/cpy/lib/python3.9/socket.py", line 704, in readinto

          return self._sock.recv_into(b)

        File "/home/xda/miniconda3/envs/cpy/lib/python3.9/ssl.py", line 1241, in recv_into

          return self.read(nbytes, buffer)

        File "/home/xda/miniconda3/envs/cpy/lib/python3.9/ssl.py", line 1099, in read

          return self._sslobj.read(len, buffer)

      socket.timeout: The read operation timed out


      During handling of the above exception, another exception occurred:


      Traceback (most recent call last):

        File "/tmp/pip-standalone-pip-oas0cddc/__env_pip__.zip/pip/_internal/cli/base_command.py", line 167, in exc_logging_wrapper

          status = run_func(*args)

        File "/tmp/pip-standalone-pip-oas0cddc/__env_pip__.zip/pip/_internal/cli/req_command.py", line 205, in wrapper

          return func(self, options, args)

        File "/tmp/pip-standalone-pip-oas0cddc/__env_pip__.zip/pip/_internal/commands/install.py", line 341, in run

          requirement_set = resolver.resolve(

        File "/tmp/pip-standalone-pip-oas0cddc/__env_pip__.zip/pip/_internal/resolution/resolvelib/resolver.py", line 94, in resolve

          result = self._result = resolver.resolve(

        File "/tmp/pip-standalone-pip-oas0cddc/__env_pip__.zip/pip/_vendor/resolvelib/resolvers.py", line 481, in resolve

          state = resolution.resolve(requirements, max_rounds=max_rounds)

        File "/tmp/pip-standalone-pip-oas0cddc/__env_pip__.zip/pip/_vendor/resolvelib/resolvers.py", line 348, in resolve

          self._add_to_criteria(self.state.criteria, r, parent=None)

        File "/tmp/pip-standalone-pip-oas0cddc/__env_pip__.zip/pip/_vendor/resolvelib/resolvers.py", line 172, in _add_to_criteria

          if not criterion.candidates:

        File "/tmp/pip-standalone-pip-oas0cddc/__env_pip__.zip/pip/_vendor/resolvelib/structs.py", line 151, in __bool__

          return bool(self._sequence)

        File "/tmp/pip-standalone-pip-oas0cddc/__env_pip__.zip/pip/_internal/resolution/resolvelib/found_candidates.py", line 155, in __bool__

          return any(self)

        File "/tmp/pip-standalone-pip-oas0cddc/__env_pip__.zip/pip/_internal/resolution/resolvelib/found_candidates.py", line 143, in <genexpr>

          return (c for c in iterator if id(c) not in self._incompatible_ids)

        File "/tmp/pip-standalone-pip-oas0cddc/__env_pip__.zip/pip/_internal/resolution/resolvelib/found_candidates.py", line 47, in _iter_built

          candidate = func()

        File "/tmp/pip-standalone-pip-oas0cddc/__env_pip__.zip/pip/_internal/resolution/resolvelib/factory.py", line 215, in _make_candidate_from_link

          self._link_candidate_cache[link] = LinkCandidate(

        File "/tmp/pip-standalone-pip-oas0cddc/__env_pip__.zip/pip/_internal/resolution/resolvelib/candidates.py", line 291, in __init__

          super().__init__(

        File "/tmp/pip-standalone-pip-oas0cddc/__env_pip__.zip/pip/_internal/resolution/resolvelib/candidates.py", line 161, in __init__

          self.dist = self._prepare()

        File "/tmp/pip-standalone-pip-oas0cddc/__env_pip__.zip/pip/_internal/resolution/resolvelib/candidates.py", line 230, in _prepare

          dist = self._prepare_distribution()

        File "/tmp/pip-standalone-pip-oas0cddc/__env_pip__.zip/pip/_internal/resolution/resolvelib/candidates.py", line 302, in _prepare_distribution

          return preparer.prepare_linked_requirement(self._ireq, parallel_builds=True)

        File "/tmp/pip-standalone-pip-oas0cddc/__env_pip__.zip/pip/_internal/operations/prepare.py", line 428, in prepare_linked_requirement

          return self._prepare_linked_requirement(req, parallel_builds)

        File "/tmp/pip-standalone-pip-oas0cddc/__env_pip__.zip/pip/_internal/operations/prepare.py", line 473, in _prepare_linked_requirement

          local_file = unpack_url(

        File "/tmp/pip-standalone-pip-oas0cddc/__env_pip__.zip/pip/_internal/operations/prepare.py", line 155, in unpack_url

          file = get_http_url(

        File "/tmp/pip-standalone-pip-oas0cddc/__env_pip__.zip/pip/_internal/operations/prepare.py", line 96, in get_http_url

          from_path, content_type = download(link, temp_dir.path)

        File "/tmp/pip-standalone-pip-oas0cddc/__env_pip__.zip/pip/_internal/network/download.py", line 146, in __call__

          for chunk in chunks:

        File "/tmp/pip-standalone-pip-oas0cddc/__env_pip__.zip/pip/_internal/cli/progress_bars.py", line 53, in _rich_progress_bar

          for chunk in iterable:

        File "/tmp/pip-standalone-pip-oas0cddc/__env_pip__.zip/pip/_internal/network/utils.py", line 63, in response_chunks

          for chunk in response.raw.stream(

        File "/tmp/pip-standalone-pip-oas0cddc/__env_pip__.zip/pip/_vendor/urllib3/response.py", line 573, in stream

          data = self.read(amt=amt, decode_content=decode_content)

        File "/tmp/pip-standalone-pip-oas0cddc/__env_pip__.zip/pip/_vendor/urllib3/response.py", line 538, in read

          raise IncompleteRead(self._fp_bytes_read, self.length_remaining)

        File "/home/xda/miniconda3/envs/cpy/lib/python3.9/contextlib.py", line 137, in __exit__

          self.gen.throw(typ, value, traceback)

        File "/tmp/pip-standalone-pip-oas0cddc/__env_pip__.zip/pip/_vendor/urllib3/response.py", line 440, in _error_catcher

          raise ReadTimeoutError(self._pool, None, "Read timed out.")

      pip._vendor.urllib3.exceptions.ReadTimeoutError: HTTPSConnectionPool(host='files.pythonhosted.org', port=443): Read timed out.

      [end of output]


  note: This error originates from a subprocess, and is likely not a problem with pip.

error: subprocess-exited-with-error
看样子,是setuptool的问题。 为了避免动这个默认库,可以安装降级版本的ciso。
pip install ciso8601==1.0.7

查询自己平时用的最多的linux命令
李魔佛 发表了文章 • 0 个评论 • 2733 次浏览 • 2022-07-18 23:55
可以用一行shell来统计
history | awk '{CMD[$2]++;count++;}END { for (a in CMD)print CMD[a] " " CMD[a]/count*100 "% " a;}' | grep -v "./" | column -c3 -s " " -t | sort -nr | nl | head -n10
得到如下结果:
神奇吧。
上述语句主要对你的history 返回数据进行统计。 查看全部
可以用一行shell来统计
history | awk '{CMD[$2]++;count++;}END { for (a in CMD)print CMD[a] " " CMD[a]/count*100 "% " a;}' | grep -v "./" | column -c3 -s " " -t | sort -nr | nl | head -n10得到如下结果:

神奇吧。
上述语句主要对你的history 返回数据进行统计。
docker安装的podman报错
李魔佛 发表了文章 • 0 个评论 • 3617 次浏览 • 2022-07-17 18:29
ERRO[0000] 'overlay' is not supported over overlayfs

Error: error creating libpod runtime: 'overlay' is not supported over overlayfs: backing file system is unsupported for this graph driver
本来计划在docker里面安装一个docker,启动docker报错,
于是安装了一个podman,结果ps -a的时候报错。
唯一的办法,可能就是启动第一个docker的时候使用特权模式, privillage=True
查看全部
ERRO[0000] 'overlay' is not supported over overlayfs
Error: error creating libpod runtime: 'overlay' is not supported over overlayfs: backing file system is unsupported for this graph driver
本来计划在docker里面安装一个docker,启动docker报错,
于是安装了一个podman,结果ps -a的时候报错。
唯一的办法,可能就是启动第一个docker的时候使用特权模式, privillage=True
映射端口 methodot 云主机 外部访问
李魔佛 发表了文章 • 0 个评论 • 3250 次浏览 • 2022-07-17 02:36
如果我们做了web,要怎么映射出来呢?
很简单,只要把web端口改为8001 - 8005 之中的一个。
然后用上面表格中对应的端口映射来访问就可以了
比如下面的flask代码:
from flask import Flask, jsonify


# 最基本的测试


app =Flask(__name__)


@app.route('/about')

def about():

    return 'this is about page'


@app.route('/404')

def error_handle():

    return '404 error'


@app.route('/')

def error_handle():

    return jsonify({'code':100})


if __name__=='__main__':

    app.run(host='0.0.0.0',port=8001,debug=True)
因为8001映射出去的端口是 33442,
所以你可以在浏览器访问你的主机:
curl http://xxxxxxxxxxxxx.methodot.com:33442/
话说,之前以为这个主机随时提桶跑路的,不过用到现在还好。
每一个应用都是一个docker镜像。 所以你的linux系统是无法使用 systemctl 控制服务启动的。
会包权限不够。 查看全部

如果我们做了web,要怎么映射出来呢?
很简单,只要把web端口改为8001 - 8005 之中的一个。
然后用上面表格中对应的端口映射来访问就可以了
比如下面的flask代码:
from flask import Flask, jsonify
# 最基本的测试
app =Flask(__name__)
@app.route('/about')
def about():
return 'this is about page'
@app.route('/404')
def error_handle():
return '404 error'
@app.route('/')
def error_handle():
return jsonify({'code':100})
if __name__=='__main__':
app.run(host='0.0.0.0',port=8001,debug=True)
因为8001映射出去的端口是 33442,
所以你可以在浏览器访问你的主机:
curl http://xxxxxxxxxxxxx.methodot.com:33442/
话说,之前以为这个主机随时提桶跑路的,不过用到现在还好。
每一个应用都是一个docker镜像。 所以你的linux系统是无法使用 systemctl 控制服务启动的。
会包权限不够。
vmware player Unable to install all modules. See log for details
李魔佛 发表了文章 • 0 个评论 • 3951 次浏览 • 2022-07-15 13:55
Unable to install all modules. See log for details
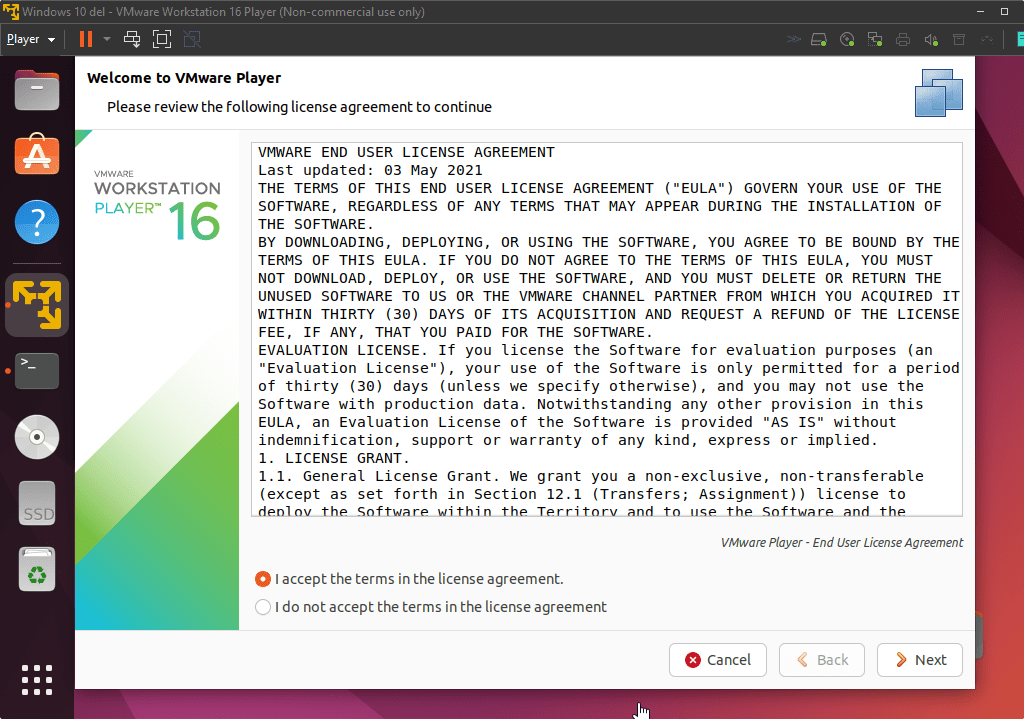
ubuntu下的vmware play经常会让更新模块。一起点击确认就可以正常编译更新。
而且一定要编译后才能打开虚拟机系统
但是奇怪的是,最近一次点击 更新,报错:
显示的英文错误信息:
Unable to install all modules. See log for details
看了日志:
 26 2022-07-15T02:15:09.595Z In(05) host-7426 /tmp/modconfig-PB4afO/vmmon-only/./include/vm_assert.h:372:22: note: in definition of macro ‘ASSERT_ON_COMPILE’

     25 2022-07-15T02:15:09.595Z In(05) host-7426   372 |       _Static_assert(e, #e); \

     24 2022-07-15T02:15:09.595Z In(05) host-7426       |                      ^

     23 2022-07-15T02:15:09.595Z In(05) host-7426 /tmp/modconfig-PB4afO/vmmon-only/./include/vm_asm_x86.h:215:7: note: in expansion of macro ‘ASSERT_ON_COMPILE_SELECTOR_SIZE’

     22 2022-07-15T02:15:09.595Z In(05) host-7426   215 |       ASSERT_ON_COMPILE_SELECTOR_SIZE(expr);                           \

     21 2022-07-15T02:15:09.595Z In(05) host-7426       |       ^~~~~~~~~~~~~~~~~~~~~~~~~~~~~~~

     20 2022-07-15T02:15:09.595Z In(05) host-7426 /tmp/modconfig-PB4afO/vmmon-only/./include/vm_asm_x86.h:227:22: note: in expansion of macro ‘SET_SEGREG’

     19 2022-07-15T02:15:09.595Z In(05) host-7426   227 | #define SET_GS(expr) SET_SEGREG(gs, expr)

     18 2022-07-15T02:15:09.595Z In(05) host-7426       |                      ^~~~~~~~~~

     17 2022-07-15T02:15:09.595Z In(05) host-7426 /tmp/modconfig-PB4afO/vmmon-only/common/task.c:2726:10: note: in expansion of macro ‘SET_GS’

     16 2022-07-15T02:15:09.595Z In(05) host-7426  2726 |          SET_GS(gs);

     15 2022-07-15T02:15:09.595Z In(05) host-7426       |          ^~~~~~

     14 2022-07-15T02:15:09.595Z In(05) host-7426 make[2]: *** [scripts/Makefile.build:285: /tmp/modconfig-PB4afO/vmmon-only/common/task.o] Error 1

     13 2022-07-15T02:15:09.595Z In(05) host-7426 make[2]: *** Waiting for unfinished jobs....

     12 2022-07-15T02:15:09.595Z In(05) host-7426 make[1]: *** [Makefile:1875: /tmp/modconfig-PB4afO/vmmon-only] Error 2

     11 2022-07-15T02:15:09.595Z In(05) host-7426 make: *** [Makefile:117: vmmon.ko] Error 2

     10 2022-07-15T02:15:09.595Z In(05) host-7426 Using kernel build system.

      9 2022-07-15T02:15:09.595Z In(05) host-7426 /tmp/modconfig-PB4afO/vmnet-only/driver.c: In function ‘VNetFileOpUnlockedIoctl’:

      8 2022-07-15T02:15:09.595Z In(05) host-7426 /tmp/modconfig-PB4afO/vmnet-only/driver.c:966:7: warning: this statement may fall through [-Wimplicit-fallthrough=]

      7 2022-07-15T02:15:09.595Z In(05) host-7426   966 |       {

      6 2022-07-15T02:15:09.595Z In(05) host-7426       |       ^

      5 2022-07-15T02:15:09.595Z In(05) host-7426 /tmp/modconfig-PB4afO/vmnet-only/driver.c:976:4: note: here

      4 2022-07-15T02:15:09.595Z In(05) host-7426   976 |    case SIOCGETAPIVERSION:

      3 2022-07-15T02:15:09.595Z In(05) host-7426       |    ^~~~

      2 2022-07-15T02:15:09.595Z In(05) host-7426 Skipping BTF generation for /tmp/modconfig-PB4afO/vmnet-only/vmnet.ko due to unavailability of vmlinux

      1 2022-07-15T02:15:09.595Z In(05) host-7426 Unable to install all modules.  See log for details.
报错信息在这里:
   host-7426 Skipping BTF generation for /tmp/modconfig-PB4afO/vmnet-only/vmnet.ko due to unavailability of vmlinux


    host-7426 Unable to install all modules.  See log for details
遇到问题后就google一番。
果然还是老外大神多。
翻了一个解决方案后,终于找到一个可行的。【所以必须的英语水平还是要的】
可行的方案:
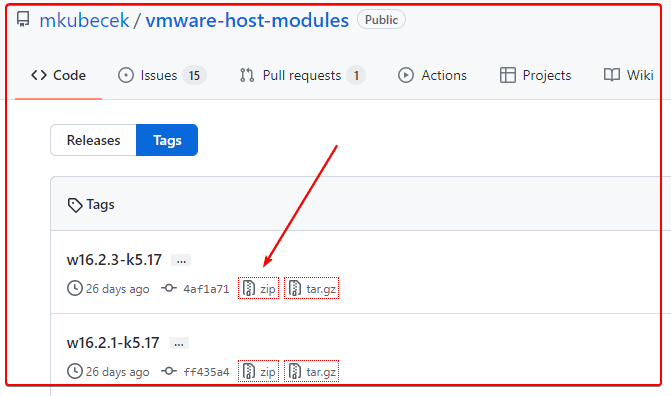
去github下载最新的host-modules
https://github.com/mkubecek/vmware-host-modules
下载一个最新的。
然后解压:unzip w16.2.3-k5.17.zip
得到以下文件 INSTALL
LICENSE
Makefile
README
vmmon-only
vmnet-only
然后我们打包两个文件夹 vmmon-only
vmnet-only tar -cf vmmon.tar vmmon-only
tar -cf vmnet.tar vmnet-only
这时,文件夹下多了2个tar的文件,vmmon.tar和vmnet.tar
然后拷贝到 目录:
/usr/lib/vmware.modules.source
sudo cp -v vmmon.tar vmnet.tar /usr/lib/vmware/modules/source/
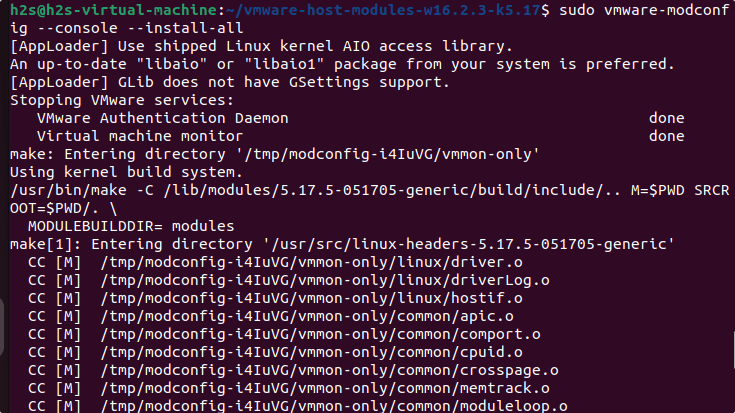
之后可以直接编译:
sudo vmware-modconfig --console --install-all
安装完成之后,再次打开vmware player就可以看到:
这样就是成功了。 查看全部
Unable to install all modules. See log for details
ubuntu下的vmware play经常会让更新模块。一起点击确认就可以正常编译更新。
而且一定要编译后才能打开虚拟机系统
但是奇怪的是,最近一次点击 更新,报错:
显示的英文错误信息:
Unable to install all modules. See log for details
看了日志:
26 2022-07-15T02:15:09.595Z In(05) host-7426 /tmp/modconfig-PB4afO/vmmon-only/./include/vm_assert.h:372:22: note: in definition of macro ‘ASSERT_ON_COMPILE’
25 2022-07-15T02:15:09.595Z In(05) host-7426 372 | _Static_assert(e, #e); \
24 2022-07-15T02:15:09.595Z In(05) host-7426 | ^
23 2022-07-15T02:15:09.595Z In(05) host-7426 /tmp/modconfig-PB4afO/vmmon-only/./include/vm_asm_x86.h:215:7: note: in expansion of macro ‘ASSERT_ON_COMPILE_SELECTOR_SIZE’
22 2022-07-15T02:15:09.595Z In(05) host-7426 215 | ASSERT_ON_COMPILE_SELECTOR_SIZE(expr); \
21 2022-07-15T02:15:09.595Z In(05) host-7426 | ^~~~~~~~~~~~~~~~~~~~~~~~~~~~~~~
20 2022-07-15T02:15:09.595Z In(05) host-7426 /tmp/modconfig-PB4afO/vmmon-only/./include/vm_asm_x86.h:227:22: note: in expansion of macro ‘SET_SEGREG’
19 2022-07-15T02:15:09.595Z In(05) host-7426 227 | #define SET_GS(expr) SET_SEGREG(gs, expr)
18 2022-07-15T02:15:09.595Z In(05) host-7426 | ^~~~~~~~~~
17 2022-07-15T02:15:09.595Z In(05) host-7426 /tmp/modconfig-PB4afO/vmmon-only/common/task.c:2726:10: note: in expansion of macro ‘SET_GS’
16 2022-07-15T02:15:09.595Z In(05) host-7426 2726 | SET_GS(gs);
15 2022-07-15T02:15:09.595Z In(05) host-7426 | ^~~~~~
14 2022-07-15T02:15:09.595Z In(05) host-7426 make[2]: *** [scripts/Makefile.build:285: /tmp/modconfig-PB4afO/vmmon-only/common/task.o] Error 1
13 2022-07-15T02:15:09.595Z In(05) host-7426 make[2]: *** Waiting for unfinished jobs....
12 2022-07-15T02:15:09.595Z In(05) host-7426 make[1]: *** [Makefile:1875: /tmp/modconfig-PB4afO/vmmon-only] Error 2
11 2022-07-15T02:15:09.595Z In(05) host-7426 make: *** [Makefile:117: vmmon.ko] Error 2
10 2022-07-15T02:15:09.595Z In(05) host-7426 Using kernel build system.
9 2022-07-15T02:15:09.595Z In(05) host-7426 /tmp/modconfig-PB4afO/vmnet-only/driver.c: In function ‘VNetFileOpUnlockedIoctl’:
8 2022-07-15T02:15:09.595Z In(05) host-7426 /tmp/modconfig-PB4afO/vmnet-only/driver.c:966:7: warning: this statement may fall through [-Wimplicit-fallthrough=]
7 2022-07-15T02:15:09.595Z In(05) host-7426 966 | {
6 2022-07-15T02:15:09.595Z In(05) host-7426 | ^
5 2022-07-15T02:15:09.595Z In(05) host-7426 /tmp/modconfig-PB4afO/vmnet-only/driver.c:976:4: note: here
4 2022-07-15T02:15:09.595Z In(05) host-7426 976 | case SIOCGETAPIVERSION:
3 2022-07-15T02:15:09.595Z In(05) host-7426 | ^~~~
2 2022-07-15T02:15:09.595Z In(05) host-7426 Skipping BTF generation for /tmp/modconfig-PB4afO/vmnet-only/vmnet.ko due to unavailability of vmlinux
1 2022-07-15T02:15:09.595Z In(05) host-7426 Unable to install all modules. See log for details.
报错信息在这里:
host-7426 Skipping BTF generation for /tmp/modconfig-PB4afO/vmnet-only/vmnet.ko due to unavailability of vmlinux
host-7426 Unable to install all modules. See log for details
遇到问题后就google一番。
果然还是老外大神多。
翻了一个解决方案后,终于找到一个可行的。【所以必须的英语水平还是要的】
可行的方案:
去github下载最新的host-modules
https://github.com/mkubecek/vmware-host-modules
下载一个最新的。
然后解压:
unzip w16.2.3-k5.17.zip
得到以下文件
    INSTALL

    LICENSE

    Makefile

    README

    vmmon-only

    vmnet-only
然后我们打包两个文件夹
vmmon-only

vmnet-only
    tar -cf vmmon.tar vmmon-only

    tar -cf vmnet.tar vmnet-only
这时,文件夹下多了2个tar的文件,vmmon.tar和vmnet.tar
然后拷贝到 目录:
/usr/lib/vmware.modules.source
sudo cp -v vmmon.tar vmnet.tar /usr/lib/vmware/modules/source/
之后可以直接编译:
sudo vmware-modconfig --console --install-all
安装完成之后,再次打开vmware player就可以看到:
这样就是成功了。
linux监控shell进程是否运行,不运行的时候自动启动
李魔佛 发表了文章 • 0 个评论 • 3194 次浏览 • 2022-07-13 00:17
保存为monitor.sh
#!/bin/bash

line=$(ps -aux | grep -c /usr/sbin/ssh | grep -v "grep")

# 匹配的行数

if [ $line -eq 1 ];

then

sudo /etc/init.d/ssh restart

# 重启ssh服务

else

echo ssh is running....

# 向日志发送邮件,显示ssh运行中。。。

fi
给个执行权限
chmod +x monitor.sh
然后设置定时任务,
比如隔5分钟运行一次上面的脚本
*/5 * * * * monitor.sh
查看全部
保存为monitor.sh
#!/bin/bash
line=$(ps -aux | grep -c /usr/sbin/ssh | grep -v "grep")
# 匹配的行数
if [ $line -eq 1 ];
then
sudo /etc/init.d/ssh restart
# 重启ssh服务
else
echo ssh is running....
# 向日志发送邮件,显示ssh运行中。。。
fi
给个执行权限
chmod +x monitor.sh
然后设置定时任务,
比如隔5分钟运行一次上面的脚本
*/5 * * * * monitor.sh
aria2c 不能下载https的文件
李魔佛 发表了文章 • 0 个评论 • 6552 次浏览 • 2022-07-10 11:07
aria2c https:// openresty.org/download/openresty-1.21.4.1-win64.zip$ aria2c
https: //openresty.org/download/openresty-1.21.4.1-win64.zip
07/10 10:58:58 [NOTICE] Downloading 1 item(s)
07/10 10:58:58 [ERROR] CUID#7 - Download aborted. URI=https: //openresty.org/download/openresty-1.21.4.1-win64.zip
Exception: [AbstractCommand.cc:351] errorCode=1 URI=https: //openresty.org/download/openresty-1.21.4.1-win64.zip
-> [InitiateConnectionCommandFactory.cc:87] errorCode=1 https is not supported yet.
07/10 10:58:58 [NOTICE] Download GID#b9bc95619990e7e4 not complete:
Download Results:
gid |stat|avg speed |path/URI
======+====+===========+=======================================================
b9bc95|ERR | n/a|
https: //openresty.org/download/openresty-1.21.4.1-win64.zip
http: //openresty.org/download/openresty-1.21.4.1-win64.zip
Status Legend:
(ERR):error occurred.
aria2 will resume download if the transfer is restarted.
If there are any errors, then see the log file. See '-l' option in help/man page for details.
只要把https改为http就可以了。(前提是完整没有把http跳转到https)
aria2 http: //openresty.org/download/openresty-1.21.4.1-win64.zip
不过这个办法不是长久之计,要解决这个问题,需要你重新编译ariac2, 编译的时候添加 ssl参数就可以啦
进入ariac2的源码目录:./configure --with-openssl接着:make && sudo make install然后就可以啦
查看全部
aria2c https:// openresty.org/download/openresty-1.21.4.1-win64.zip
$ aria2c

https: //openresty.org/download/openresty-1.21.4.1-win64.zip


07/10 10:58:58 [NOTICE] Downloading 1 item(s)


07/10 10:58:58 [ERROR] CUID#7 - Download aborted. URI=https: //openresty.org/download/openresty-1.21.4.1-win64.zip

Exception: [AbstractCommand.cc:351] errorCode=1 URI=https: //openresty.org/download/openresty-1.21.4.1-win64.zip

  -> [InitiateConnectionCommandFactory.cc:87] errorCode=1 https is not supported yet.


07/10 10:58:58 [NOTICE] Download GID#b9bc95619990e7e4 not complete:


Download Results:

gid   |stat|avg speed  |path/URI

======+====+===========+=======================================================

b9bc95|ERR |        n/a|

https: //openresty.org/download/openresty-1.21.4.1-win64.zip


http: //openresty.org/download/openresty-1.21.4.1-win64.zip


Status Legend:

(ERR):error occurred.


aria2 will resume download if the transfer is restarted.

If there are any errors, then see the log file. See '-l' option in help/man page for details.
只要把https改为http就可以了。(前提是完整没有把http跳转到https)
aria2 http: //openresty.org/download/openresty-1.21.4.1-win64.zip
不过这个办法不是长久之计,要解决这个问题,需要你重新编译ariac2, 编译的时候添加 ssl参数就可以啦
进入ariac2的源码目录:
./configure --with-openssl接着:
make && sudo make install然后就可以啦
最近几天的有道云笔记保存的笔记全部丢失了
李魔佛 发表了文章 • 0 个评论 • 2706 次浏览 • 2022-06-21 09:46
最近几天记录了几篇笔记,基本全部都不见了,最新日期的还是6月17日的。中间这几天保存的笔记被狗吃了。
搜索功能也越做越垃圾,建议用一个 云文件同步+typora 做笔记就可以。
最近几天记录了几篇笔记,基本全部都不见了,最新日期的还是6月17日的。中间这几天保存的笔记被狗吃了。
搜索功能也越做越垃圾,建议用一个 云文件同步+typora 做笔记就可以。
linux下好用的git gui工具 推荐!
李魔佛 发表了文章 • 0 个评论 • 4651 次浏览 • 2022-06-11 17:37
ubuntu下最好的图形git管理工具kranken (免费版本)
用了一个月之后,发现免费版不支持私有仓库,这。。。。。
那自己的私有仓库还得专门找软件管理。
突然看到ubuntu下平时用的不多的vs code,发现里面git的插件可真多。
把最多星的git相关插件装上后,它的功能基本大部分都可以覆盖了95%kraken的可视化功能了!
查看全部
ubuntu下最好的图形git管理工具kranken (免费版本)
用了一个月之后,发现免费版不支持私有仓库,这。。。。。
那自己的私有仓库还得专门找软件管理。
突然看到ubuntu下平时用的不多的vs code,发现里面git的插件可真多。
把最多星的git相关插件装上后,它的功能基本大部分都可以覆盖了95%kraken的可视化功能了!


轻量服务器原来都只是一个docker出来给你的应用
李魔佛 发表了文章 • 0 个评论 • 2482 次浏览 • 2022-06-07 01:50
之前的服务器好歹还给你弄个虚拟机,现在就是一个进程隔离而已,CPU 跑到 100%一段时间以后就开始失去响应了,没有强制进程调度,跑重负载肯定是不行的,所以叫:“轻量”,诚不欺我也……
之前的服务器好歹还给你弄个虚拟机,现在就是一个进程隔离而已,CPU 跑到 100%一段时间以后就开始失去响应了,没有强制进程调度,跑重负载肯定是不行的,所以叫:“轻量”,诚不欺我也……
ubuntu用非root用户 无法启用80端口web服务
李魔佛 发表了文章 • 0 个评论 • 3712 次浏览 • 2022-06-05 00:19
默认情况下,1024以下的端口,只有root用户可以使用,例如想用python3启动一个在80端口上的web服务,只能切换到root用户再启动。如果想不用root用户启动,怎么办呢?


解决办法

记录一种测试了的办法:

Linux 内核从 2.6.24 版本开始就有了能力的概念,这使得普通用户也能够做只有超级用户才能完成的工作。


使用 setcap 命令让指定程序拥有绑定端口的能力,这样即使程序运行在普通用户下,也能够绑定到 1024 以下的特权端口上。


# 给指定程序设置 CAP_NET_BIND_SERVICE 能力

$ sudo setcap cap_net_bind_service=+eip /home/xda/miniconda3/bin/python3.9


注意赋给的程序目标不能是软链接
注意 conda的python一般都是软链接
比如:
/home/xda/miniconda3/bin/python
很可能是指向
/home/xda/miniconda3/bin/python3.9的
如果使用的python路径
/home/xda/miniconda3/bin/python
给
setcap cap_net_bind_service=+eip
会报错的。 查看全部
需求 conda python
默认情况下,1024以下的端口,只有root用户可以使用,例如想用python3启动一个在80端口上的web服务,只能切换到root用户再启动。如果想不用root用户启动,怎么办呢?
解决办法
记录一种测试了的办法:
Linux 内核从 2.6.24 版本开始就有了能力的概念,这使得普通用户也能够做只有超级用户才能完成的工作。
使用 setcap 命令让指定程序拥有绑定端口的能力,这样即使程序运行在普通用户下,也能够绑定到 1024 以下的特权端口上。
# 给指定程序设置 CAP_NET_BIND_SERVICE 能力
$ sudo setcap cap_net_bind_service=+eip /home/xda/miniconda3/bin/python3.9
注意赋给的程序目标不能是软链接
注意 conda的python一般都是软链接
比如:
/home/xda/miniconda3/bin/python
很可能是指向
/home/xda/miniconda3/bin/python3.9的
如果使用的python路径
/home/xda/miniconda3/bin/python
给
setcap cap_net_bind_service=+eip
会报错的。
ubuntu下最好的图形git管理工具kranken (免费版本)
李魔佛 发表了文章 • 0 个评论 • 5905 次浏览 • 2022-05-30 19:06
不过最新的版本已经要收费了。
但是如果你用回以前的旧版本,还是可以依然免费的。[url]https://release.axocdn.com/lin ... 1.deb[/url]
[url]https://release.axocdn.com/lin ... 1.rpm[/url]
[url]https://release.axocdn.com/lin ... ar.gz[/url]
[url]https://release.axocdn.com/win ... 1.exe[/url]
如果上面链接下载不了,可以换一个源。我在本地ip下似乎下不了,跑到腾讯云上的云服务器 就可以正常下载。
反正多试几次就可以。
不要点击安装,不然出错了,也不知道是什么问题。
使用命令行安装:sudo dpkg -i gitkraken-amd64.deb
如果报错,依赖出错,那么可以这样操作:sudo apt --fix-broken install
搞定 查看全部

不过最新的版本已经要收费了。
但是如果你用回以前的旧版本,还是可以依然免费的。
[url]https://release.axocdn.com/lin ... 1.deb[/url]
[url]https://release.axocdn.com/lin ... 1.rpm[/url]
[url]https://release.axocdn.com/lin ... ar.gz[/url]
[url]https://release.axocdn.com/win ... 1.exe[/url]
如果上面链接下载不了,可以换一个源。我在本地ip下似乎下不了,跑到腾讯云上的云服务器 就可以正常下载。
反正多试几次就可以。
不要点击安装,不然出错了,也不知道是什么问题。
使用命令行安装:
sudo dpkg -i gitkraken-amd64.deb
如果报错,依赖出错,那么可以这样操作:
sudo apt --fix-broken install
搞定
ubuntu下虚拟机对比virtualbox 和 vmware
李魔佛 发表了文章 • 0 个评论 • 4204 次浏览 • 2022-05-28 01:27
virtual box当时选择的是在snap store安装的,不过安装完成之后系统依赖不满足,需要下载系统内核开发库。kernel-headers, kernel-devel. 这个整下来,需要800MB,并且很多系统依赖库可能要被重新安装,因为对应的版本可能对不上。
看到这,想起以前基本每年一次ubuntu重装经历,心有余悸。 思考略1秒,果断关闭,卸载virtual box。选择vmware的怀抱。
vmware的安装包是bundle格式,设置x 可执行权限后,直接安装就可以了。
一路顺畅。
查看全部
virtual box当时选择的是在snap store安装的,不过安装完成之后系统依赖不满足,需要下载系统内核开发库。kernel-headers, kernel-devel. 这个整下来,需要800MB,并且很多系统依赖库可能要被重新安装,因为对应的版本可能对不上。

看到这,想起以前基本每年一次ubuntu重装经历,心有余悸。 思考略1秒,果断关闭,卸载virtual box。选择vmware的怀抱。
vmware的安装包是bundle格式,设置x 可执行权限后,直接安装就可以了。

一路顺畅。
原来ubuntu发行的版本数字是按照年份来定的22.04 是22年4月发行的
李魔佛 发表了文章 • 0 个评论 • 2779 次浏览 • 2022-05-26 11:30
最早用的10.04 这么看就是12年前的操作系统了。
而18.04也差不多也是4年前的操作系统了。
而当前最新的应该就是22.04 LTS 长期支持版本了。
最早用的10.04 这么看就是12年前的操作系统了。
而18.04也差不多也是4年前的操作系统了。
而当前最新的应该就是22.04 LTS 长期支持版本了。
ubuntu20 conda安装python ta-lib 股票分析库
李魔佛 发表了文章 • 0 个评论 • 3864 次浏览 • 2022-05-20 23:11
$ conda install -c quantopian ta-lib=0.4.9一般而说,上面的会失败,可以按照下面的方法:2. 自己手工编译安装,适合需要自己修改内部的一些函数
a) 下载ta-lib的源码
$ wget [url=http://prdownloads.sourceforge ... ar.gz(]http://prdownloads.sourceforge ... ar.gz[/url] 如果无法下载的话,可以直接复制到浏览器下载,我的wget就是无法下载,估计有反盗链设计了
prdownloads.sourceforge.net/ta-lib/ta-lib-0.4.0-src.tar.gz或者文末也可以获取。
$ untar and cd
$ ./configure --prefix=/usr
$ make
$ sudo make install
假如之前用anaconda安装过,需要将生成的库替换到anaconda安装的目录
$ cp /usr/lib/libta_lib* /home/user/anaconda2/lib/
b) 下载ta-lib的Python wrapper
pip install ta-lib或者
$ git clone https://github.com/mrjbq7/ta-lib.git
$ cd ta-lib
$ python setup.py install 最后在Python里面 import talib没有报错就安装成功了
在公众号后台留言: talib 就可以获取文件。
查看全部
. 使用 Anaconda 里面的conda 工具


$ conda install -c quantopian ta-lib=0.4.9
一般而说,上面的会失败,可以按照下面的方法:
2. 自己手工编译安装,适合需要自己修改内部的一些函数


a) 下载ta-lib的源码


$ wget [url=http://prdownloads.sourceforge ... ar.gz(]http://prdownloads.sourceforge ... ar.gz[/url]
如果无法下载的话,可以直接复制到浏览器下载,我的wget就是无法下载,估计有反盗链设计了


prdownloads.sourceforge.net/ta-lib/ta-lib-0.4.0-src.tar.gz
或者文末也可以获取。
$ untar and cd

$ ./configure --prefix=/usr

$ make

$ sudo make install

假如之前用anaconda安装过,需要将生成的库替换到anaconda安装的目录


$ cp /usr/lib/libta_lib* /home/user/anaconda2/lib/


b) 下载ta-lib的Python wrapper
pip install ta-lib
或者


$ git clone https://github.com/mrjbq7/ta-lib.git

$ cd ta-lib

$ python setup.py install
最后在Python里面 import talib没有报错就安装成功了
在公众号后台留言: talib 就可以获取文件。
Ubuntu20安装搜狗输入法 (自带的智能拼音太烂了)
李魔佛 发表了文章 • 0 个评论 • 3746 次浏览 • 2022-05-20 13:49
Ubuntu20.04安装搜狗输入法步骤
1、更新源
在终端执行 sudo apt update
2、安装fcitx输入法框架
\1. 在终端输入 sudo apt install fcitx
\2. 设置fcitx为系统输入法
点击左下角菜单选择语言支持,将语言选择为fcitx(如下图二)
\3. 设置fcitx开机自启动
在终端执行sudo cp /usr/share/applications/fcitx.desktop /etc/xdg/autostart/
\4. 卸载系统ibus输入法框架
在终端执行 sudo apt purge ibus
3、安装搜狗输入法
\1. 在官网下载搜狗输入法安装包,并安装,安装命令 sudo dpkg -i 安装包名
\2. 安装输入法依赖
在终端执行
sudo apt install libqt5qml5 libqt5quick5 libqt5quickwidgets5 qml-module-qtquick2
sudo apt install libgsettings-qt1
4、重启电脑、调出输入法
1.重启电脑
2.查看右上角,可以看到“搜狗”字样,在输入窗口即可且出搜狗输入法。
\3. 没有“搜狗”字样,选择配置,将搜狗加入输入法列表即可
至此,搜狗输入法安装完毕 查看全部

Ubuntu20.04安装搜狗输入法步骤
1、更新源
在终端执行 sudo apt update
2、安装fcitx输入法框架
\1. 在终端输入 sudo apt install fcitx
\2. 设置fcitx为系统输入法
点击左下角菜单选择语言支持,将语言选择为fcitx(如下图二)
\3. 设置fcitx开机自启动
在终端执行sudo cp /usr/share/applications/fcitx.desktop /etc/xdg/autostart/
\4. 卸载系统ibus输入法框架
在终端执行 sudo apt purge ibus
3、安装搜狗输入法
\1. 在官网下载搜狗输入法安装包,并安装,安装命令 sudo dpkg -i 安装包名
\2. 安装输入法依赖
在终端执行
sudo apt install libqt5qml5 libqt5quick5 libqt5quickwidgets5 qml-module-qtquick2
sudo apt install libgsettings-qt1
4、重启电脑、调出输入法
1.重启电脑
2.查看右上角,可以看到“搜狗”字样,在输入窗口即可且出搜狗输入法。
\3. 没有“搜狗”字样,选择配置,将搜狗加入输入法列表即可
至此,搜狗输入法安装完毕