通知设置 新通知
ubuntu 12.04及以上安装nvidia显卡驱动
李魔佛 发表了文章 • 0 个评论 • 3088 次浏览 • 2018-02-10 16:06
运行命令: apt-get install nvidia-current
然后一路回车即可,如果遇到依赖关系,看看差哪些库,然后优先使用apt-get来安装,如果实在安装不了,就可以使用aptitude install 来安装(使用这个命令可以省下很多解决依赖问题)
查看全部
运行命令: apt-get install nvidia-current
然后一路回车即可,如果遇到依赖关系,看看差哪些库,然后优先使用apt-get来安装,如果实在安装不了,就可以使用aptitude install 来安装(使用这个命令可以省下很多解决依赖问题)
apt-get安装软件时 需要依赖更低版本的依赖库 通用解决办法
李魔佛 发表了文章 • 0 个评论 • 7149 次浏览 • 2017-08-08 23:35
xda@xda-dt:~$ sudo apt-get install sqlite3 libsqlite3-0=3.7.9-2ubuntu1.1

Reading package lists... Done

Building dependency tree

Reading state information... Done

libsqlite3-0 is already the newest version.

Some packages could not be installed. This may mean that you have

requested an impossible situation or if you are using the unstable

distribution that some required packages have not yet been created

or been moved out of Incoming.

The following information may help to resolve the situation:


The following packages have unmet dependencies:

 sqlite3 : Depends: libsqlite3-0 (= 3.7.9-2ubuntu1) but 3.7.9-2ubuntu1.1 is to be installed

E: Unable to correct problems, you have held broken packages.
会出现上面的问题。
方法1,使用aptitude 安装。
xda@xda-dt:~$ sudo aptitude install sqlite3

The following NEW packages will be installed:

  sqlite3{b}

0 packages upgraded, 1 newly installed, 0 to remove and 0 not upgraded.

Need to get 26.9 kB of archives. After unpacking 174 kB will be used.

The following packages have unmet dependencies:

 sqlite3 : Depends: libsqlite3-0 (= 3.7.9-2ubuntu1) but 3.7.9-2ubuntu1.1 is installed.

The following actions will resolve these dependencies:


     Keep the following packages at their current version:

1)     sqlite3 [Not Installed]


Accept this solution? [Y/n/q/?] n

The following actions will resolve these dependencies:


     Downgrade the following packages:

1)     libsqlite3-0 [3.7.9-2ubuntu1.1 (now) -> 3.7.9-2ubuntu1 (precise)]


Accept this solution? [Y/n/q/?] Y

The following packages will be DOWNGRADED:

  libsqlite3-0

The following NEW packages will be installed:

  sqlite3

0 packages upgraded, 1 newly installed, 1 downgraded, 0 to remove and 0 not upgraded.

Need to get 375 kB of archives. After unpacking 174 kB will be used.

Do you want to continue? [Y/n/?] Y

Get: 1 http://hk.archive.ubuntu.com/ubuntu/ precise/main libsqlite3-0 amd64 3.7.9-2ubuntu1 [348 kB]

Get: 2 http://hk.archive.ubuntu.com/ubuntu/ precise/main sqlite3 amd64 3.7.9-2ubuntu1 [26.9 kB]

Fetched 375 kB in 1s (306 kB/s)

dpkg: warning: downgrading libsqlite3-0 from 3.7.9-2ubuntu1.1 to 3.7.9-2ubuntu1.

(Reading database ... 162912 files and directories currently installed.)

Preparing to replace libsqlite3-0 3.7.9-2ubuntu1.1 (using .../libsqlite3-0_3.7.9-2ubuntu1_amd64.deb) ...

Unpacking replacement libsqlite3-0 ...

Selecting previously unselected package sqlite3.

Unpacking sqlite3 (from .../sqlite3_3.7.9-2ubuntu1_amd64.deb) ...

Processing triggers for man-db ...

Setting up libsqlite3-0 (3.7.9-2ubuntu1) ...

Setting up sqlite3 (3.7.9-2ubuntu1) ...

Processing triggers for libc-bin ...

ldconfig deferred processing now taking place


xda@xda-dt:~$ sqlite3

SQLite version 3.7.9 2011-11-01 00:52:41

Enter ".help" for instructions

Enter SQL statements terminated with a ";"

sqlite> .exit
查看全部
xda@xda-dt:~$ sudo apt-get install sqlite3 libsqlite3-0=3.7.9-2ubuntu1.1
Reading package lists... Done
Building dependency tree
Reading state information... Done
libsqlite3-0 is already the newest version.
Some packages could not be installed. This may mean that you have
requested an impossible situation or if you are using the unstable
distribution that some required packages have not yet been created
or been moved out of Incoming.
The following information may help to resolve the situation:
The following packages have unmet dependencies:
sqlite3 : Depends: libsqlite3-0 (= 3.7.9-2ubuntu1) but 3.7.9-2ubuntu1.1 is to be installed
E: Unable to correct problems, you have held broken packages.
会出现上面的问题。
方法1,使用aptitude 安装。
xda@xda-dt:~$ sudo aptitude install sqlite3
The following NEW packages will be installed:
sqlite3{b}
0 packages upgraded, 1 newly installed, 0 to remove and 0 not upgraded.
Need to get 26.9 kB of archives. After unpacking 174 kB will be used.
The following packages have unmet dependencies:
sqlite3 : Depends: libsqlite3-0 (= 3.7.9-2ubuntu1) but 3.7.9-2ubuntu1.1 is installed.
The following actions will resolve these dependencies:
Keep the following packages at their current version:
1) sqlite3 [Not Installed]
Accept this solution? [Y/n/q/?] n
The following actions will resolve these dependencies:
Downgrade the following packages:
1) libsqlite3-0 [3.7.9-2ubuntu1.1 (now) -> 3.7.9-2ubuntu1 (precise)]
Accept this solution? [Y/n/q/?] Y
The following packages will be DOWNGRADED:
libsqlite3-0
The following NEW packages will be installed:
sqlite3
0 packages upgraded, 1 newly installed, 1 downgraded, 0 to remove and 0 not upgraded.
Need to get 375 kB of archives. After unpacking 174 kB will be used.
Do you want to continue? [Y/n/?] Y
Get: 1 http://hk.archive.ubuntu.com/ubuntu/ precise/main libsqlite3-0 amd64 3.7.9-2ubuntu1 [348 kB]
Get: 2 http://hk.archive.ubuntu.com/ubuntu/ precise/main sqlite3 amd64 3.7.9-2ubuntu1 [26.9 kB]
Fetched 375 kB in 1s (306 kB/s)
dpkg: warning: downgrading libsqlite3-0 from 3.7.9-2ubuntu1.1 to 3.7.9-2ubuntu1.
(Reading database ... 162912 files and directories currently installed.)
Preparing to replace libsqlite3-0 3.7.9-2ubuntu1.1 (using .../libsqlite3-0_3.7.9-2ubuntu1_amd64.deb) ...
Unpacking replacement libsqlite3-0 ...
Selecting previously unselected package sqlite3.
Unpacking sqlite3 (from .../sqlite3_3.7.9-2ubuntu1_amd64.deb) ...
Processing triggers for man-db ...
Setting up libsqlite3-0 (3.7.9-2ubuntu1) ...
Setting up sqlite3 (3.7.9-2ubuntu1) ...
Processing triggers for libc-bin ...
ldconfig deferred processing now taking place
xda@xda-dt:~$ sqlite3
SQLite version 3.7.9 2011-11-01 00:52:41
Enter ".help" for instructions
Enter SQL statements terminated with a ";"
sqlite> .exit
编译cmake到更新的版本 【ubuntu】
李魔佛 发表了文章 • 0 个评论 • 6502 次浏览 • 2017-08-05 23:31
如果只是使用命令:
sudo apt-get install cmake 或者sudo apt-get upgrade cmake
获取到的版本还是2.8.7
正确的做法:
cd ~/Downloads/
wget http://www.cmake.org/files/v2. ... ar.gz
tar xzvf cmake-2.8.10.tar.gz
cd cmake-2.8.10
./configure
make -j4
sudo make install
关闭命令行后重新开一个命令行,然后运行 cmake --version, 就可以看到你的cmake已经更新到你要的版本。 查看全部
如果只是使用命令:
sudo apt-get install cmake 或者sudo apt-get upgrade cmake
获取到的版本还是2.8.7
正确的做法:
cd ~/Downloads/
wget http://www.cmake.org/files/v2. ... ar.gz
tar xzvf cmake-2.8.10.tar.gz
cd cmake-2.8.10
./configure
make -j4
sudo make install
关闭命令行后重新开一个命令行,然后运行 cmake --version, 就可以看到你的cmake已经更新到你要的版本。
在uefi主板上安装ubuntu,grub一直无法写入
李魔佛 发表了文章 • 0 个评论 • 9351 次浏览 • 2017-08-05 19:57
因为要安装ubuntu,所以使用ultraISO烧录的启动u盘,然后u盘启动。
重启后,顺利进入安装界面,一路下去后。 最后卡在 grub安装出错的界面处。
因为用的是最新的ubuntu16.04,所以开始以为是系统兼容性问题,所以就降级到12.04。 用ultraISO重新烧录可启动U盘。
结果问题依然存在,所以排除系统问题,因为以前在其他机子上装过很多次12.04了。
于是到ubuntu官网上搜了一下,发现这个很多人遇到问题。
解决方案无非有2个,一个是禁用uefi模式,一个是创建efi分区。
然后自己自己折腾自己的bios设置。 技嘉的板子没有直接禁用uefi的选项,百度之。 原来一部分主板bios的uefi的设置选项,是CSM, 这个选项默认是开启的了,然后把个功能关闭, 然后重新安装,问题还是出现。
而此之后,启动设备的优先级里面,一直会出现一个ubuntu的选项。
重置bios设置,这个选项会一直都在。
然后无解,只能用第二种方法。 启动uefi,在安装ubuntu过程中,分区选项里面,选择手工分区,分了以下分区:
/
/boot
/home
swap
/efi (一定要这个分区)
划分上面分区,系统不再出现grub安装失败的错误。 可是,系统重启后,系统就会挂掉,很不稳定。
后来重试了几次,没办法,重试第一次的方法。 这一次,我把主板的电池扣掉,放电几分钟。 然后进bios,重新禁用CSM, 重装。 使用默认的分区方法, 然后重要成功了。
查看全部
因为要安装ubuntu,所以使用ultraISO烧录的启动u盘,然后u盘启动。
重启后,顺利进入安装界面,一路下去后。 最后卡在 grub安装出错的界面处。
因为用的是最新的ubuntu16.04,所以开始以为是系统兼容性问题,所以就降级到12.04。 用ultraISO重新烧录可启动U盘。
结果问题依然存在,所以排除系统问题,因为以前在其他机子上装过很多次12.04了。
于是到ubuntu官网上搜了一下,发现这个很多人遇到问题。
解决方案无非有2个,一个是禁用uefi模式,一个是创建efi分区。
然后自己自己折腾自己的bios设置。 技嘉的板子没有直接禁用uefi的选项,百度之。 原来一部分主板bios的uefi的设置选项,是CSM, 这个选项默认是开启的了,然后把个功能关闭, 然后重新安装,问题还是出现。
而此之后,启动设备的优先级里面,一直会出现一个ubuntu的选项。
重置bios设置,这个选项会一直都在。
然后无解,只能用第二种方法。 启动uefi,在安装ubuntu过程中,分区选项里面,选择手工分区,分了以下分区:
/
/boot
/home
swap
/efi (一定要这个分区)
划分上面分区,系统不再出现grub安装失败的错误。 可是,系统重启后,系统就会挂掉,很不稳定。
后来重试了几次,没办法,重试第一次的方法。 这一次,我把主板的电池扣掉,放电几分钟。 然后进bios,重新禁用CSM, 重装。 使用默认的分区方法, 然后重要成功了。
树莓派上安装redis-server 亲测
树莓派 • 李魔佛 发表了文章 • 0 个评论 • 7497 次浏览 • 2017-07-17 23:47
1. 下载源码压缩包:
官方网址: https://redis.io/download
下载下来的格式为tar.gz
通过命令行解压: tar xvfz xxxxxx.tar.gz
2. 解压后进入 redis-4.0.0的目录,然后执行命令: make
3. 等待源码编译(树莓派上有点久), 见到这一行:Hint: It's a good idea to run 'make test' ;)
说明你安装成功了
4. 编译成功后, 记得运行命令 sudo src/redis-server
来启动redis server。
成功运行后的文字界面:
12718:C 17 Jul 23:09:24.447 # oO0OoO0OoO0Oo Redis is starting oO0OoO0OoO0Oo
12718:C 17 Jul 23:09:24.448 # Redis version=4.0.0, bits=64, commit=00000000, modified=0, pid=12718, just started
12718:C 17 Jul 23:09:24.448 # Warning: no config file specified, using the default config. In order to specify a config file use src/redis-server /path/to/redis.conf
12718:M 17 Jul 23:09:24.450 * Increased maximum number of open files to 10032 (it was originally set to 256).
_._
_.-``__ ''-._
_.-`` `. `_. ''-._ Redis 4.0.0 (00000000/0) 64 bit
.-`` .-```. ```\/ _.,_ ''-._
( ' , .-` | `, ) Running in standalone mode
|`-._`-...-` __...-.``-._|'` _.-'| Port: 6379
| `-._ `._ / _.-' | PID: 12718
`-._ `-._ `-./ _.-' _.-'
|`-._`-._ `-.__.-' _.-'_.-'|
| `-._`-._ _.-'_.-' | http://redis.io
`-._ `-._`-.__.-'_.-' _.-'
|`-._`-._ `-.__.-' _.-'_.-'|
| `-._`-._ _.-'_.-' |
`-._ `-._`-.__.-'_.-' _.-'
`-._ `-.__.-' _.-'
`-._ _.-'
`-.__.-'
12718:M 17 Jul 23:09:24.451 # Server initialized
12718:M 17 Jul 23:09:24.451 * Ready to accept connections 查看全部
1. 下载源码压缩包:
官方网址: https://redis.io/download
下载下来的格式为tar.gz
通过命令行解压: tar xvfz xxxxxx.tar.gz
2. 解压后进入 redis-4.0.0的目录,然后执行命令: make
3. 等待源码编译(树莓派上有点久), 见到这一行:Hint: It's a good idea to run 'make test' ;)
说明你安装成功了
4. 编译成功后, 记得运行命令 sudo src/redis-server
来启动redis server。
成功运行后的文字界面:
12718:C 17 Jul 23:09:24.447 # oO0OoO0OoO0Oo Redis is starting oO0OoO0OoO0Oo
12718:C 17 Jul 23:09:24.448 # Redis version=4.0.0, bits=64, commit=00000000, modified=0, pid=12718, just started
12718:C 17 Jul 23:09:24.448 # Warning: no config file specified, using the default config. In order to specify a config file use src/redis-server /path/to/redis.conf
12718:M 17 Jul 23:09:24.450 * Increased maximum number of open files to 10032 (it was originally set to 256).
_._
_.-``__ ''-._
_.-`` `. `_. ''-._ Redis 4.0.0 (00000000/0) 64 bit
.-`` .-```. ```\/ _.,_ ''-._
( ' , .-` | `, ) Running in standalone mode
|`-._`-...-` __...-.``-._|'` _.-'| Port: 6379
| `-._ `._ / _.-' | PID: 12718
`-._ `-._ `-./ _.-' _.-'
|`-._`-._ `-.__.-' _.-'_.-'|
| `-._`-._ _.-'_.-' | http://redis.io
`-._ `-._`-.__.-'_.-' _.-'
|`-._`-._ `-.__.-' _.-'_.-'|
| `-._`-._ _.-'_.-' |
`-._ `-._`-.__.-'_.-' _.-'
`-._ `-.__.-' _.-'
`-._ _.-'
`-.__.-'
12718:M 17 Jul 23:09:24.451 # Server initialized
12718:M 17 Jul 23:09:24.451 * Ready to accept connections
pycharm当前使用的换行是windows模式还是mac OSX模式 ?
李魔佛 发表了文章 • 0 个评论 • 9644 次浏览 • 2017-05-31 11:40
在pycharm的右下角,有一个状态栏,上面显示
如果显示的是: CRLF,说明当前文档用的是windows的换行,占用的是2个字符 \n\r
而对于Mac OSX 系统,显示的则是CR, 换行则是 \r
而Linux下的换行,显示的是LR, 字符为\n 查看全部
安装secureCRT7.3.4 配置公私钥远程登陆debian
追着萝卜的驴 发表了文章 • 0 个评论 • 4540 次浏览 • 2017-05-20 19:00
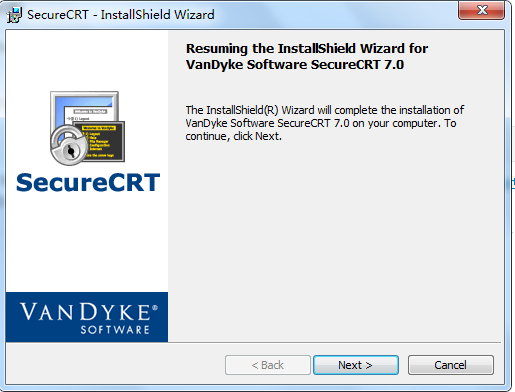
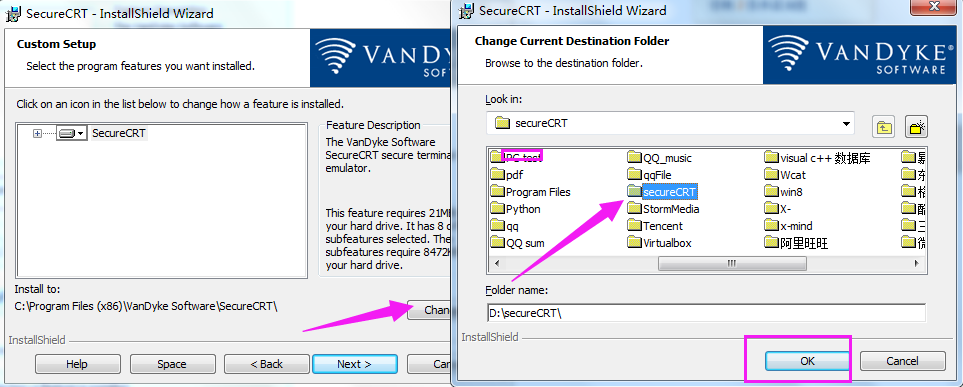
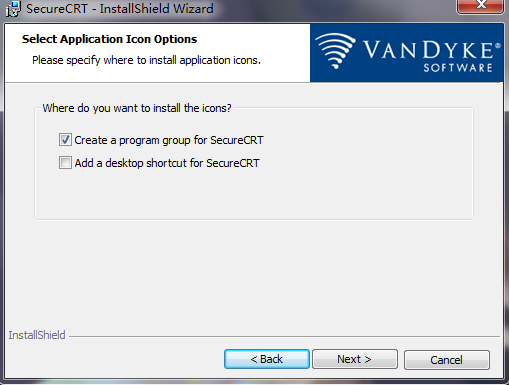
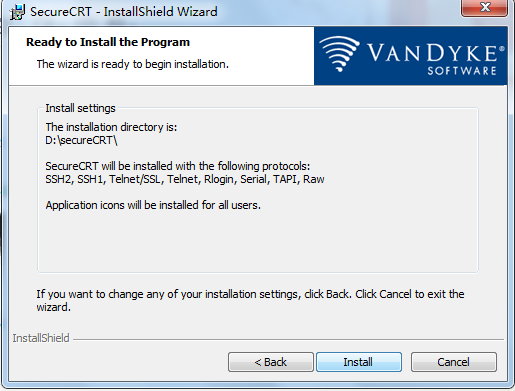
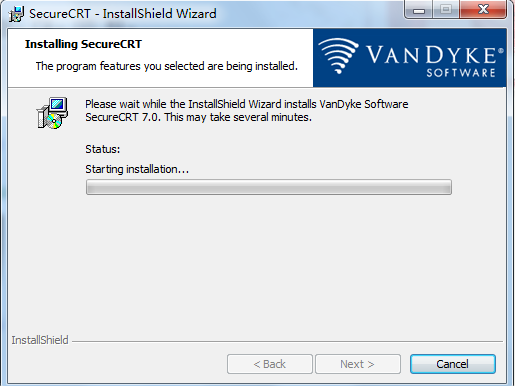
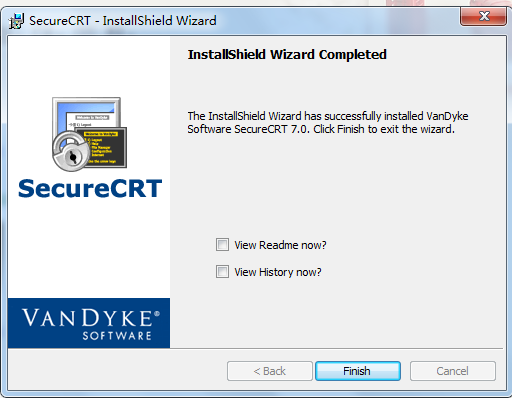
(1)next;
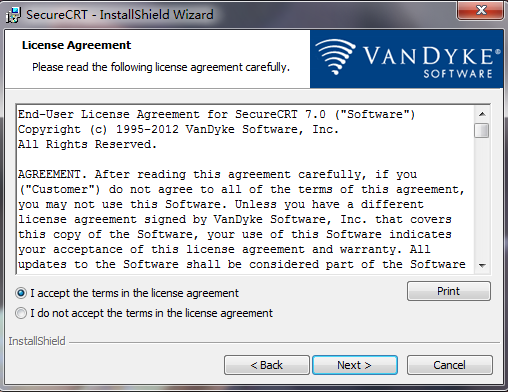
(2)accept;
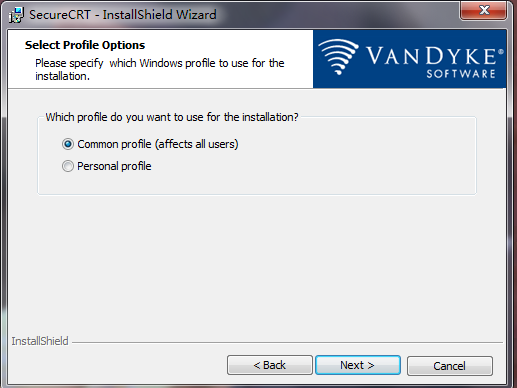
(3)Common profile;
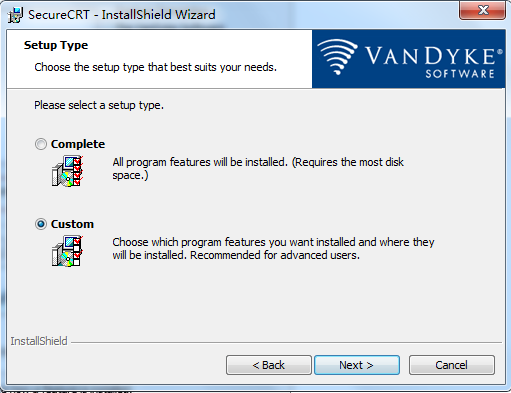
(4)Custom;
(5)改变安装路径;
(6)next;
(7)Install;
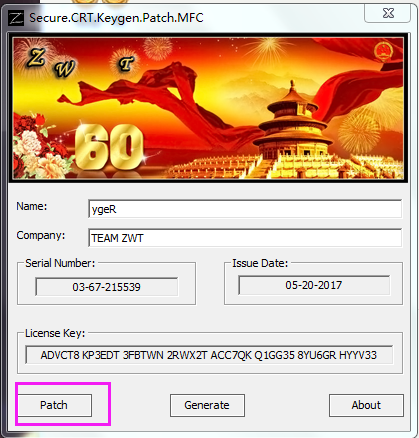
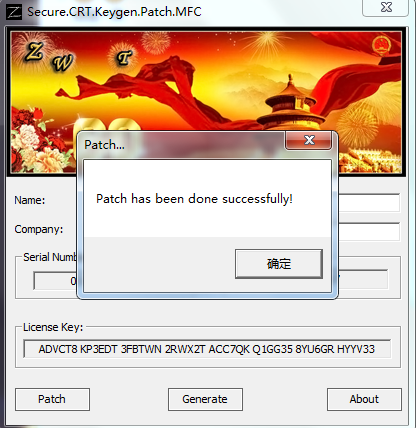
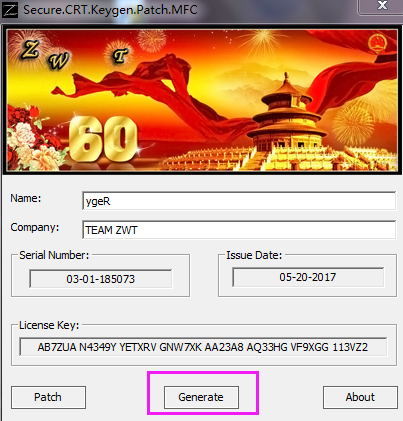
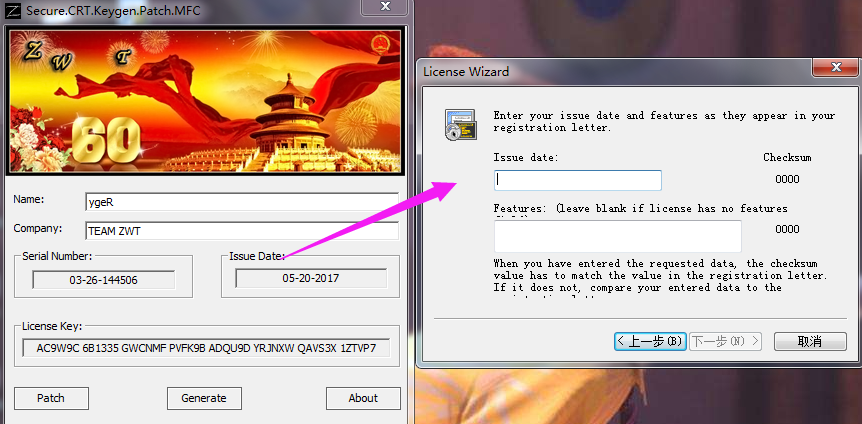
(8)保持securtCRT.exe未打开的状态,打开keygen.exee,选择path;
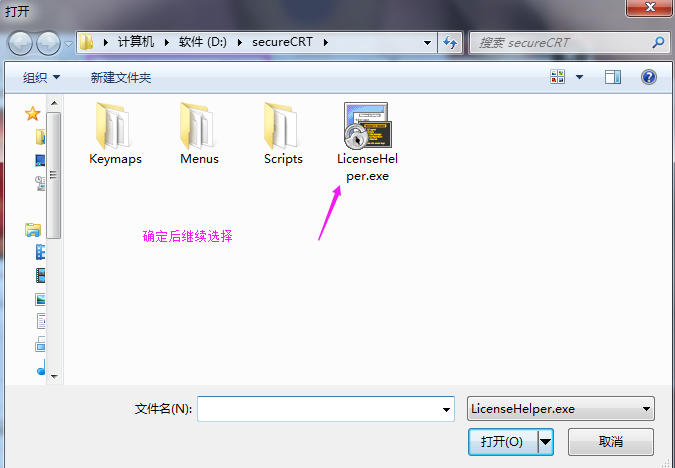
(9)在secureCRT安装路径选择secureCRT.ext和LicenseHelper.exe;
(10)选择“Generate”更换序列;
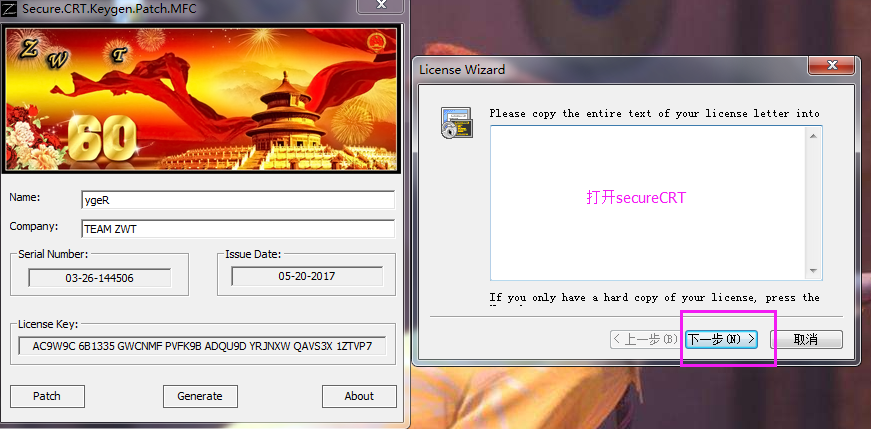
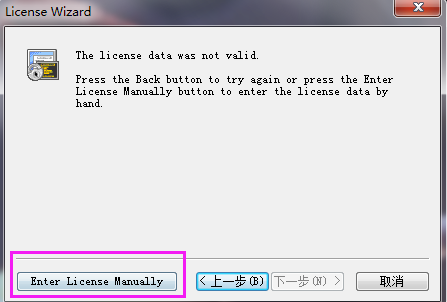
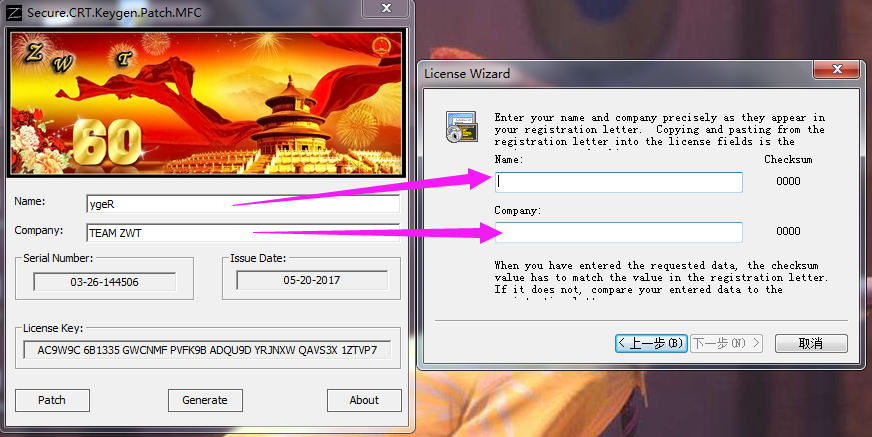
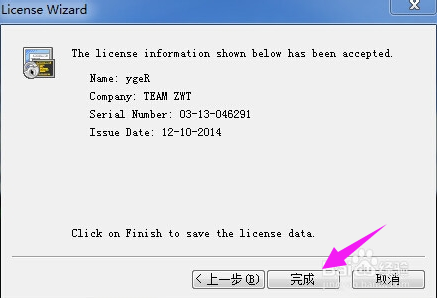
(11)打开secureCRT.exe(安装完成后的快捷方式),对应位置填入内容;
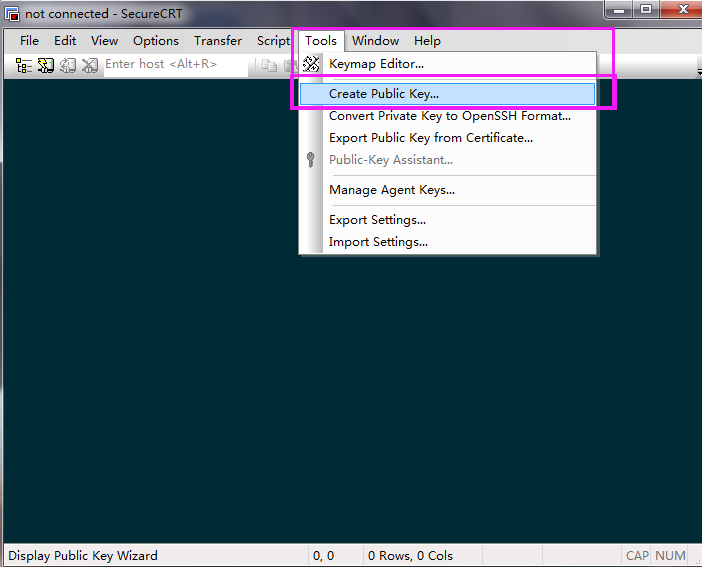
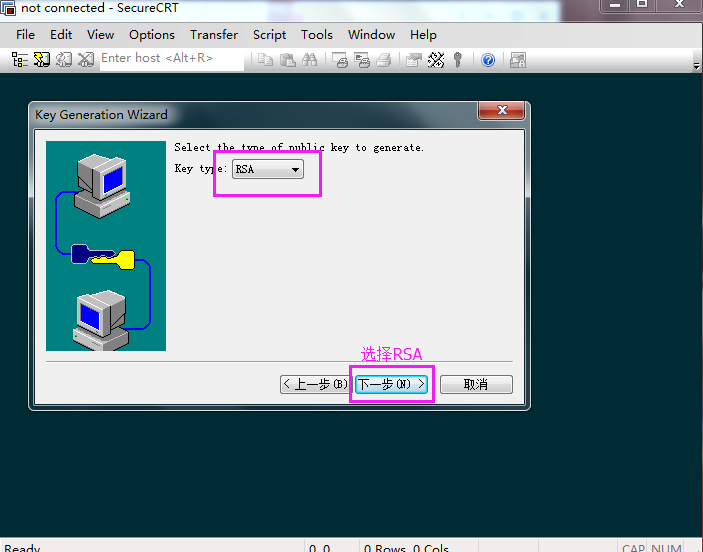
(12)完成安装,打开secureCRT,选择Tool-Create Public key;
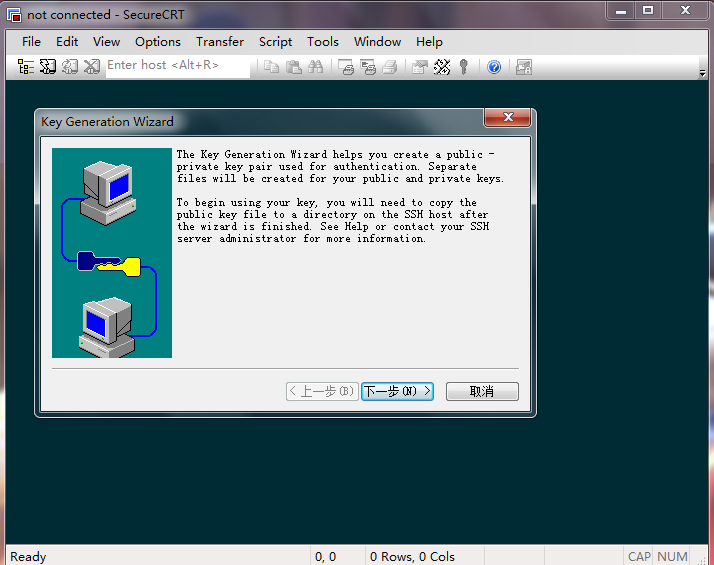
(13)选择RSA,下一步;
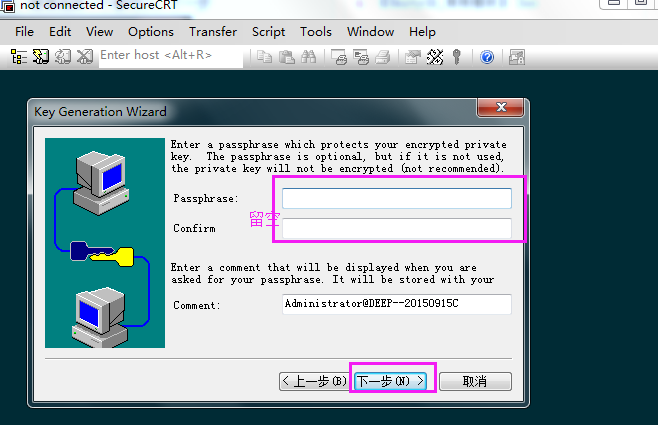
(14)登陆输入口令和密码,建议留空,comment默认主机名字
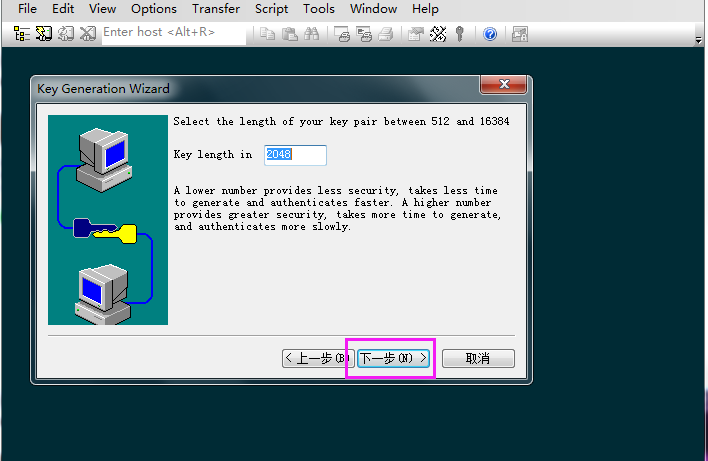
(15)密码长度默认;
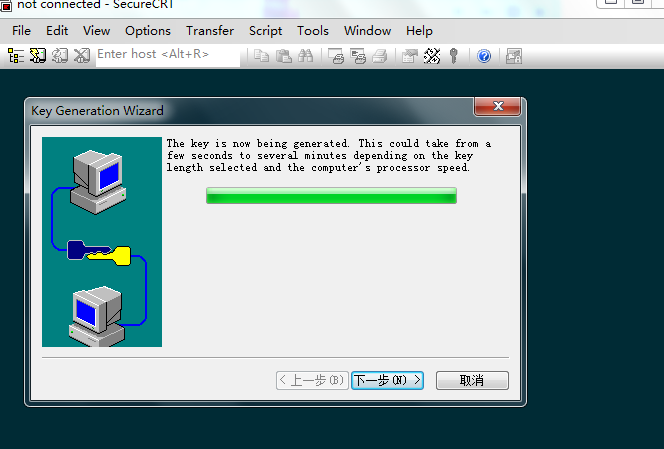
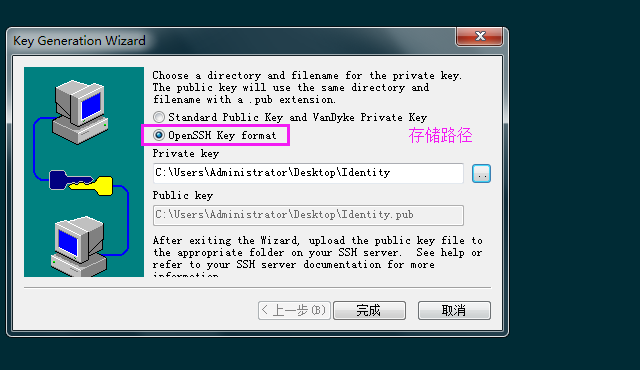
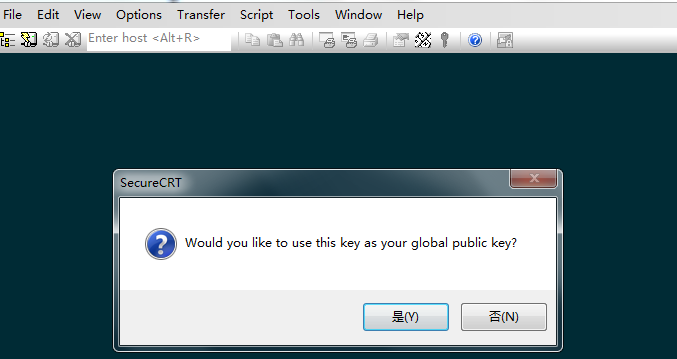
(16)选择openSSHkey format;修改存储路径,确定为global public key;
(17)创建公私钥成功,后缀为pub为公钥,另外一个为私钥;
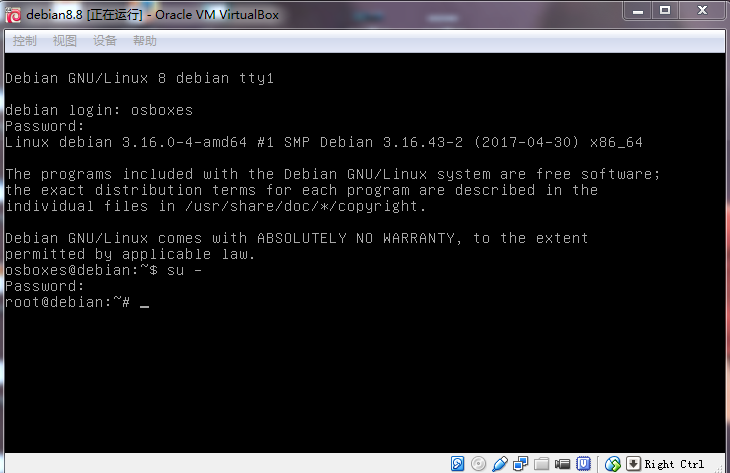
(18)打开虚拟机,进入终端界面,配置SSH服务(ctrl + alt + F1 可切换界面);su -
进入root用户;
(19)创建.ssh目录,修改该目录权限为700
创建authorized_keys文件,修改文件权限为600或者644;
将公钥(后缀.pub)内容拷贝到authorized_keys(可通过邮件从主机发送到虚拟机,再修改文件名字为authorized_keys)mkdir ~/.ssh
chmod 700 ~/.ssh
mv /home/osboxes/Downloads/Identity.pub ~/.ssh/authorized_keys
#(下载文件保存在主用户目录,osboxes为安装时创建的用户)
#(以上语句将公钥文件移动到~/.ssh ,并且修改名字为authorized_keys)
chmod 600 ~/.ssh/authorized_keys
cat ~/.ssh/authorize_keys
#(查看公钥内容)
ls -al ~
#(查看.ssh目录权限)
ls -al ~/.
#(查看authorized_keys权限,该文件的用户组为osboxes会导致链接失败,应该修改为root)
chown root.root ~/.ssh/authorized_keys
ls -al ~/.
#(可见文件用户组和用户已经修改为root)
(20)修改sshd_conf配置;vi /etc/ssh/shhd_configPermitRootLogin no # 禁止root用户登陆;
RSAAuthentication yes # 启用 RSA 认证;
AuthorizedKeysFile %h/.ssh/authorized_keys # 验证公钥的存放路径;
PubkeyAuthentication yes # 启用公钥认证;
PasswordAuthentication yes # 禁止密码认证,默认是打开的;
(21)回到虚拟机,修改网络连接方式,注意进入网络适配器,禁用虚拟机另外一个网络;
/etc/init.d/ssh restart
#重启ssh服务
/etc/init.d/networking restart
#重启网络服务
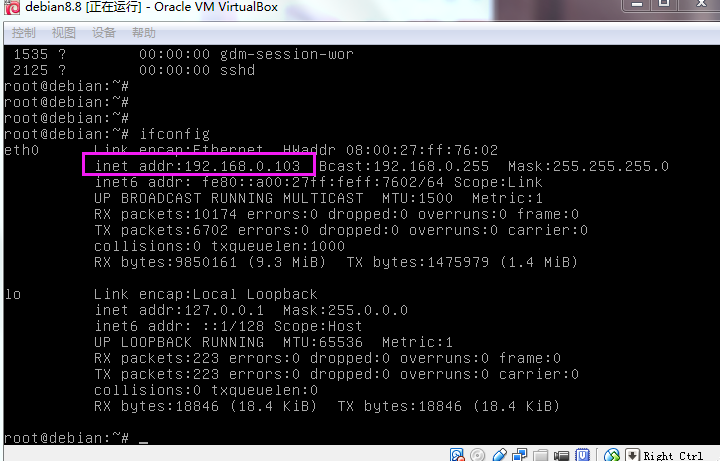
ifconfig
#查看虚拟机IP地址
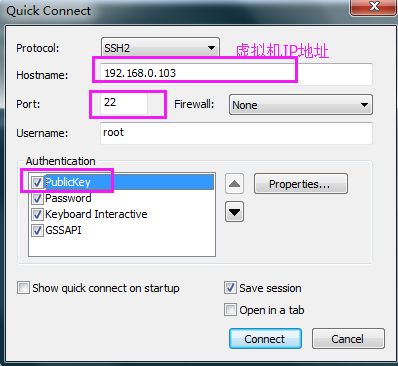
(22)配置远程链接,打开secureCRT,Quick Connect;
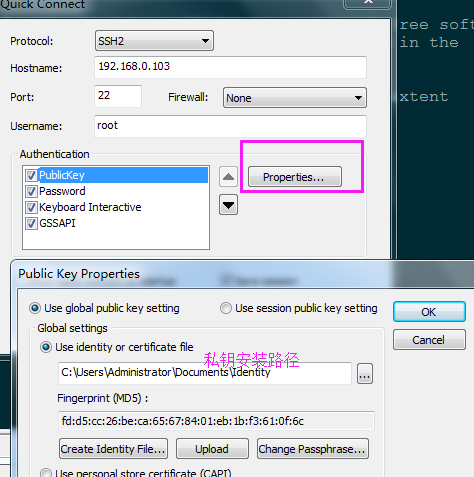
(23)配置虚拟机IP地址,登陆账号,将公钥提前启动档次,选择properties;
(24)选择私钥路径,connet;
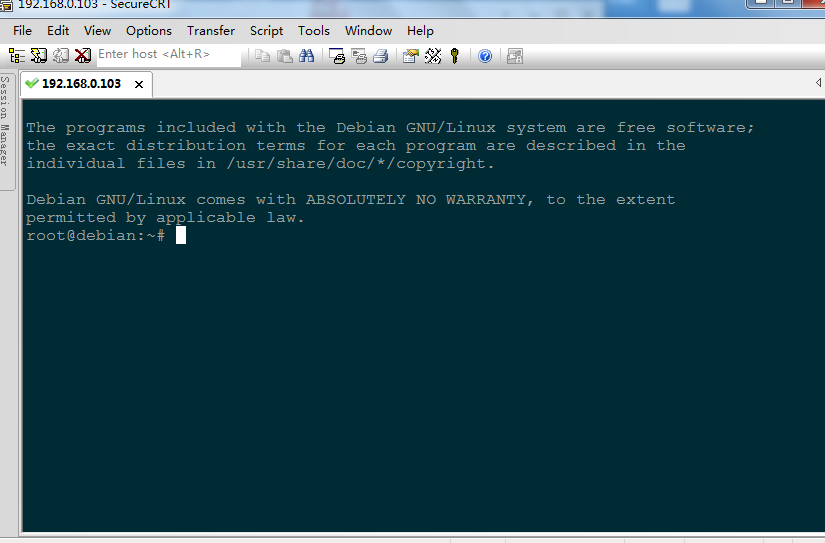
(25)回车键链接成功;
查看全部
(1)next;
(2)accept;
(3)Common profile;
(4)Custom;
(5)改变安装路径;
(6)next;
(7)Install;
(8)保持securtCRT.exe未打开的状态,打开keygen.exee,选择path;
(9)在secureCRT安装路径选择secureCRT.ext和LicenseHelper.exe;
(10)选择“Generate”更换序列;
(11)打开secureCRT.exe(安装完成后的快捷方式),对应位置填入内容;
(12)完成安装,打开secureCRT,选择Tool-Create Public key;
(13)选择RSA,下一步;
(14)登陆输入口令和密码,建议留空,comment默认主机名字
(15)密码长度默认;
(16)选择openSSHkey format;修改存储路径,确定为global public key;
(17)创建公私钥成功,后缀为pub为公钥,另外一个为私钥;
(18)打开虚拟机,进入终端界面,配置SSH服务(ctrl + alt + F1 可切换界面);
su -进入root用户;
(19)创建.ssh目录,修改该目录权限为700
创建authorized_keys文件,修改文件权限为600或者644;
将公钥(后缀.pub)内容拷贝到authorized_keys(可通过邮件从主机发送到虚拟机,再修改文件名字为authorized_keys)
mkdir ~/.ssh

chmod 700 ~/.ssh

mv /home/osboxes/Downloads/Identity.pub ~/.ssh/authorized_keys

#(下载文件保存在主用户目录,osboxes为安装时创建的用户)

#(以上语句将公钥文件移动到~/.ssh ,并且修改名字为authorized_keys)

chmod 600 ~/.ssh/authorized_keys

cat ~/.ssh/authorize_keys

#(查看公钥内容)

ls -al ~

#(查看.ssh目录权限)

ls -al ~/.

#(查看authorized_keys权限,该文件的用户组为osboxes会导致链接失败,应该修改为root)

chown root.root ~/.ssh/authorized_keys

ls -al ~/.

#(可见文件用户组和用户已经修改为root)
(20)修改sshd_conf配置;
vi /etc/ssh/shhd_configPermitRootLogin no # 禁止root用户登陆;
RSAAuthentication yes # 启用 RSA 认证;
AuthorizedKeysFile %h/.ssh/authorized_keys # 验证公钥的存放路径;
PubkeyAuthentication yes # 启用公钥认证;
PasswordAuthentication yes # 禁止密码认证,默认是打开的;
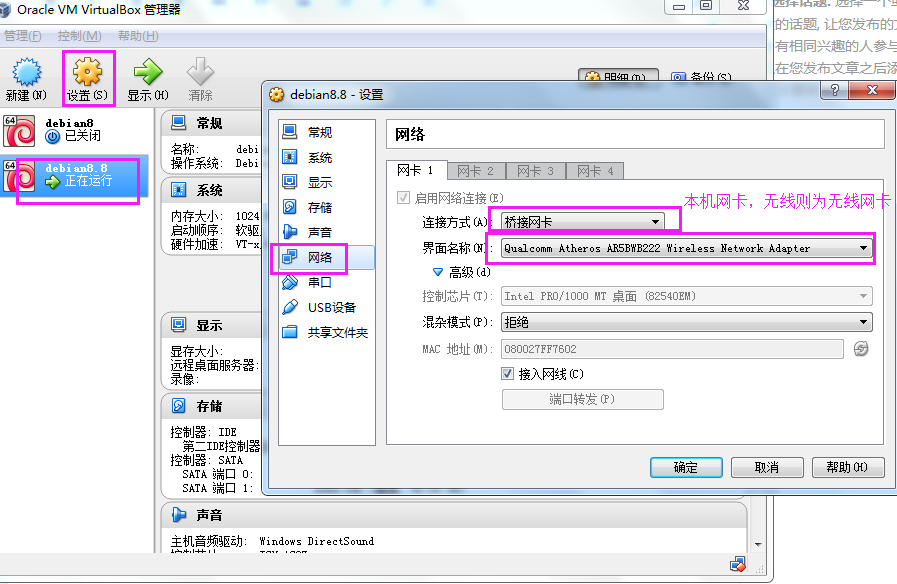
(21)回到虚拟机,修改网络连接方式,注意进入网络适配器,禁用虚拟机另外一个网络;
/etc/init.d/ssh restart

#重启ssh服务

/etc/init.d/networking restart

#重启网络服务

ifconfig

#查看虚拟机IP地址
(22)配置远程链接,打开secureCRT,Quick Connect;
(23)配置虚拟机IP地址,登陆账号,将公钥提前启动档次,选择properties;
(24)选择私钥路径,connet;
(25)回车键链接成功;
在VirtualBox安装debian8.8(完整版)
追着萝卜的驴 发表了文章 • 2 个评论 • 7097 次浏览 • 2017-05-20 13:51
【参考: http://www.cnblogs.com/zhangkaimin/p/4213578.html 】
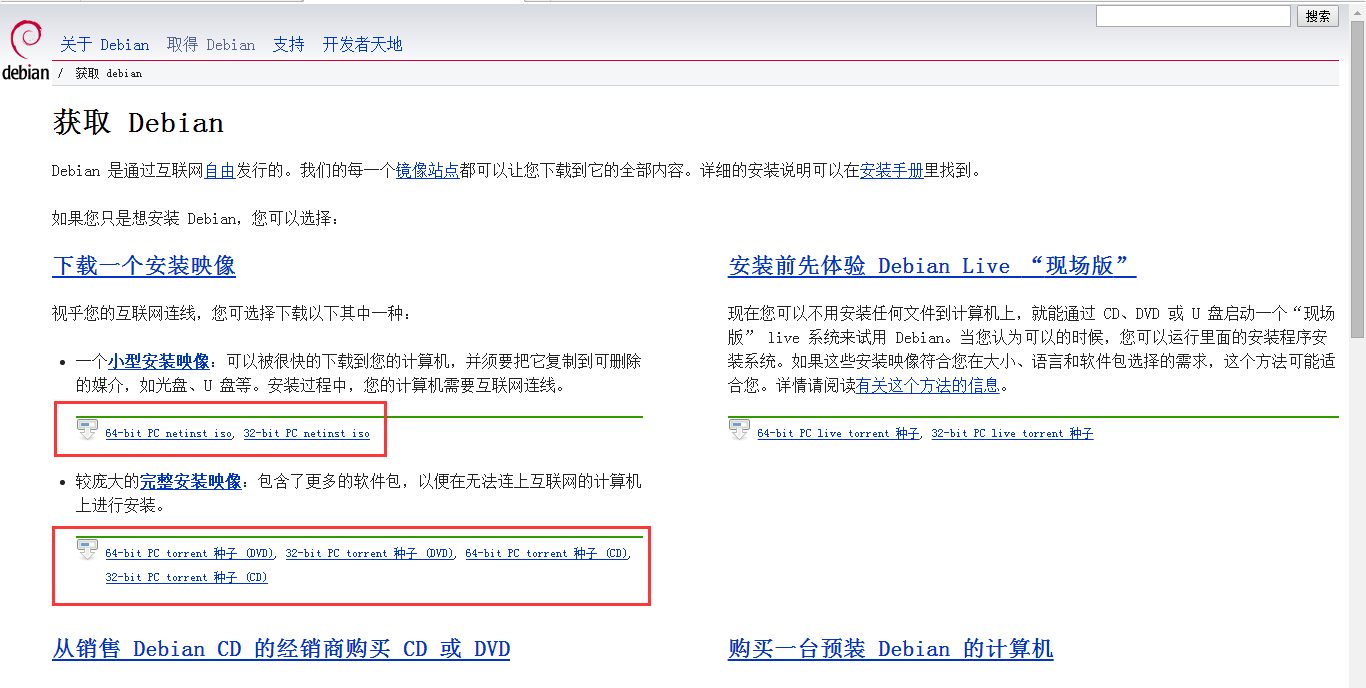
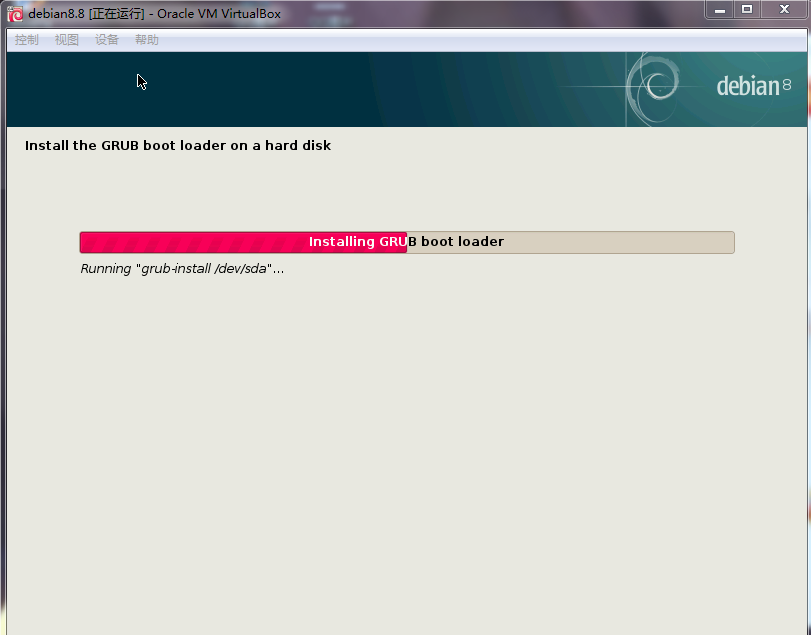
(1)通过官网下载最新版本的iso;https://www.debian.org/distrib/
(2)新建一个文件夹存放建立的虚拟硬盘;
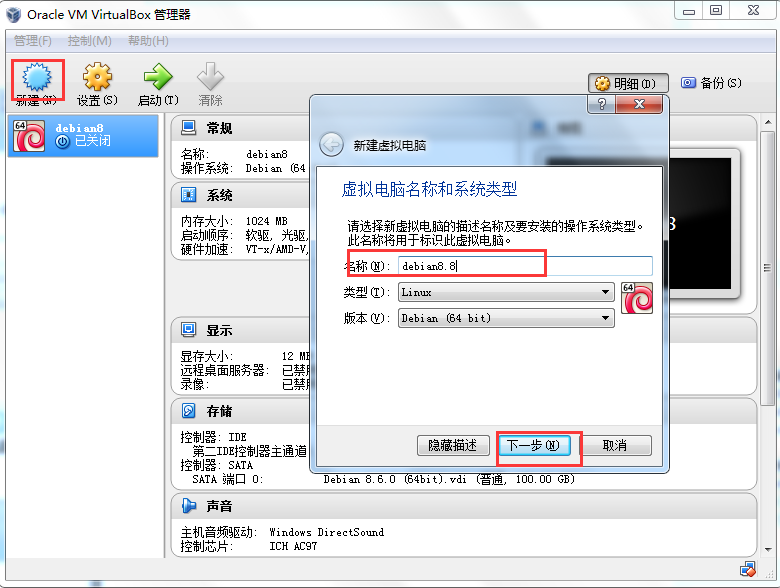
(3)打开VirtualBox,新建,输入虚拟机的名称,下一步;
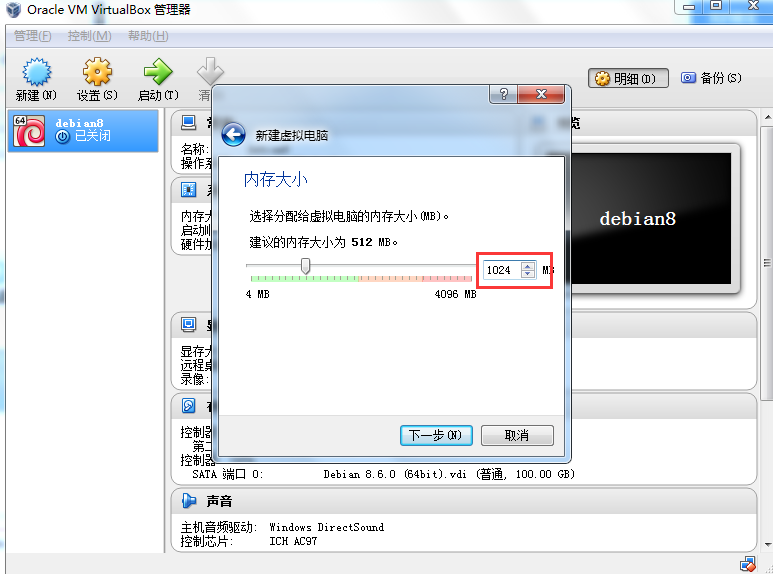
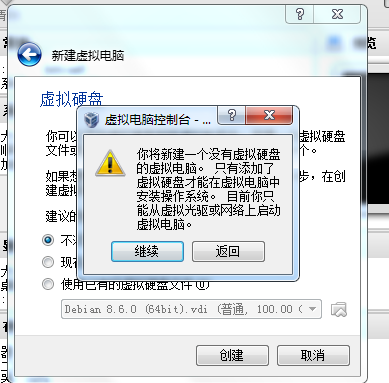
(4)分配内存:1024,下一步;
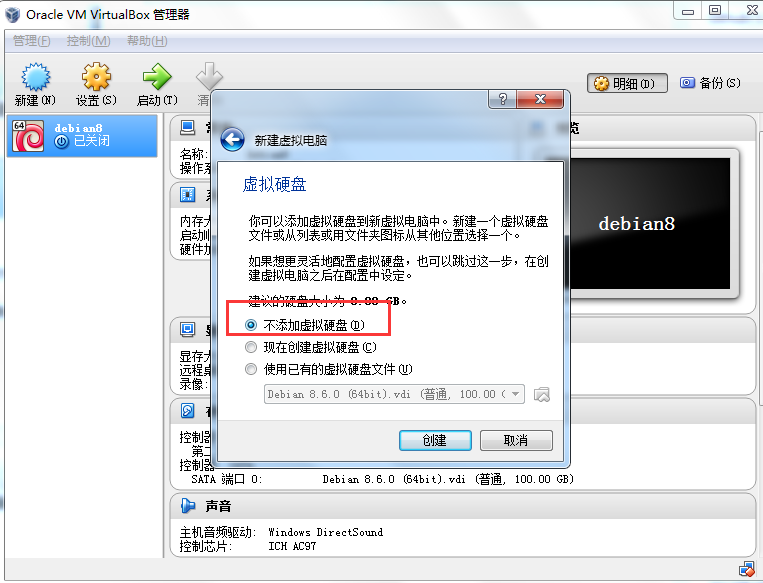
(5)不添加虚拟硬盘,创建;
(6)继续;
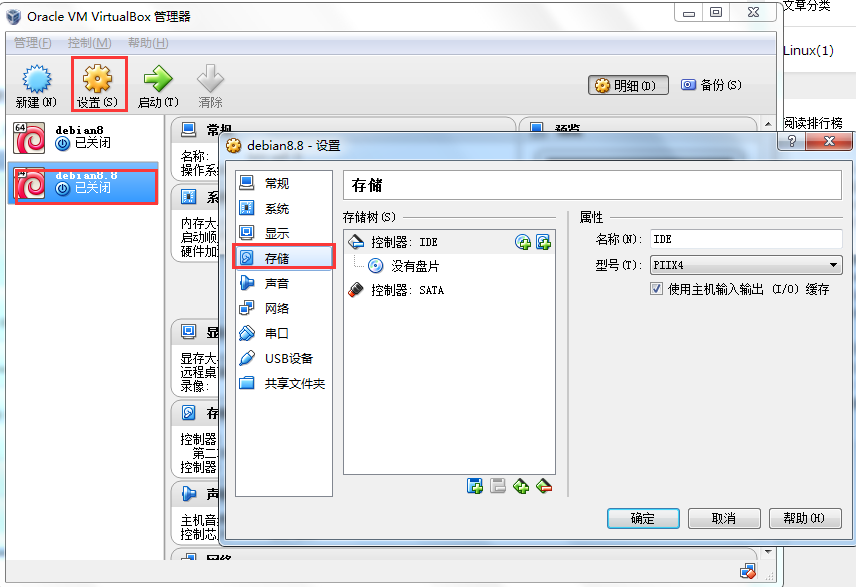
(7)选中新建的系统,点击选项框的设置,选中“存储”选项卡;
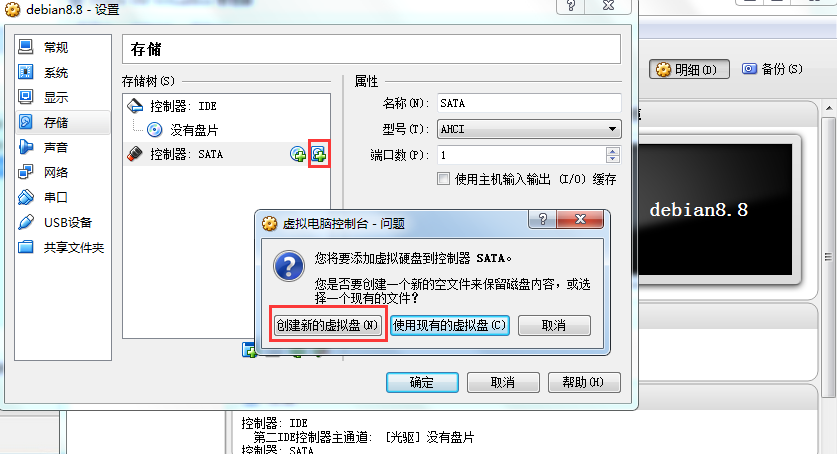
(8)选择创建虚拟硬盘;
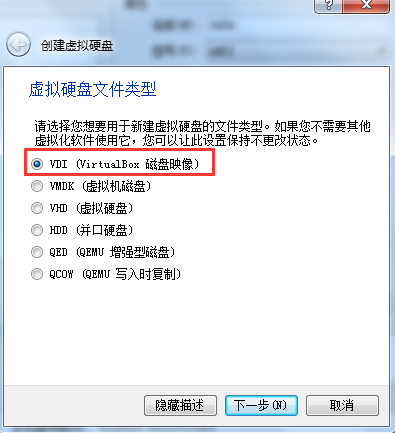
(9)选择VDI,下一步;
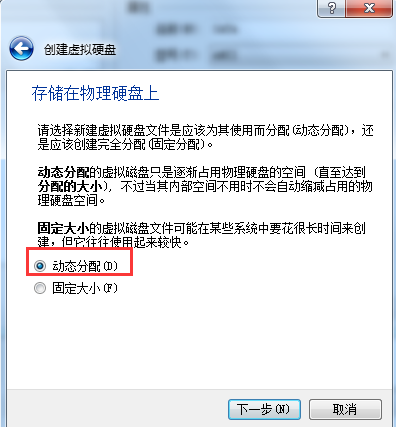
(10)动态分配,下一步;
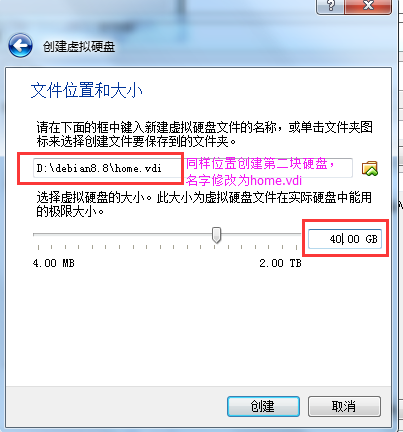
(11)设定存储VDI位置,这里为刚新建文件夹,修改新建VDI名字为“boot.VDI”,大小为30GB;
(12)同样的方式新建另外一块虚拟硬盘,存储位置刚新建文件夹,名字为“home.VDI”,大小为40GB;
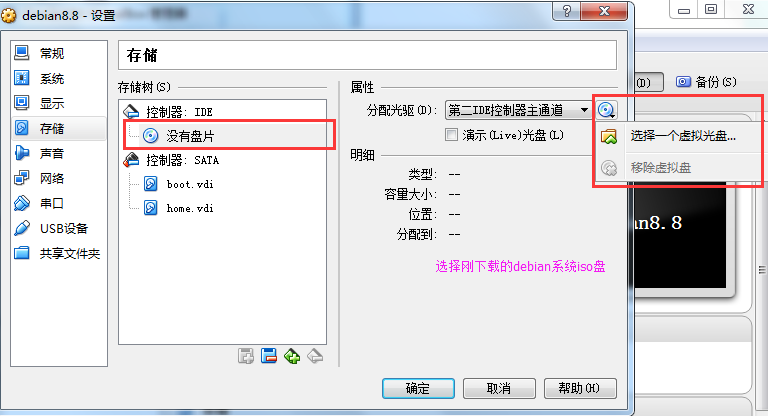
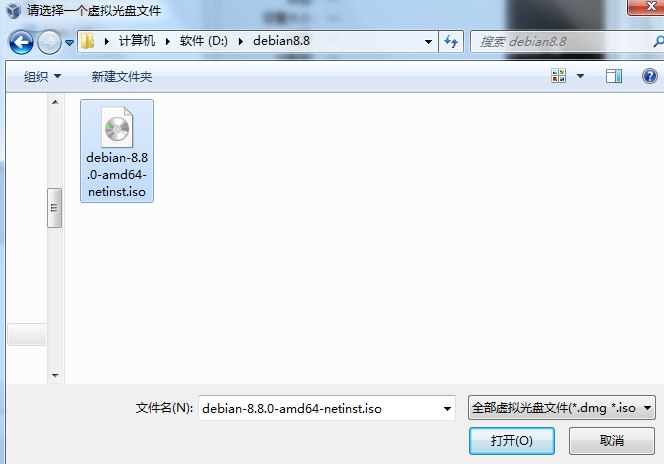
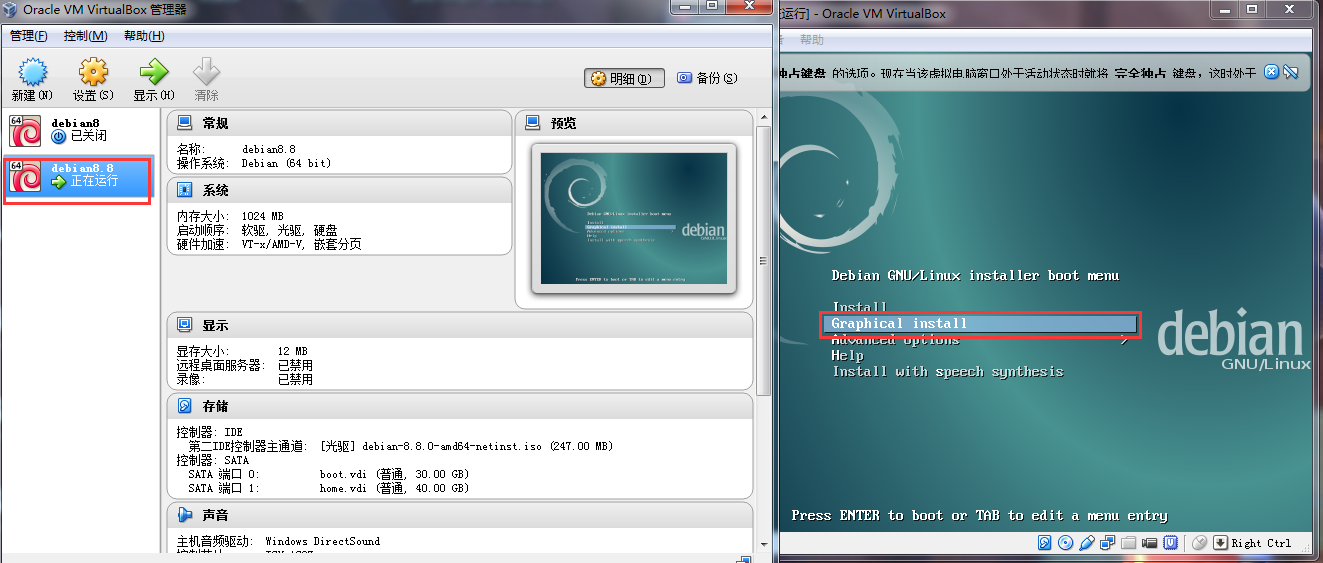
(13)选择光盘,为官网下载的系统ISO;
(14)确定后,双击启动系统,选择“Graphical install”,Enter键;
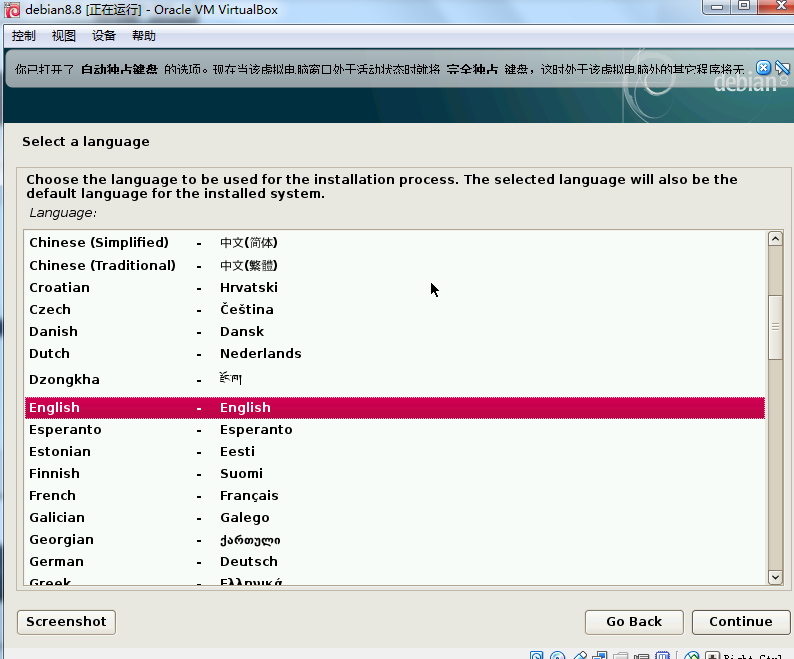
(15)语言建议默认English;
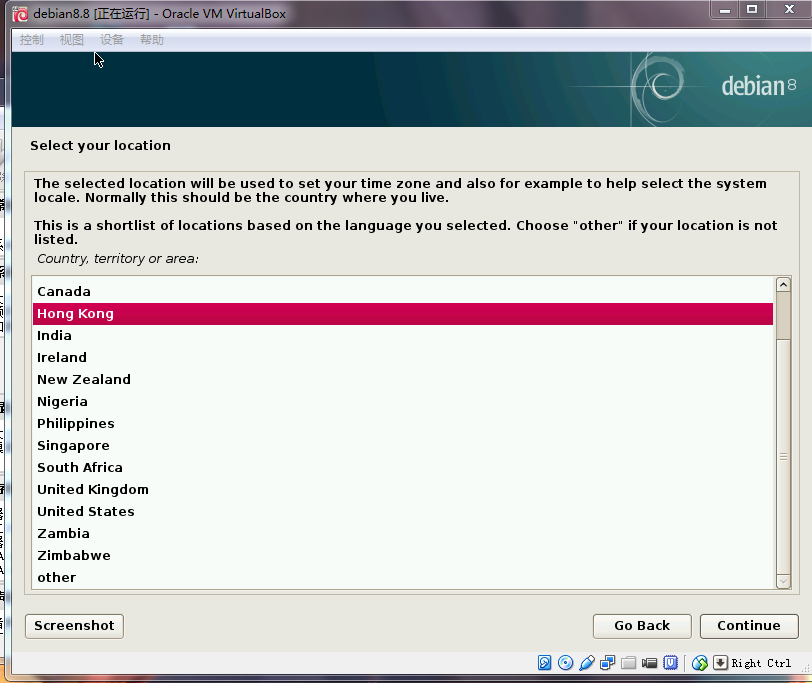
(16)地理位置HongKong;
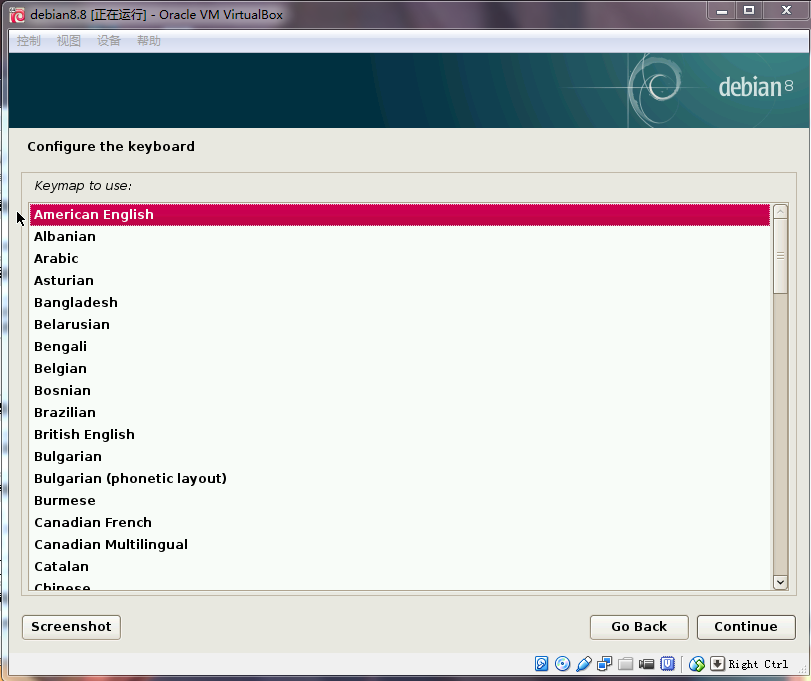
(17)键盘默认American English;
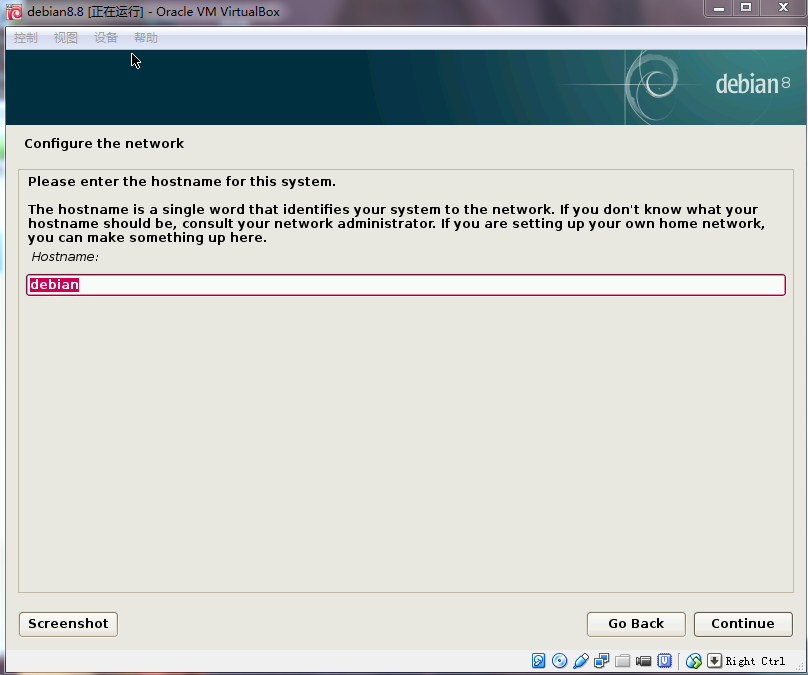
(18)Hostname:debian(可自行设置);
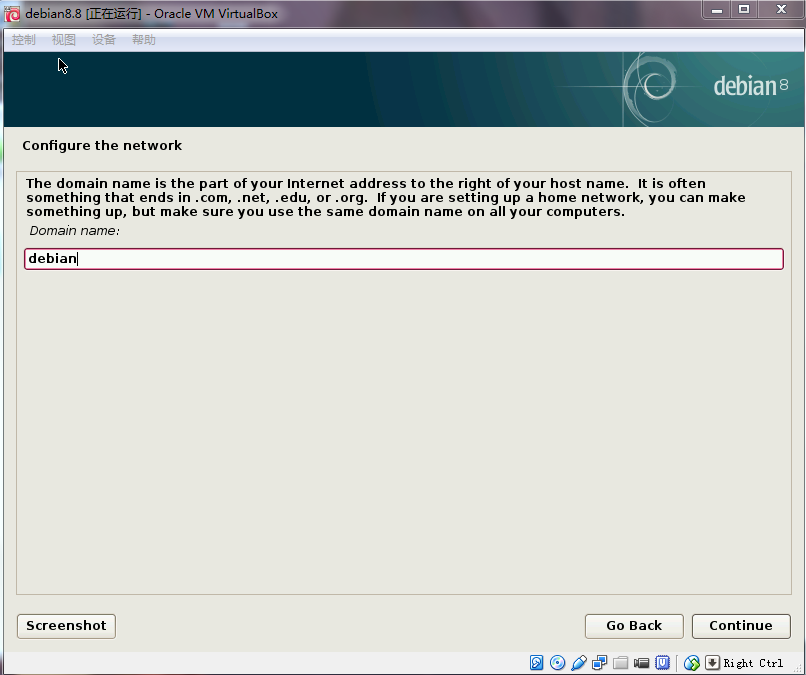
(19)Domain name:debian
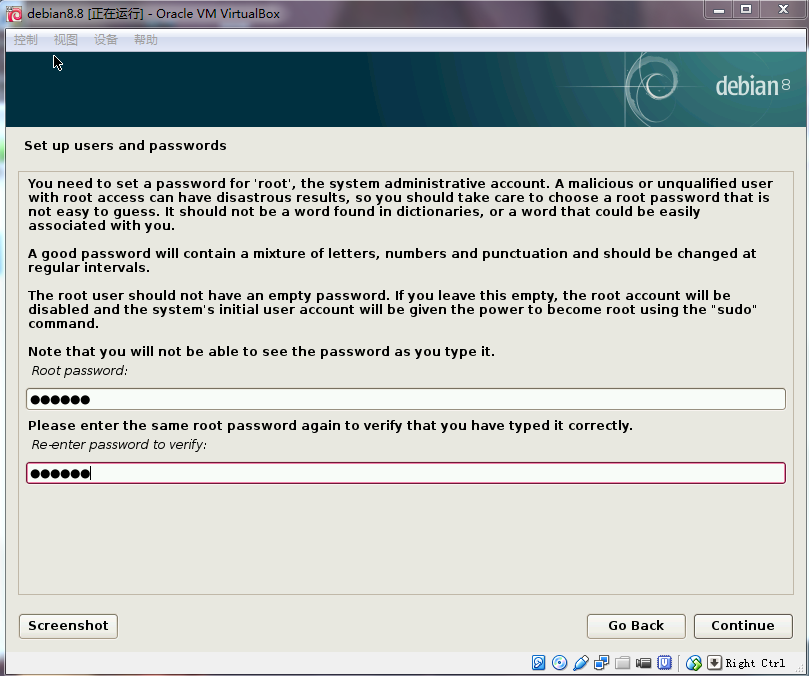
(20)Hostname的密码;
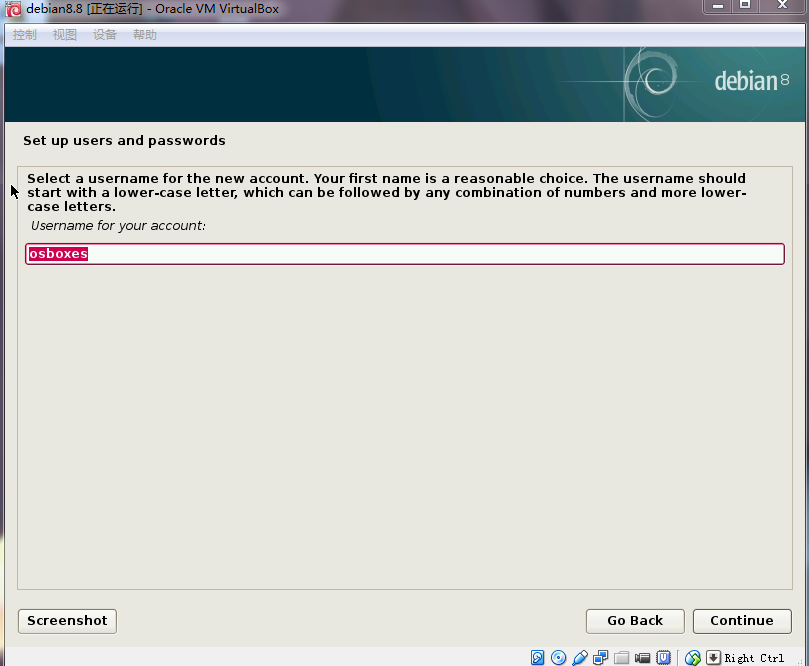
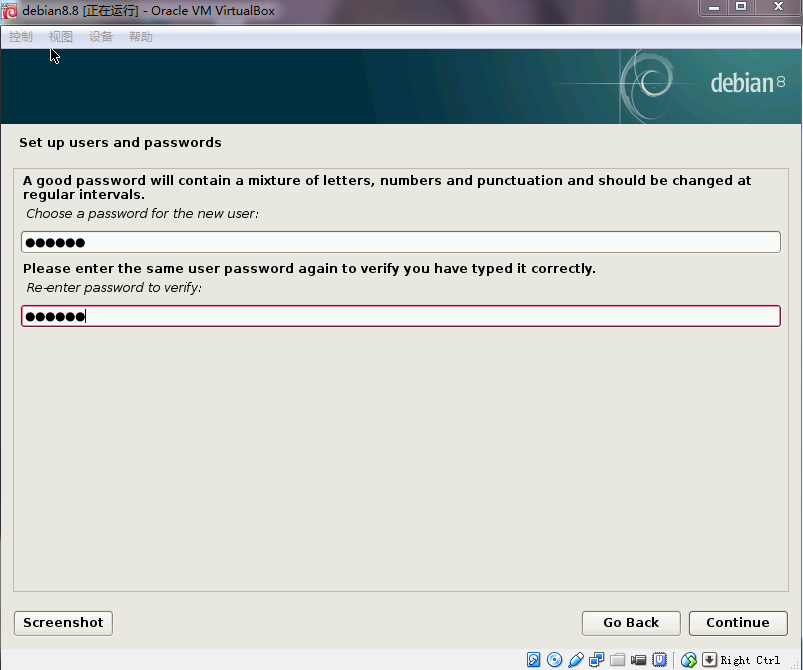
(21)新的用户账号:osboxes(可自行设置);
(22)用户账号;
(23)用户账号的密码;
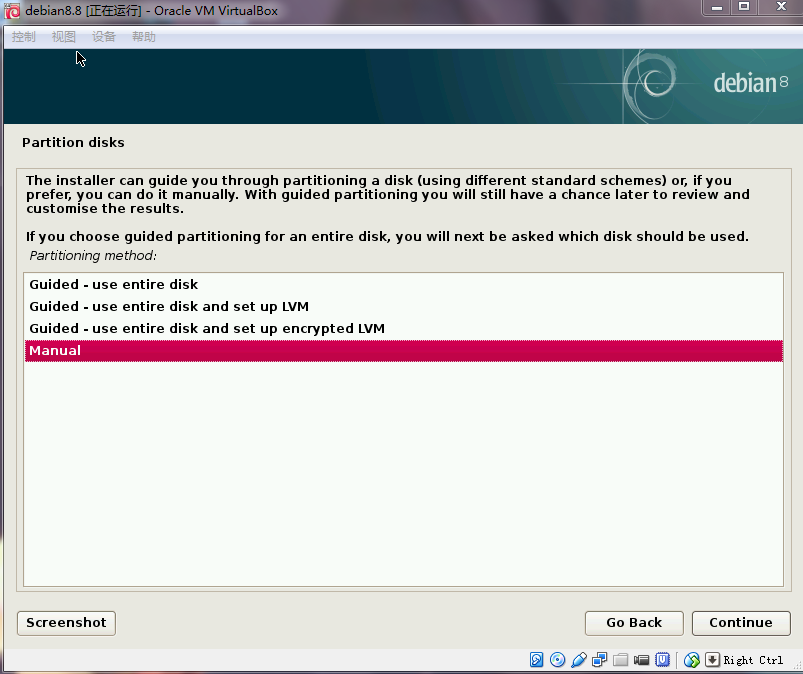
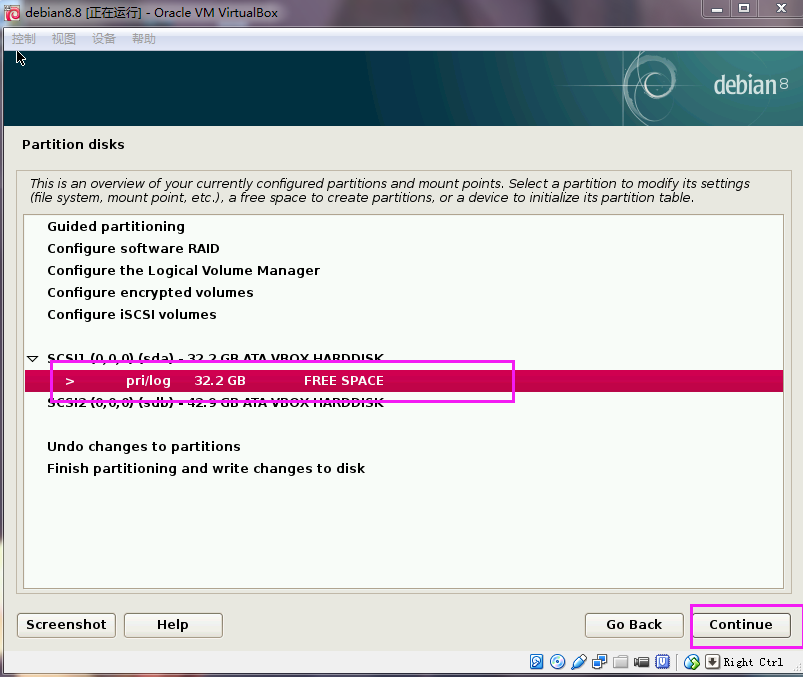
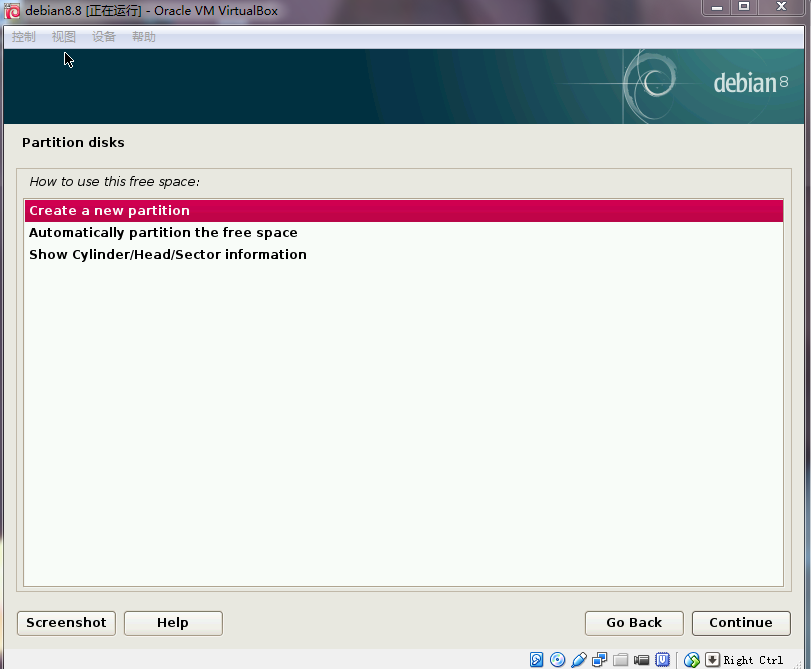
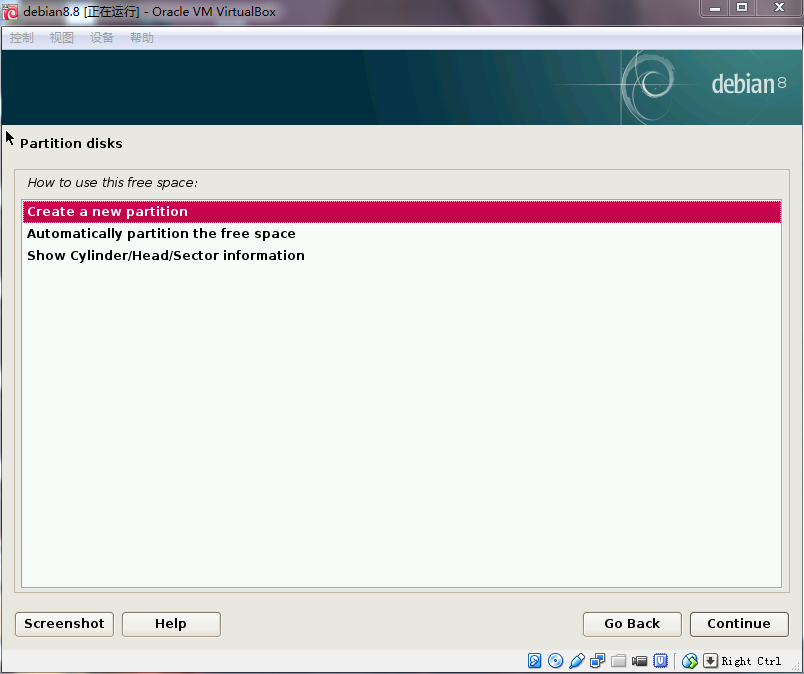
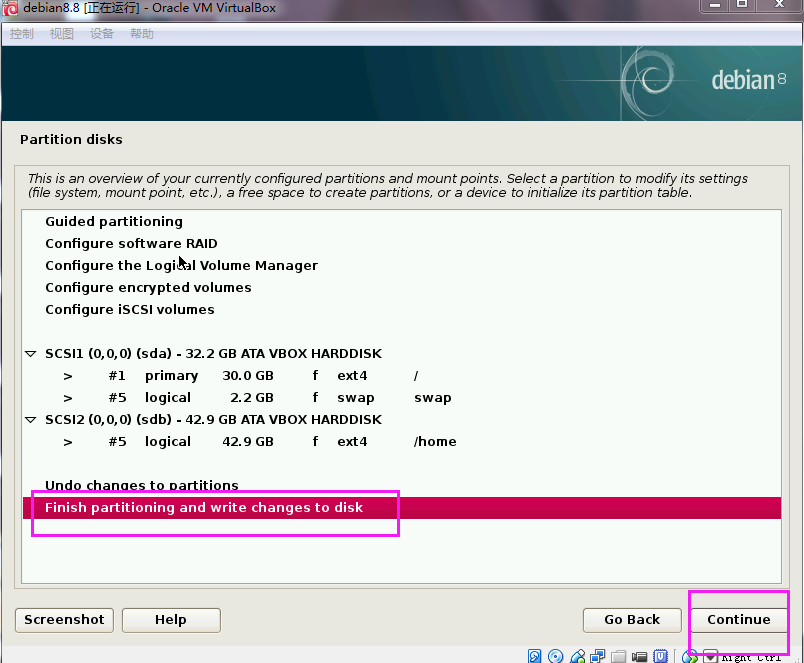
(24)分区选中Manual;
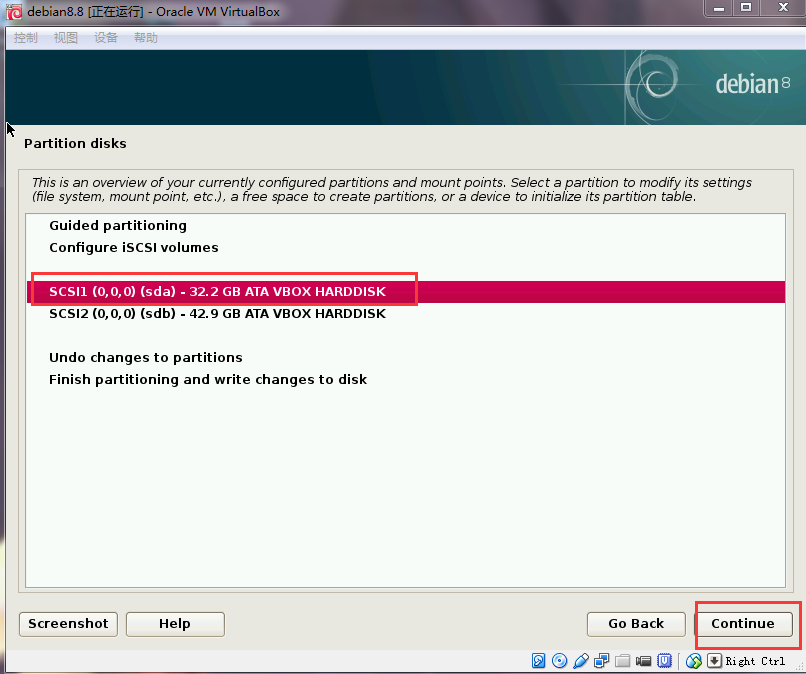
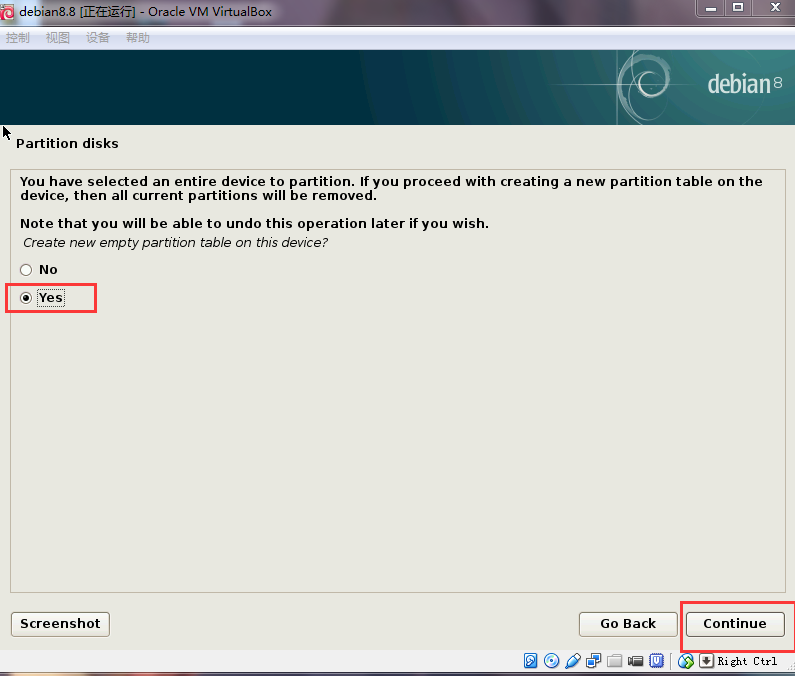
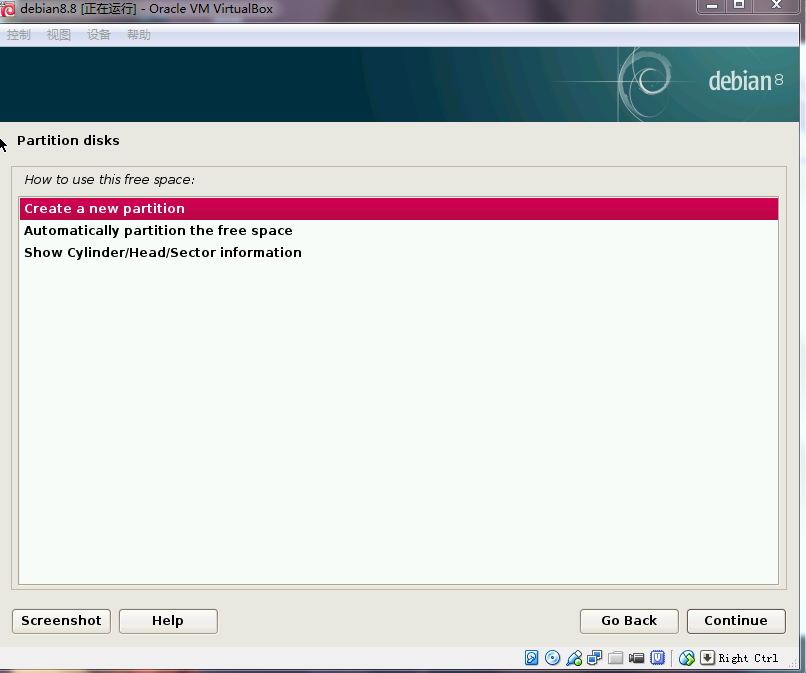
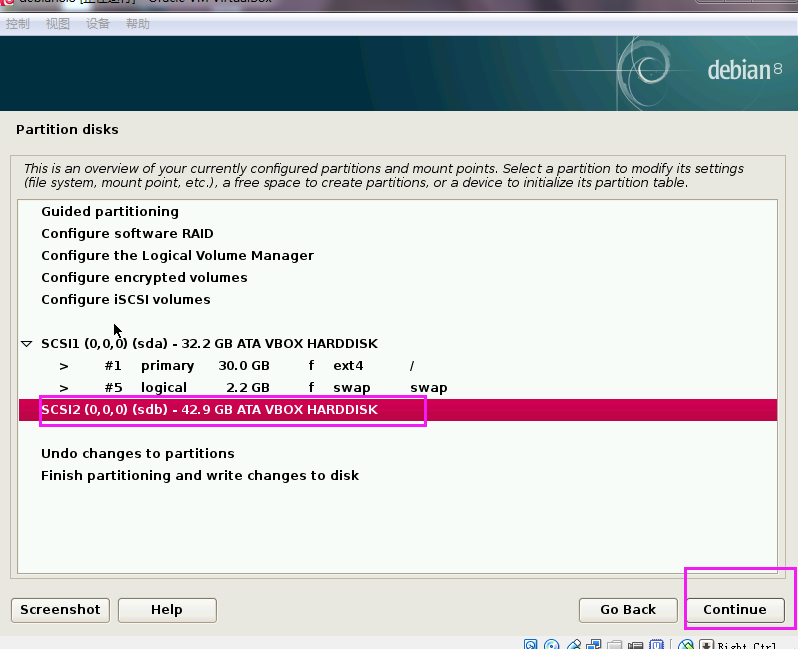
(25)选中第一块硬盘,continue;
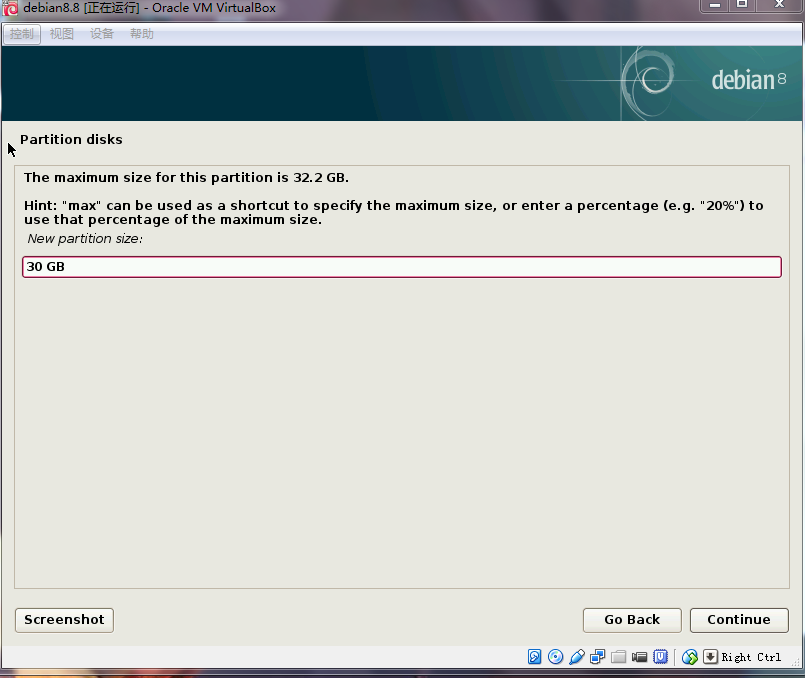
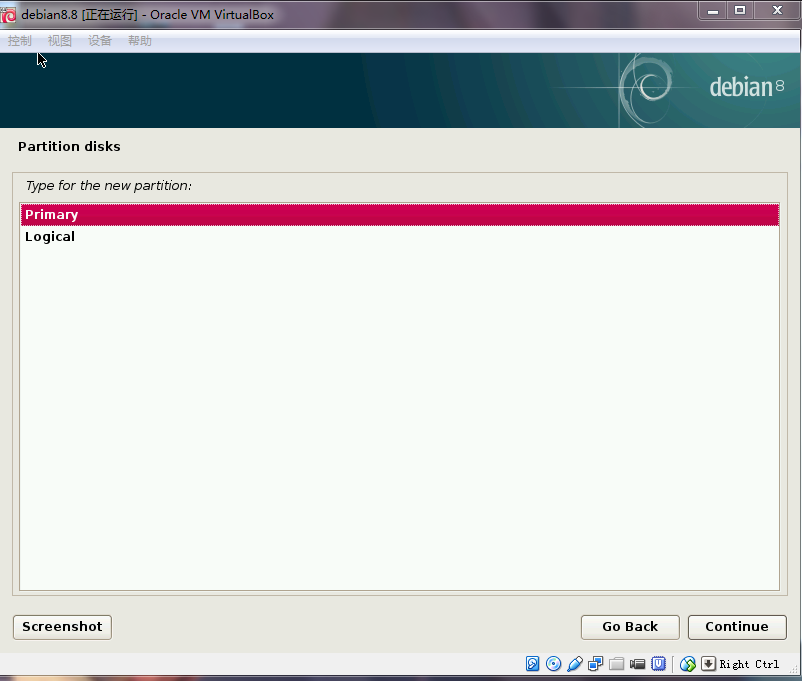
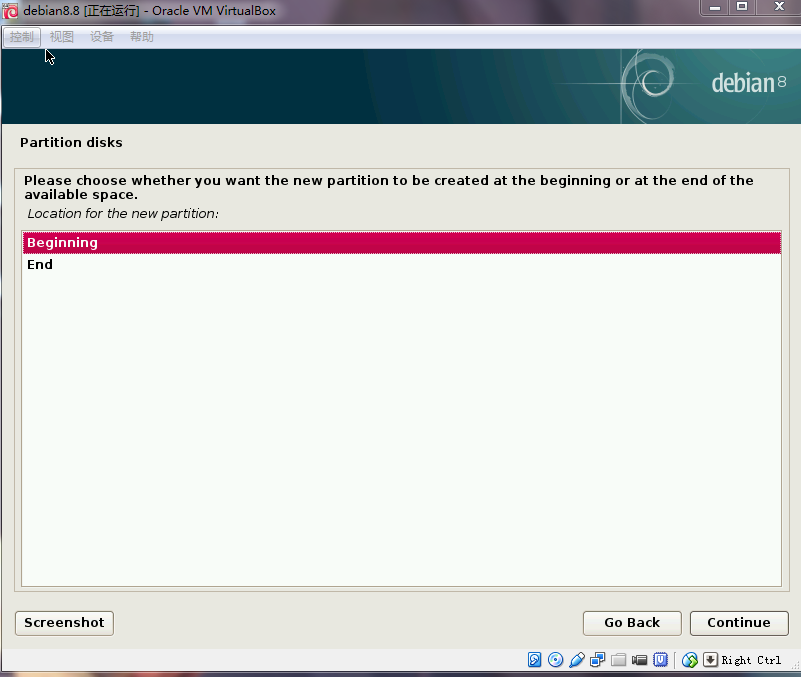
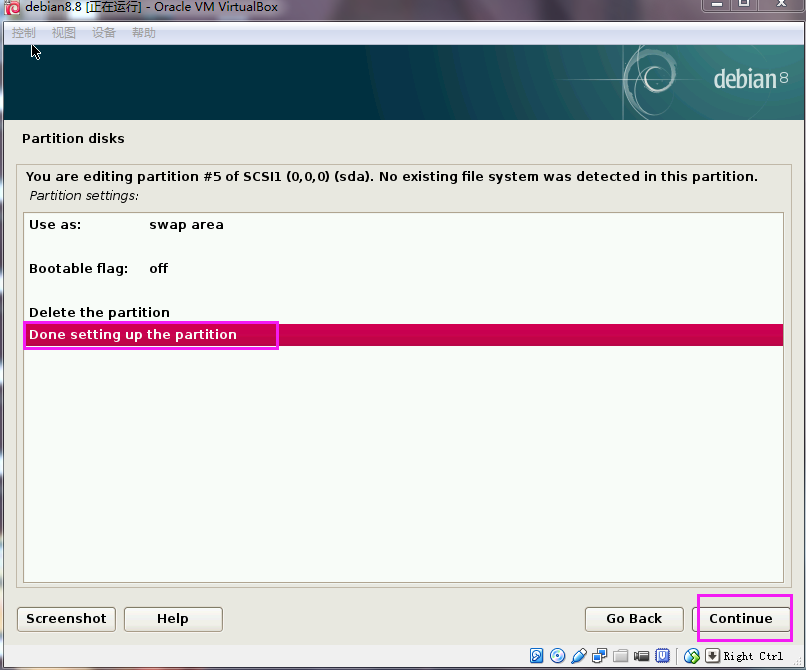
(26)分配空间为30GB;Primary;Begining;
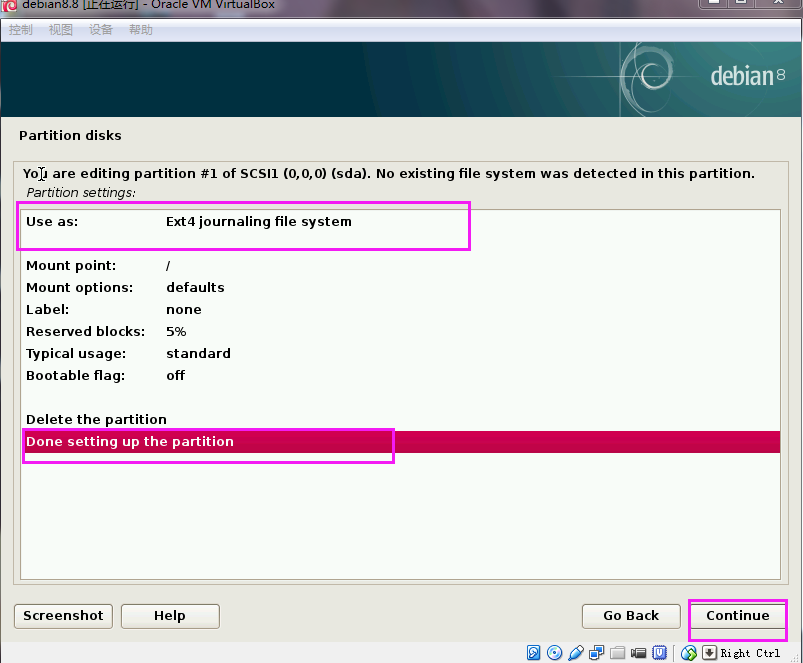
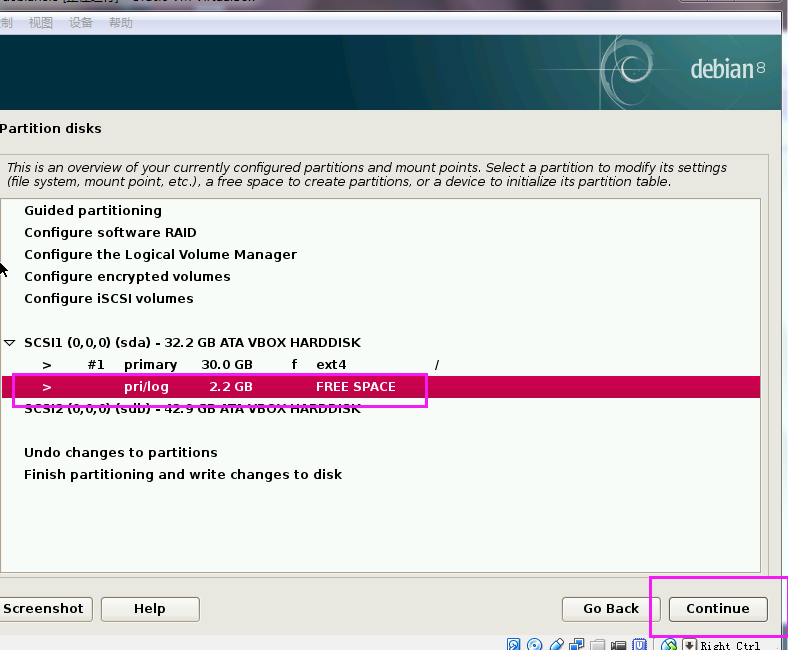
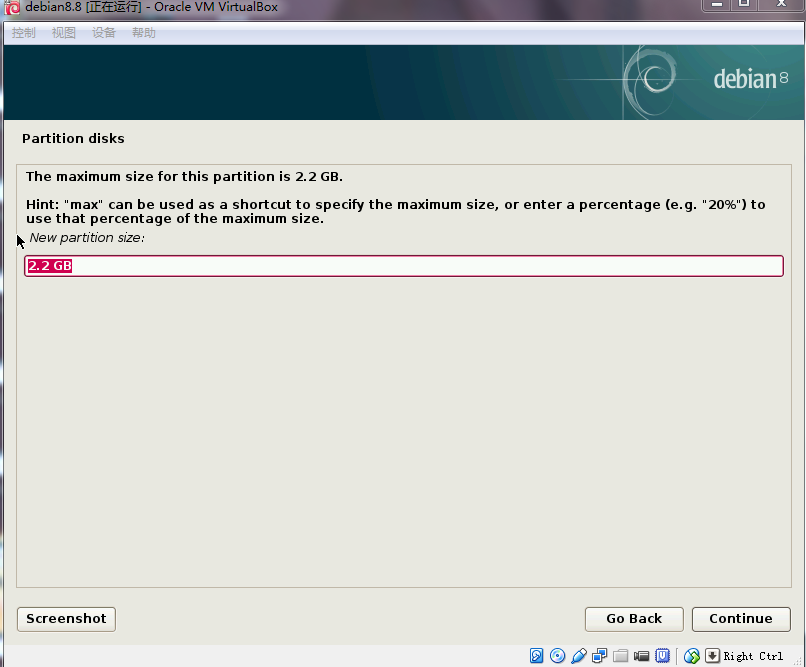
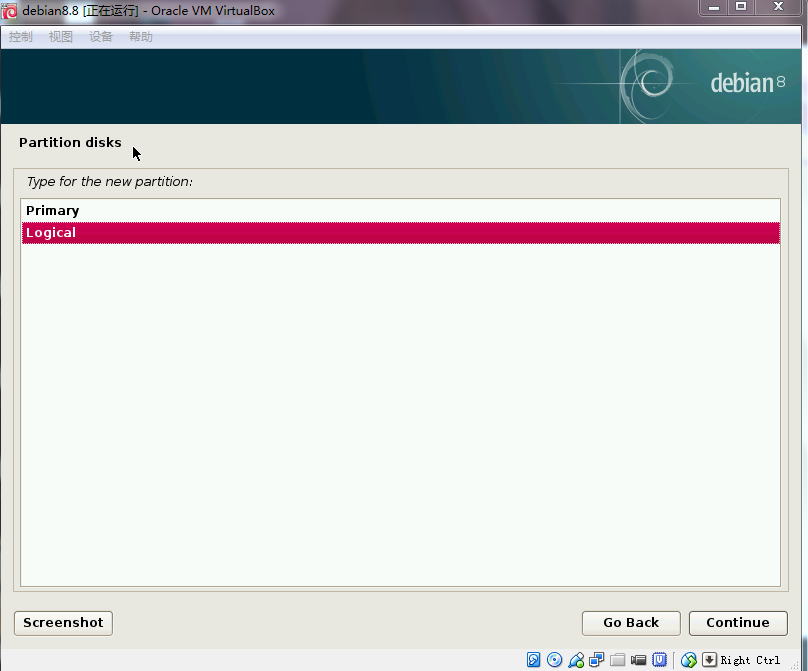
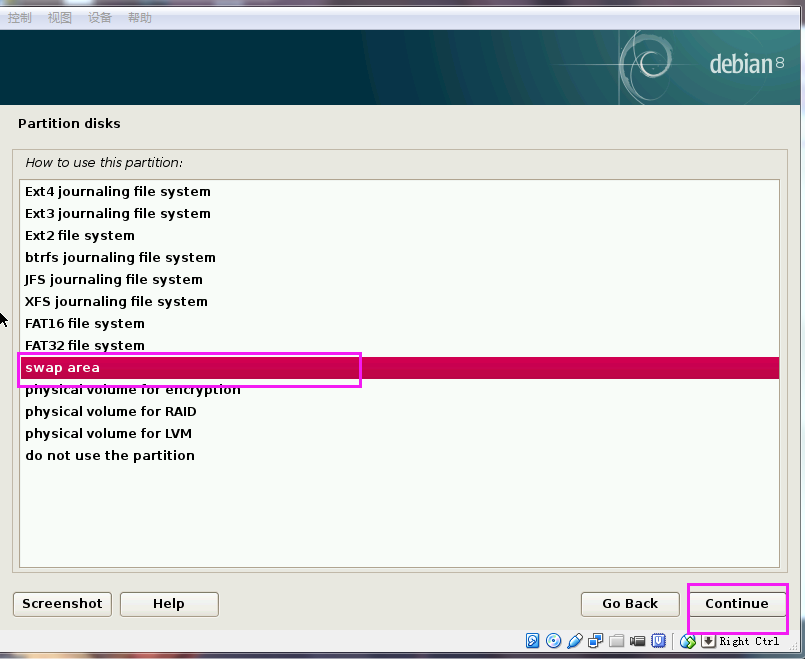
(27)剩余2.2GB全部分配;Logical;确保Use as: swap;
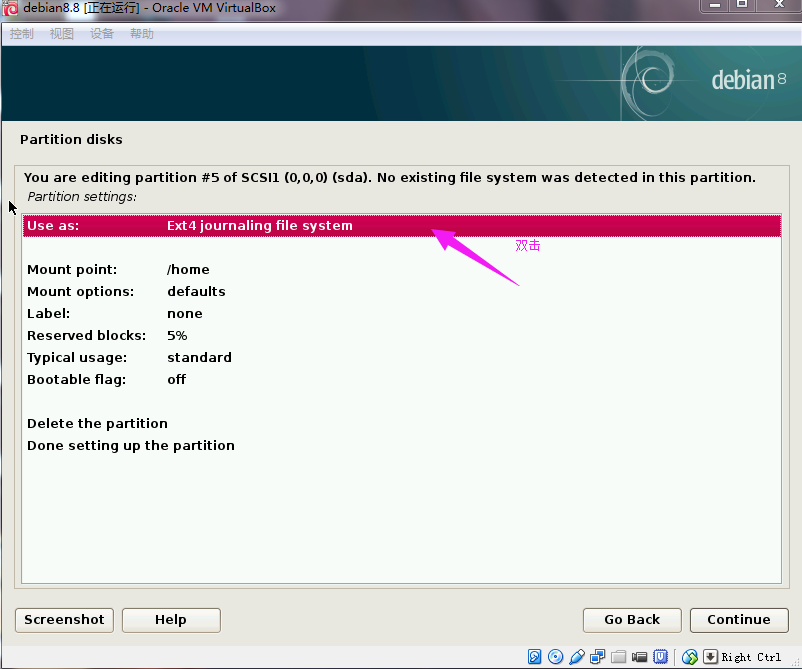
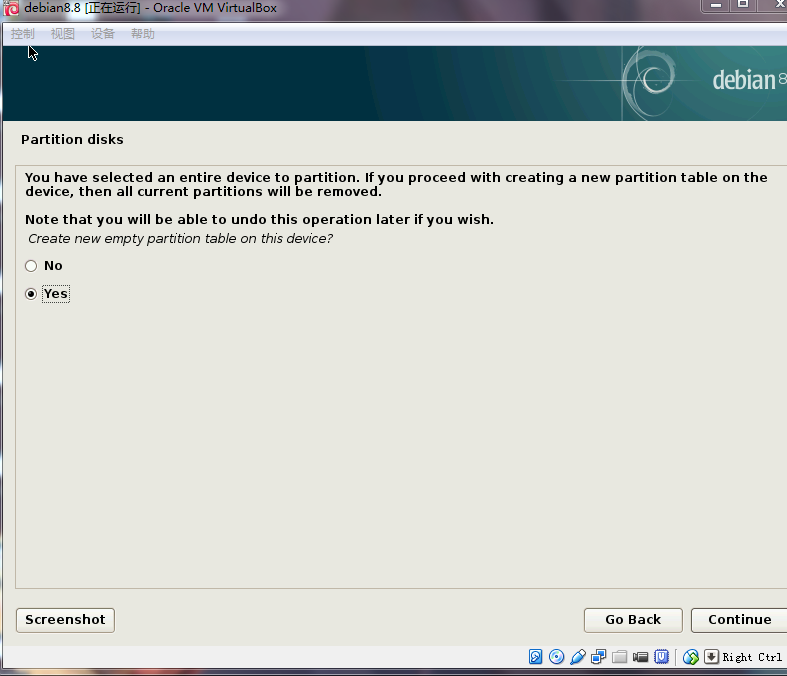
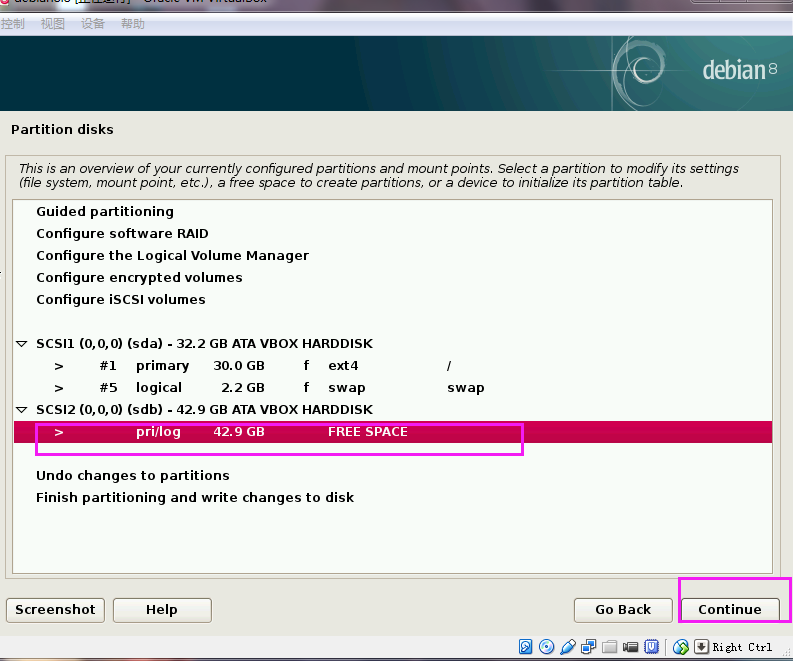
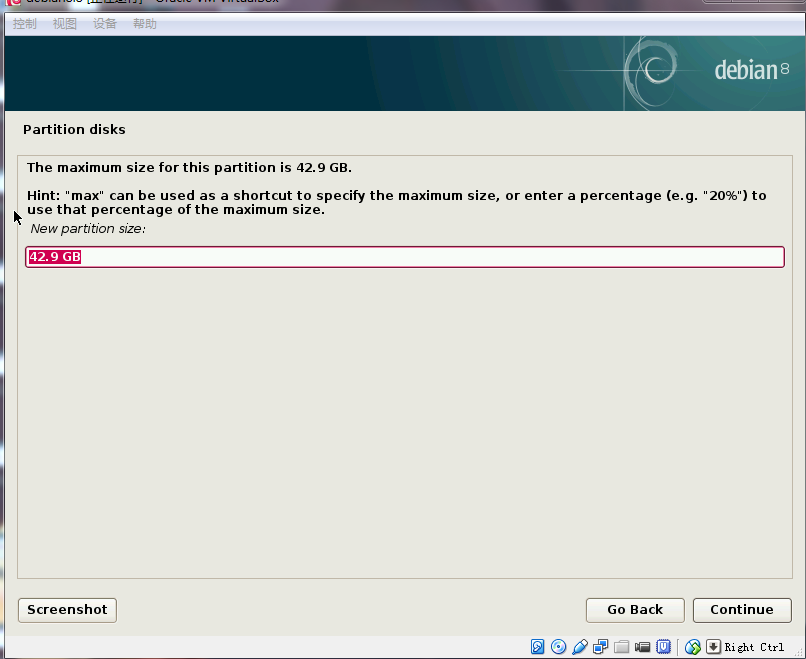
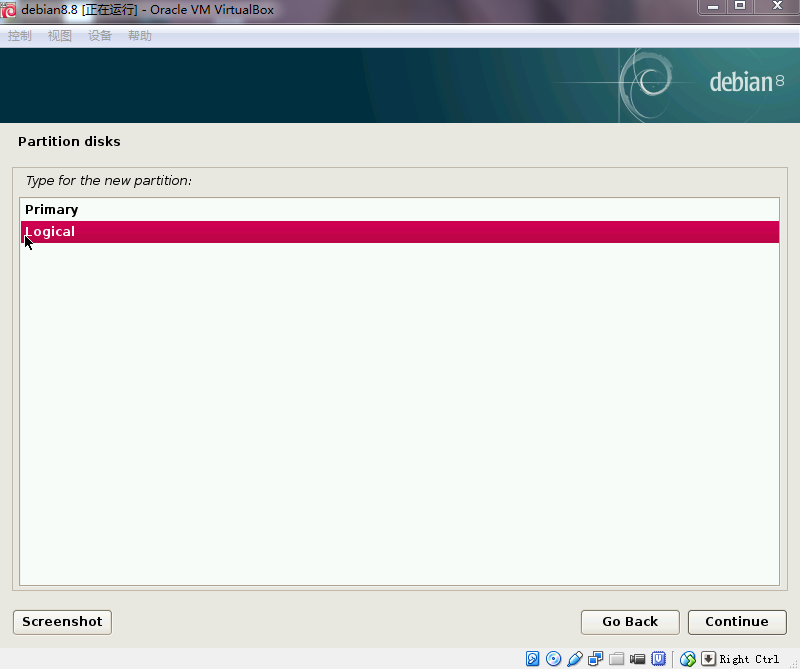
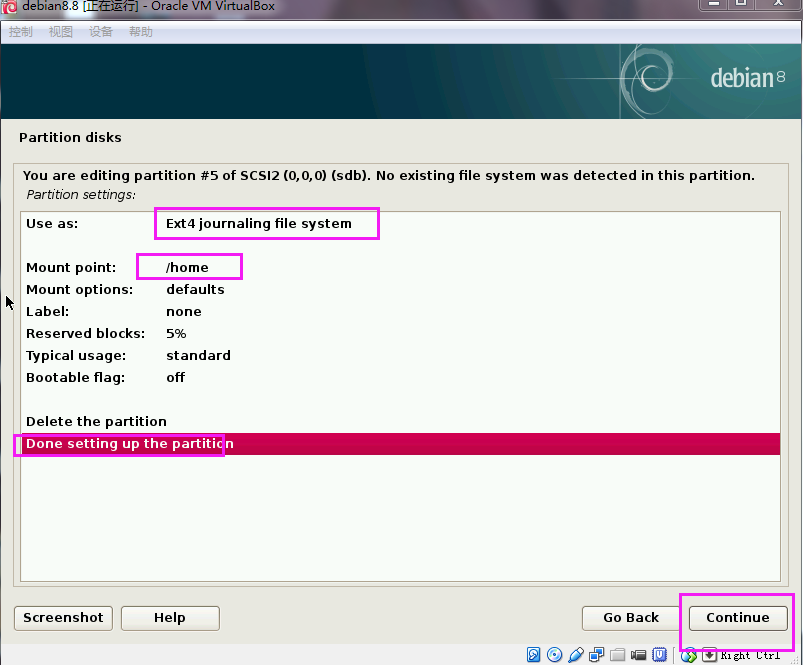
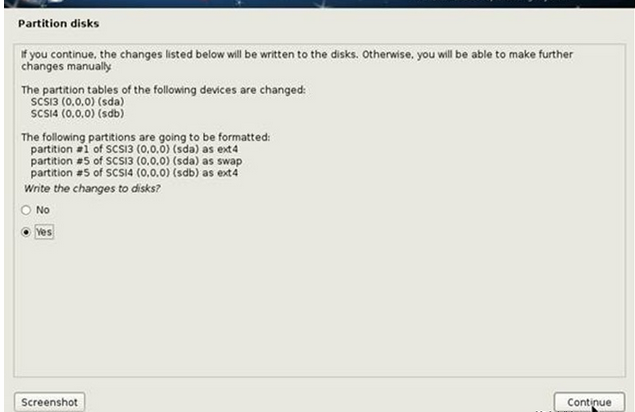
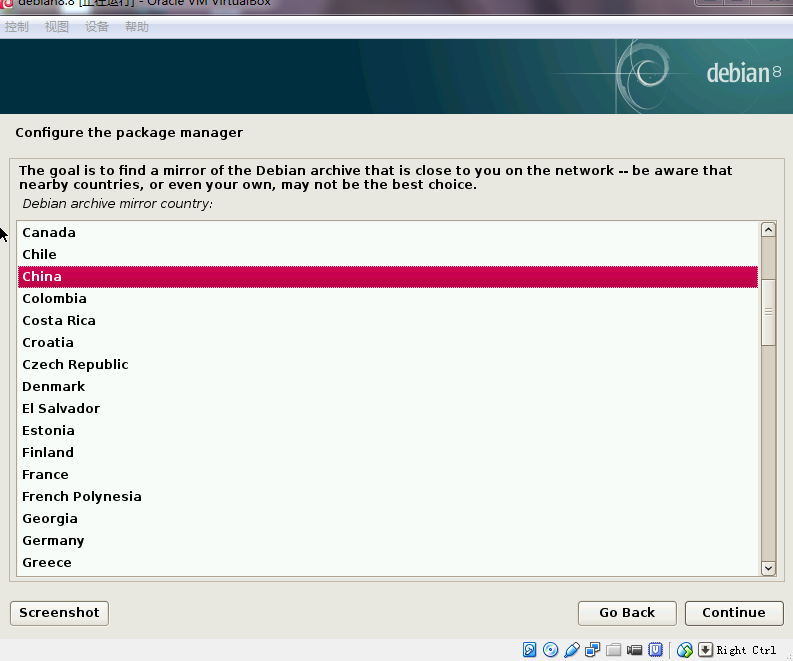
(28)选中第二块硬盘;42.9GB;Logical;确保EX4,挂靠为/home;
(29)确定安装源的位置China,建议ftp.cn.debian.org;
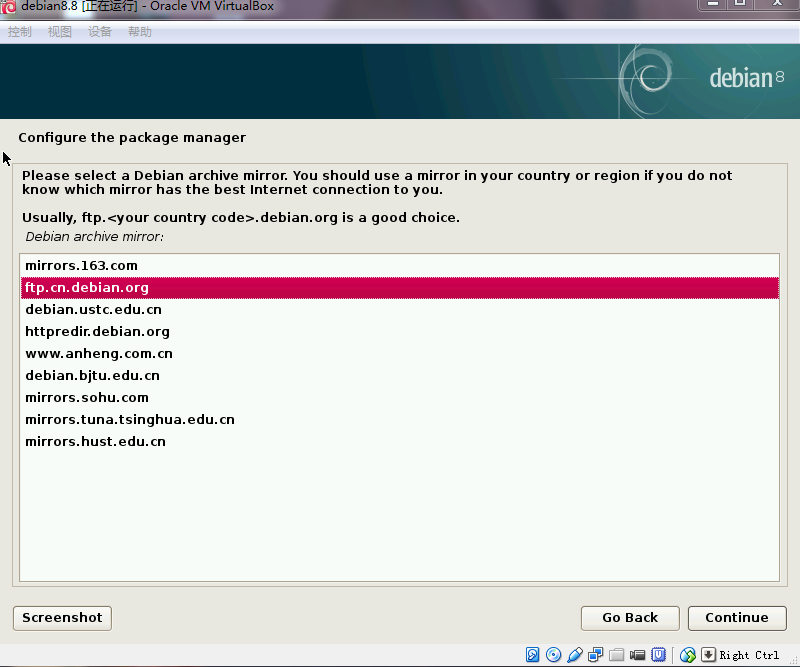
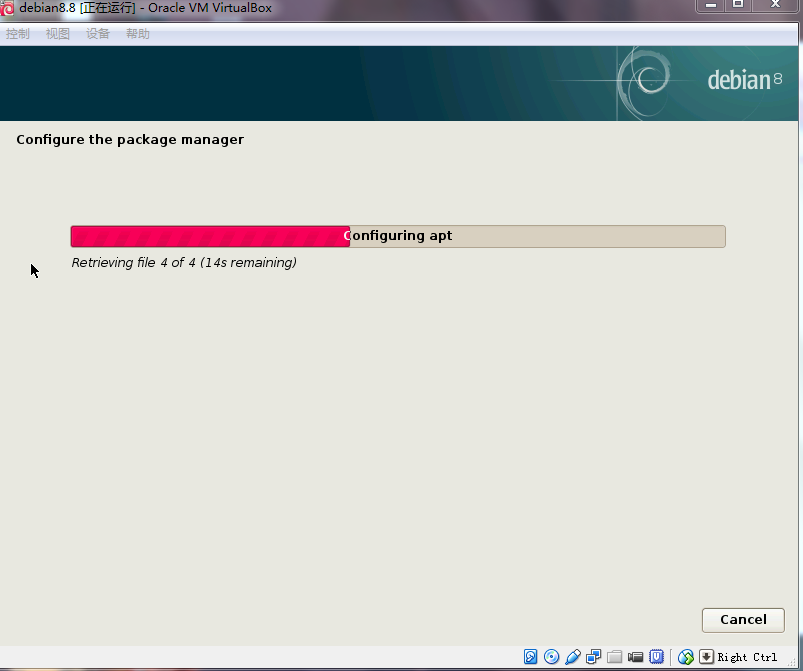
(30)pro X,Y暂时留白,后期根据需要个人进行设置;
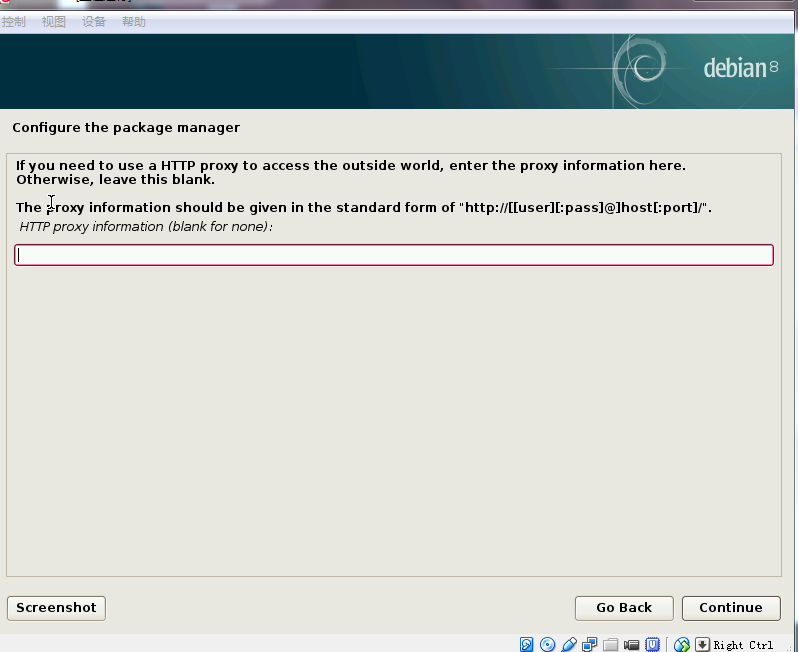
(31)考虑后期要远程链接,建议SSH勾上;
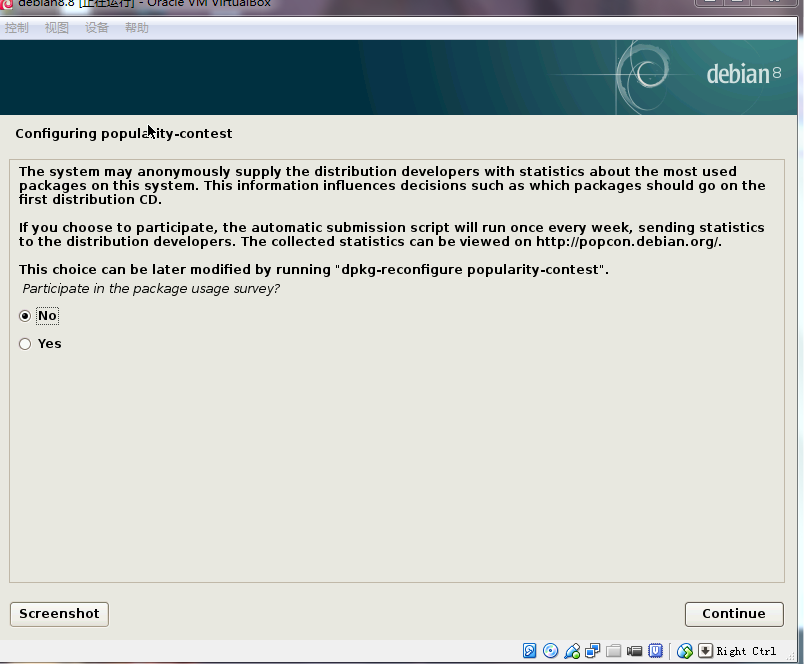
(32)选择Grub挂载硬盘,选择根目录为主的sda硬盘;
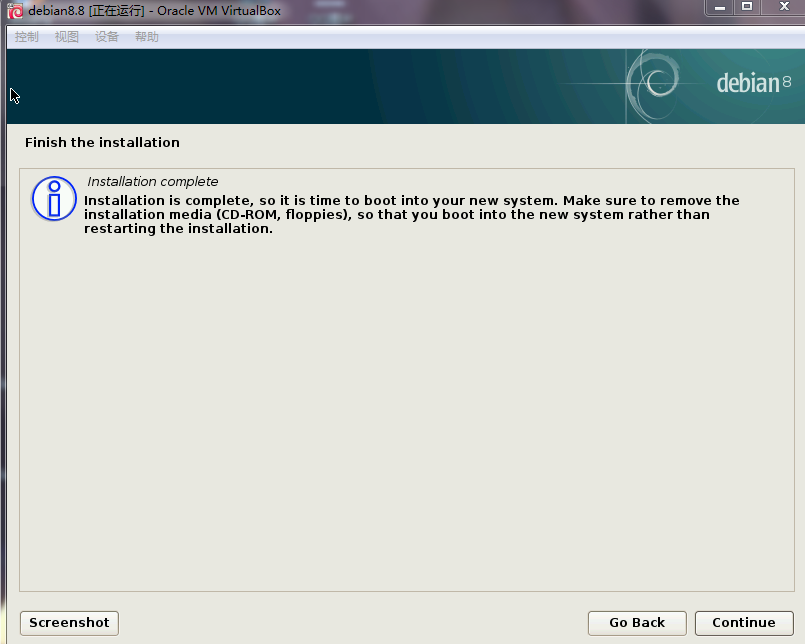
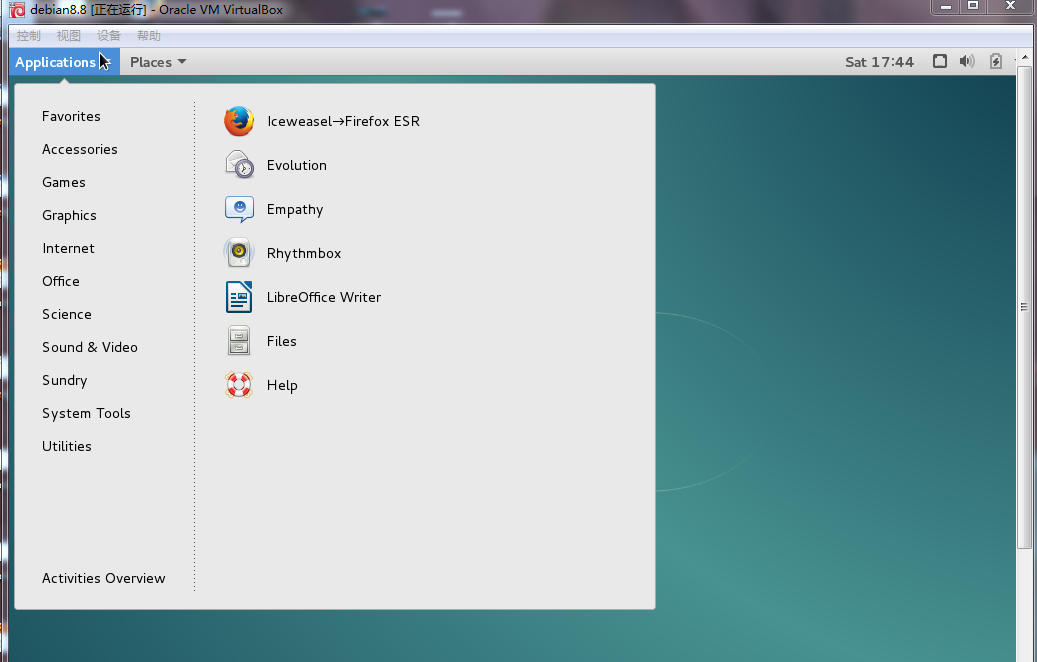
(32)最后重新启动,进入可视化界面登陆;
查看全部
【参考: http://www.cnblogs.com/zhangkaimin/p/4213578.html 】
(1)通过官网下载最新版本的iso;https://www.debian.org/distrib/
(2)新建一个文件夹存放建立的虚拟硬盘;
(3)打开VirtualBox,新建,输入虚拟机的名称,下一步;
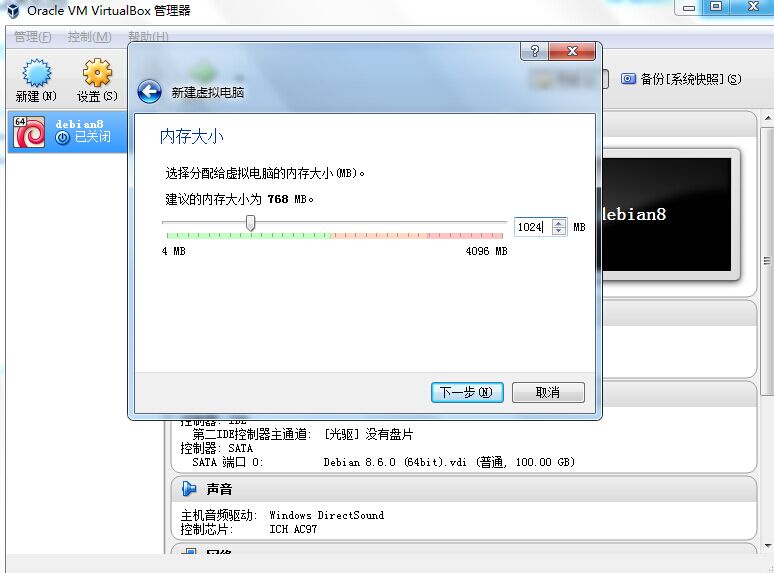
(4)分配内存:1024,下一步;
(5)不添加虚拟硬盘,创建;
(6)继续;
(7)选中新建的系统,点击选项框的设置,选中“存储”选项卡;
(8)选择创建虚拟硬盘;
(9)选择VDI,下一步;
(10)动态分配,下一步;
(11)设定存储VDI位置,这里为刚新建文件夹,修改新建VDI名字为“boot.VDI”,大小为30GB;
(12)同样的方式新建另外一块虚拟硬盘,存储位置刚新建文件夹,名字为“home.VDI”,大小为40GB;
(13)选择光盘,为官网下载的系统ISO;
(14)确定后,双击启动系统,选择“Graphical install”,Enter键;
(15)语言建议默认English;
(16)地理位置HongKong;
(17)键盘默认American English;
(18)Hostname:debian(可自行设置);
(19)Domain name:debian
(20)Hostname的密码;
(21)新的用户账号:osboxes(可自行设置);
(22)用户账号;
(23)用户账号的密码;
(24)分区选中Manual;
(25)选中第一块硬盘,continue;
(26)分配空间为30GB;Primary;Begining;
(27)剩余2.2GB全部分配;Logical;确保Use as: swap;
(28)选中第二块硬盘;42.9GB;Logical;确保EX4,挂靠为/home;
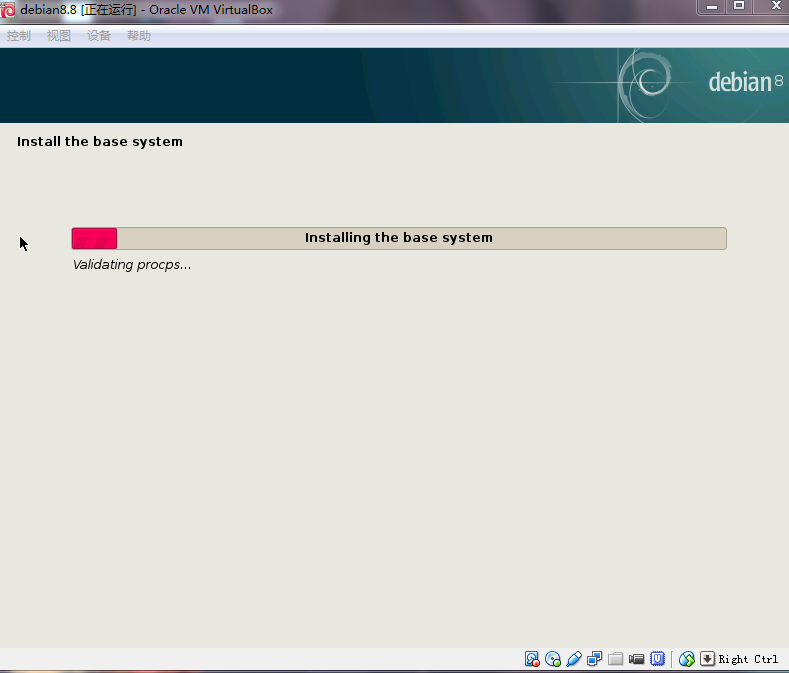
(29)确定安装源的位置China,建议ftp.cn.debian.org;
(30)pro X,Y暂时留白,后期根据需要个人进行设置;
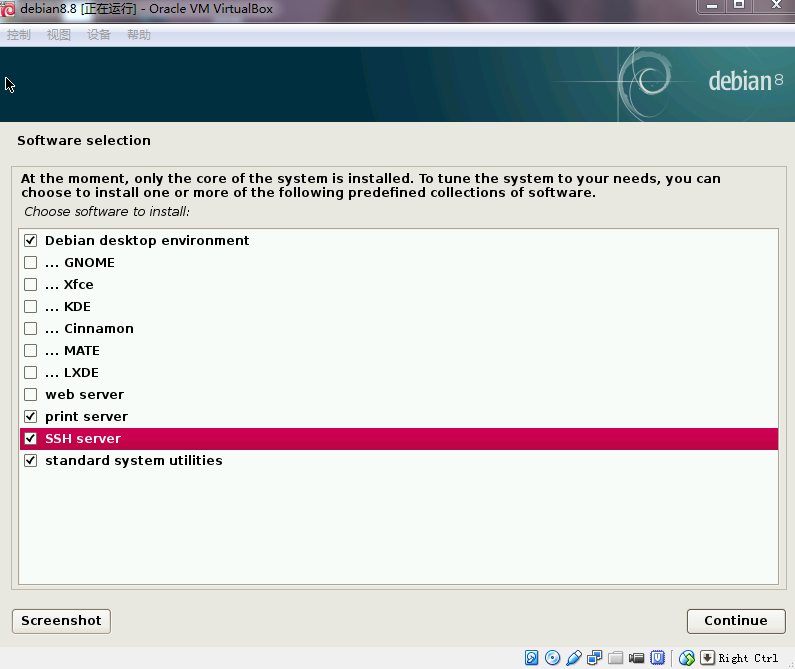
(31)考虑后期要远程链接,建议SSH勾上;
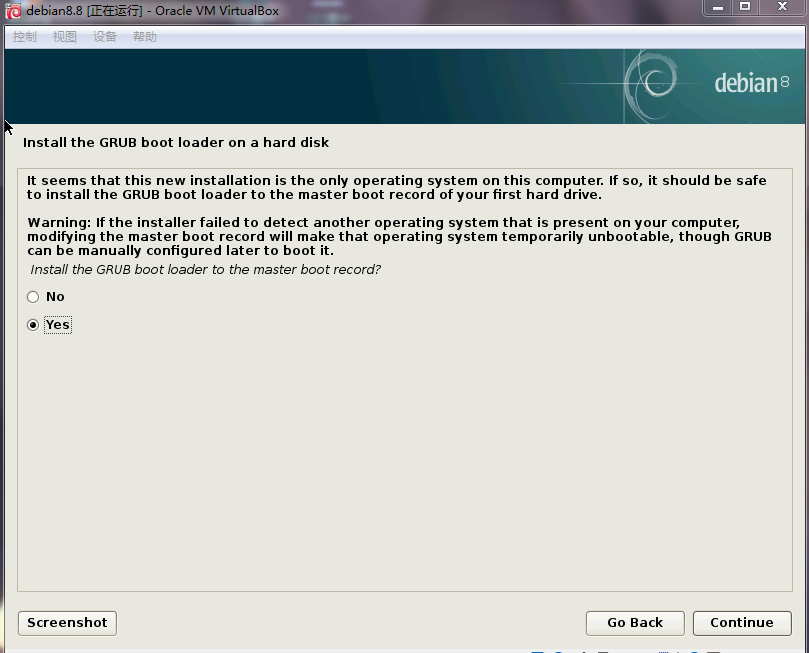
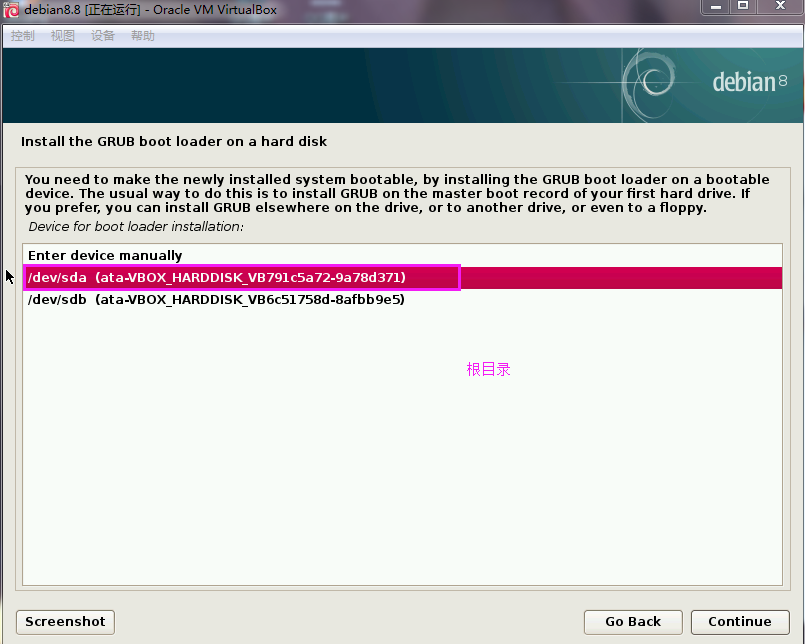
(32)选择Grub挂载硬盘,选择根目录为主的sda硬盘;
(32)最后重新启动,进入可视化界面登陆;
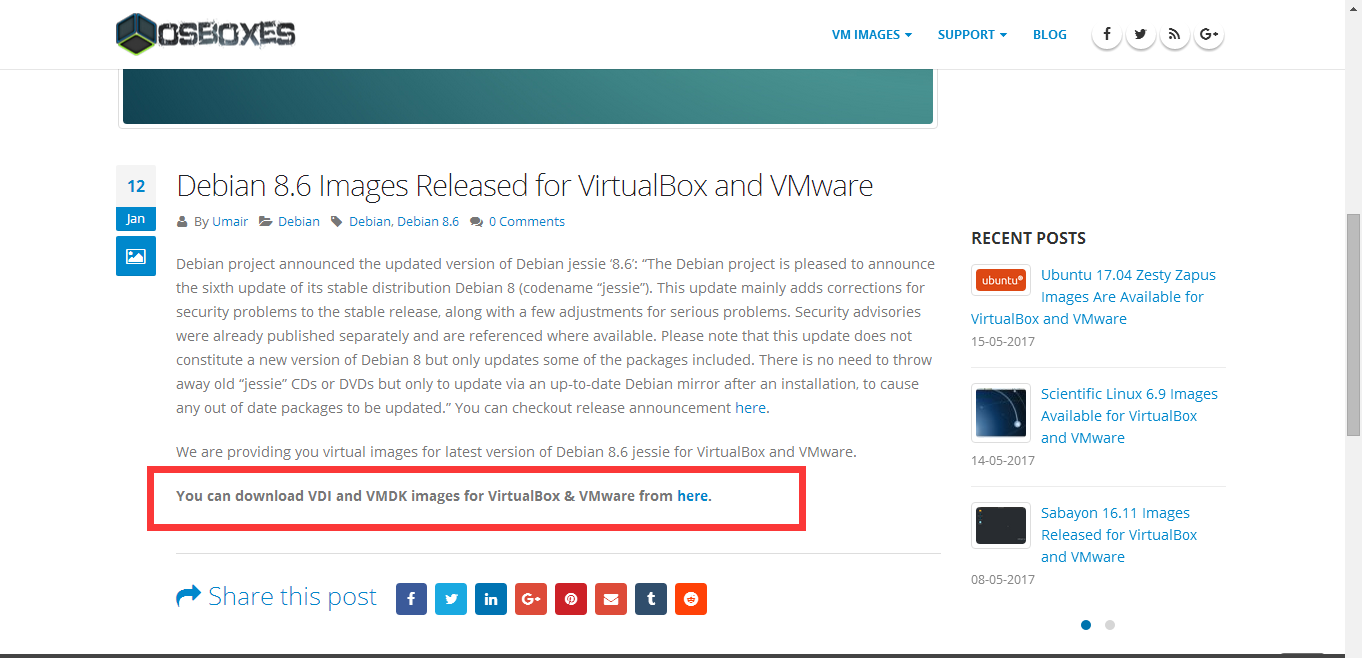
在VirtualBox安装debian8.6系统的方法(简易版)
追着萝卜的驴 发表了文章 • 0 个评论 • 4711 次浏览 • 2017-05-20 11:35
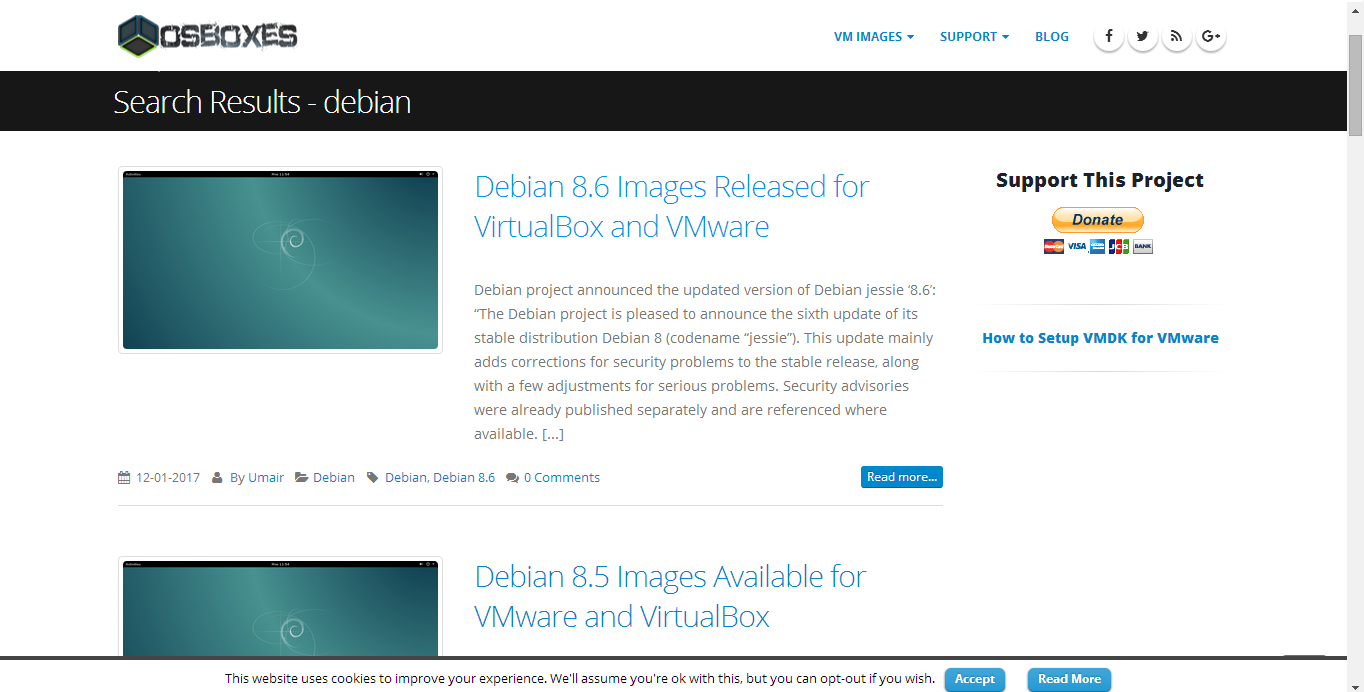
官网: http://www.osboxes.org/ 安装向导: http://www.osboxes.org/guide/
根据虚拟机的软件和要安装的linux系统进行选择:
本机使用的是VirtualBox5.0.40版本,系统是osboxes提供的debian8.6镜像;
1.1进入官网,在左上角搜索debian;
1.2选择最新版本的镜像8.6;
1.3下拉点击下载页面;
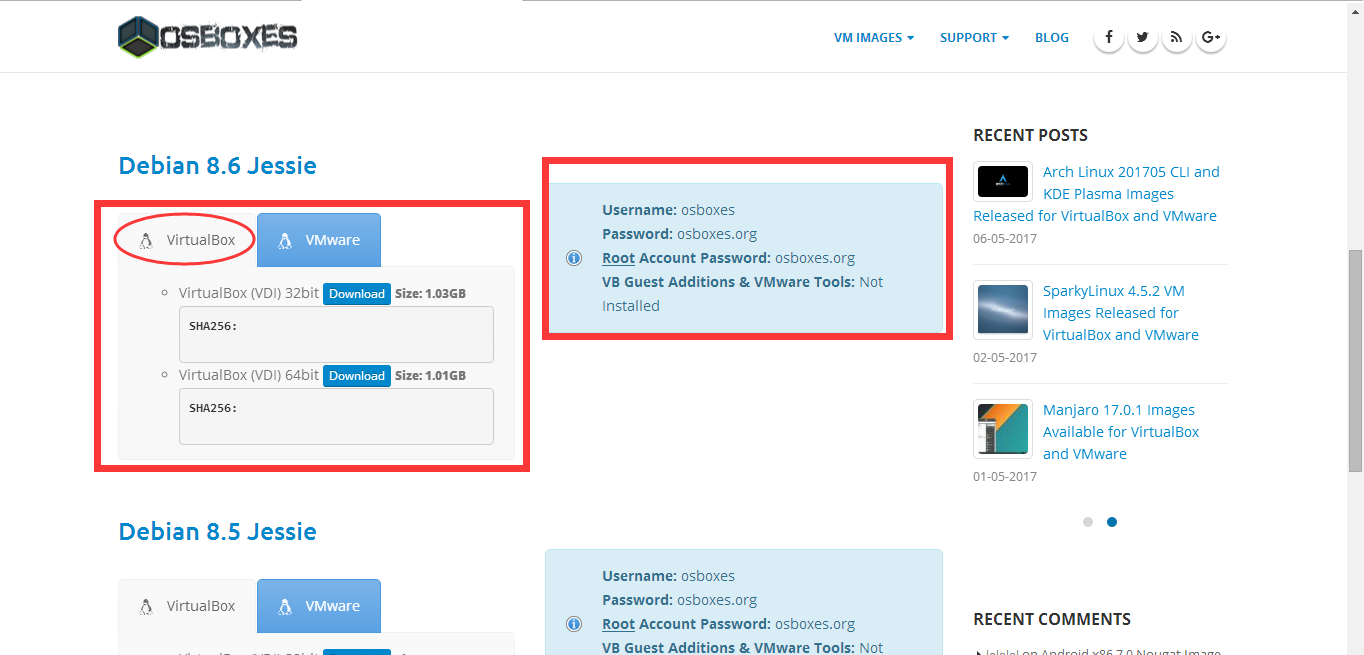
1.4根据虚拟机版本和电脑系统版本选择下载的镜像;
注意点:
(1)右红框为该系统的【日常用户账号,登陆密码】【管理员账号,登陆密码】;
(2)在安装完成后首次登陆系统的账号,后续可因需要个人进行修改密码;
(3)登陆需使用日常用户账号登陆,再通过“su -”命令切换至root账号;
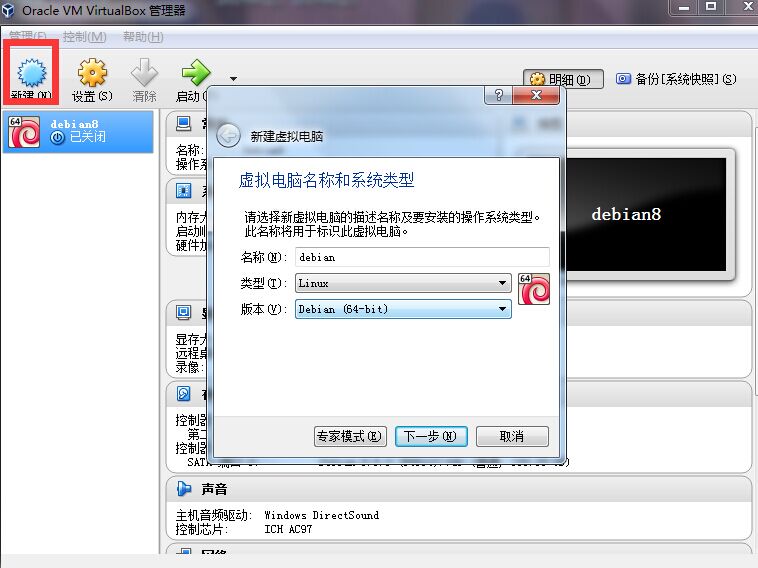
1.5下载完成后,打开虚拟机进行首次安装,点击新建,弹出“新建虚拟电脑”,输入系统名称后,版本和类型会自动更换为相应的信息,如错误,可自行选择,此处输入debian;
1.6设定虚拟内存,设定1024就足够了;
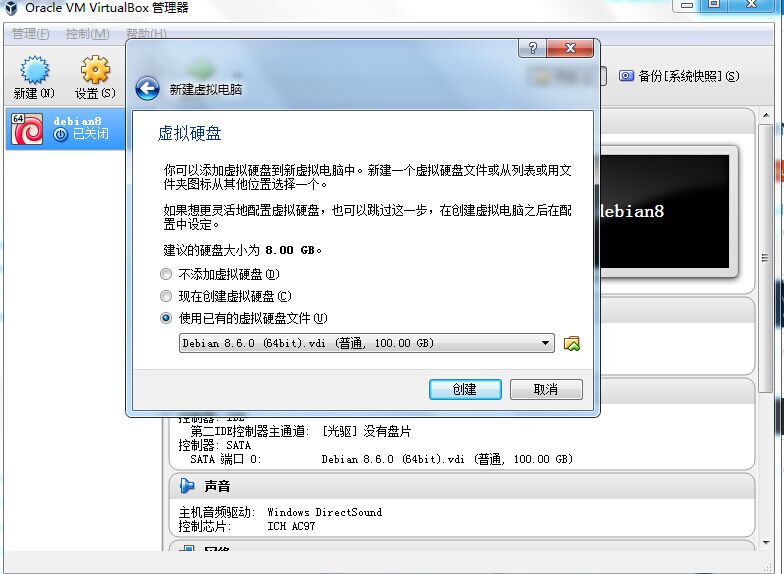
1.7选择使用已有的虚拟硬盘软件,选中刚下载的“debian镜像文件,点击创建”
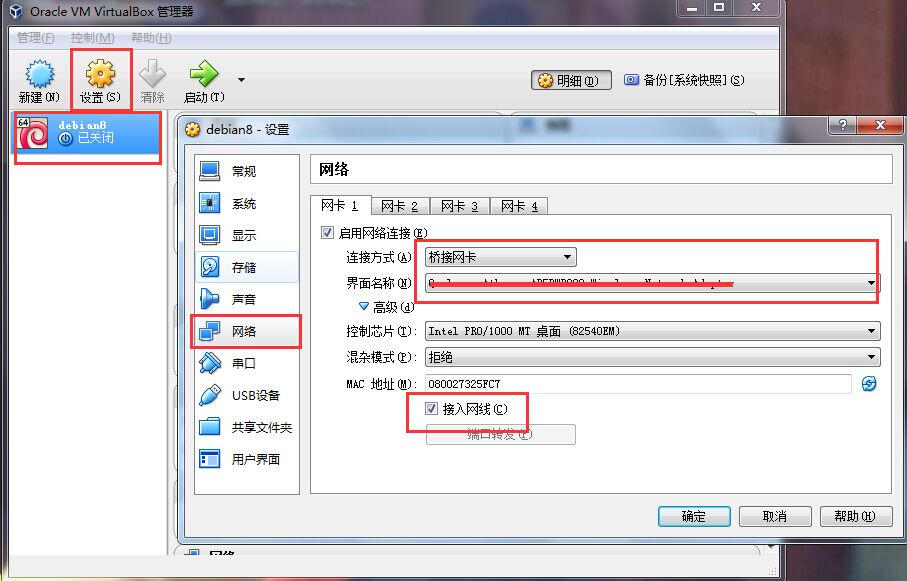
1.8设定网络链接,选中debian,点击设置,在弹出的对话框中,选中网络选项,设置为“桥接方式”,网卡为“接了网线则为有线网卡,无线则为无线网卡”,下方的接入网线必选;
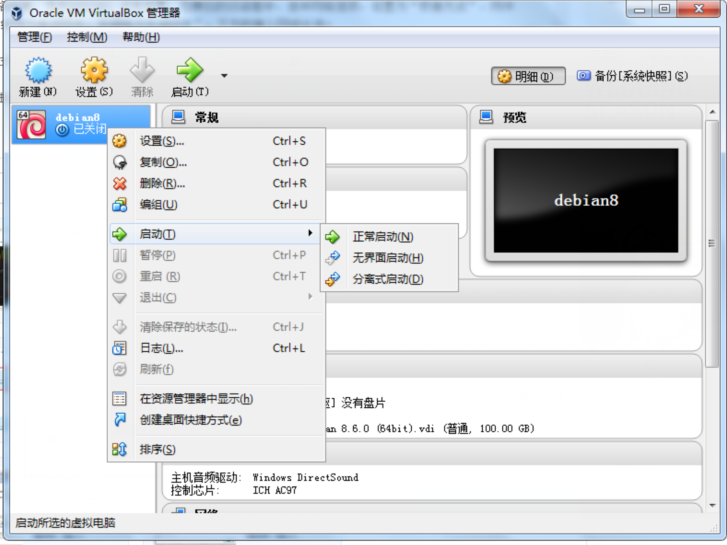
1.9之后双击直接启动虚拟机,也可通过虚拟机的右键选择启动选项;
2.0以上简易版安装完毕
查看全部
官网: http://www.osboxes.org/ 安装向导: http://www.osboxes.org/guide/
根据虚拟机的软件和要安装的linux系统进行选择:
本机使用的是VirtualBox5.0.40版本,系统是osboxes提供的debian8.6镜像;
1.1进入官网,在左上角搜索debian;
1.2选择最新版本的镜像8.6;
1.3下拉点击下载页面;
1.4根据虚拟机版本和电脑系统版本选择下载的镜像;
注意点:
(1)右红框为该系统的【日常用户账号,登陆密码】【管理员账号,登陆密码】;
(2)在安装完成后首次登陆系统的账号,后续可因需要个人进行修改密码;
(3)登陆需使用日常用户账号登陆,再通过“su -”命令切换至root账号;
1.5下载完成后,打开虚拟机进行首次安装,点击新建,弹出“新建虚拟电脑”,输入系统名称后,版本和类型会自动更换为相应的信息,如错误,可自行选择,此处输入debian;
1.6设定虚拟内存,设定1024就足够了;
1.7选择使用已有的虚拟硬盘软件,选中刚下载的“debian镜像文件,点击创建”
1.8设定网络链接,选中debian,点击设置,在弹出的对话框中,选中网络选项,设置为“桥接方式”,网卡为“接了网线则为有线网卡,无线则为无线网卡”,下方的接入网线必选;
1.9之后双击直接启动虚拟机,也可通过虚拟机的右键选择启动选项;
2.0以上简易版安装完毕
安装VirtualBox
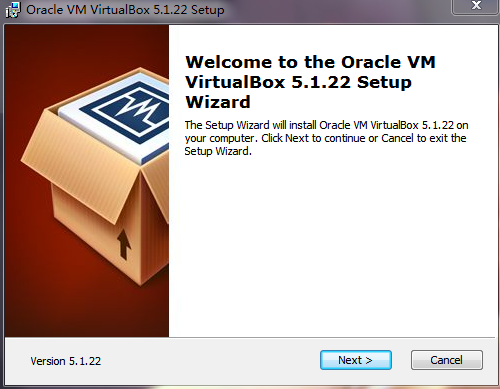
追着萝卜的驴 发表了文章 • 0 个评论 • 3667 次浏览 • 2017-05-20 10:26
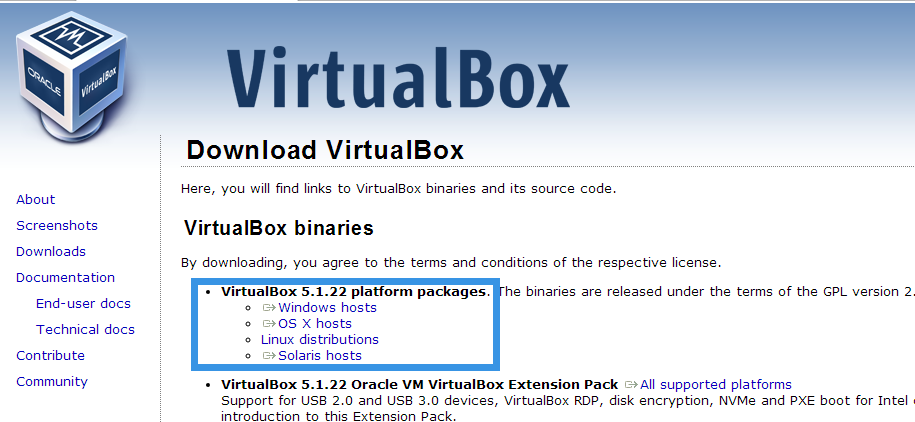
官网:https://www.virtualbox.org/ ; 截止文章发表的时间,目前最新的版本是5.1.2;但我下载最新版本使用时与系统有些配置出现冲突,因此退而求其次使用了5.0.40;
1.1根据自己所需要的版本进行下载,主机电脑是windows,因此下载windos版本;
1.2点击主程序进行安装,建议是一路next,只要修改安装的路径即可;
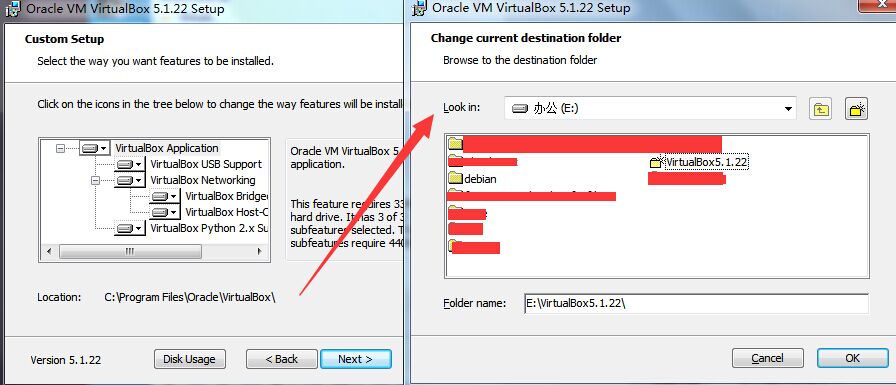
1.3修改安装路径,next;
1.4根据需要修改启动方式和快捷键,next;
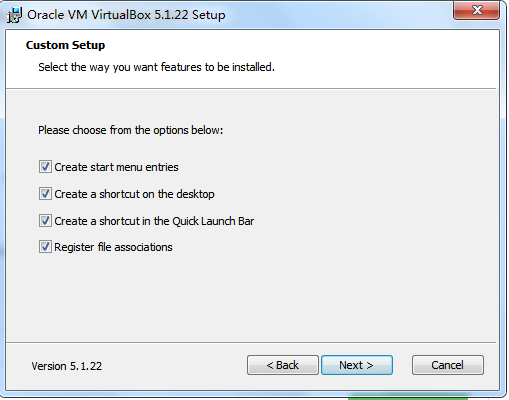
1.5安装时网络会暂时中断,Yes;
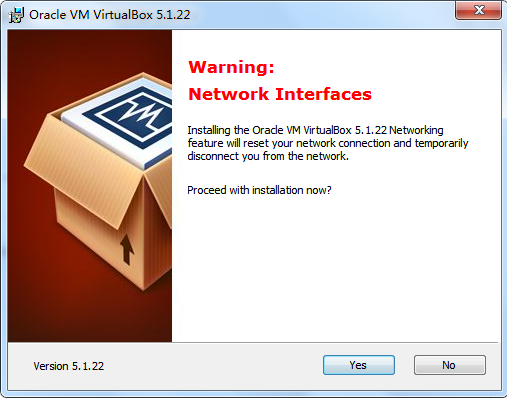
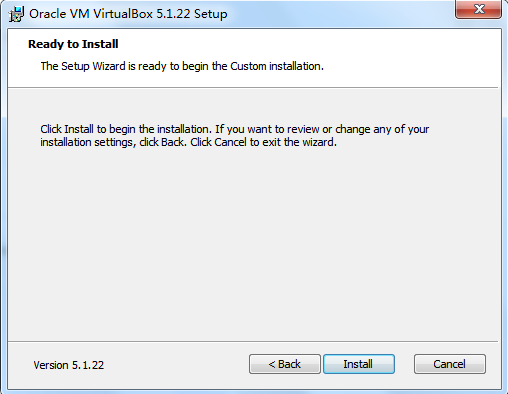
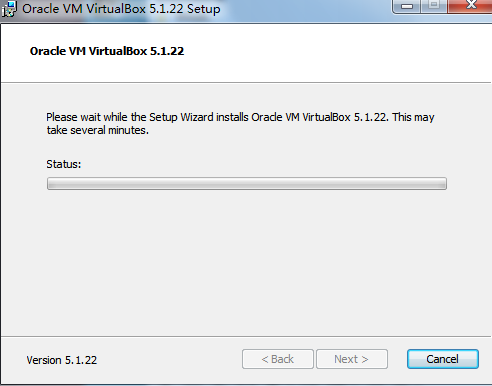
1.6点击install;
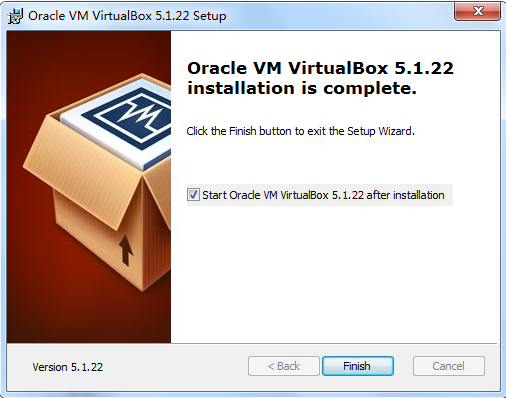
1.7完成安装,界面如下;
查看全部
官网:https://www.virtualbox.org/ ; 截止文章发表的时间,目前最新的版本是5.1.2;但我下载最新版本使用时与系统有些配置出现冲突,因此退而求其次使用了5.0.40;
1.1根据自己所需要的版本进行下载,主机电脑是windows,因此下载windos版本;
1.2点击主程序进行安装,建议是一路next,只要修改安装的路径即可;
1.3修改安装路径,next;
1.4根据需要修改启动方式和快捷键,next;
1.5安装时网络会暂时中断,Yes;
1.6点击install;
1.7完成安装,界面如下;
dataframe 将某列字符类型转为日期类型
树莓派 • 李魔佛 发表了文章 • 0 个评论 • 20886 次浏览 • 2017-04-29 22:05
注意,这里dataframe没有很智能地把你的日期字符转为datatime格式
而需要手工转换
df['my_date']=df['my_date'].astype('datetime64')
调用astype 函数就可以了。
查看 df.dtypes
就可以看到数据的类型发生了改变。
查看全部
注意,这里dataframe没有很智能地把你的日期字符转为datatime格式
而需要手工转换
df['my_date']=df['my_date'].astype('datetime64')
调用astype 函数就可以了。
查看 df.dtypes
就可以看到数据的类型发生了改变。
ubuntu 使用vnv连接win7 出现错误 Too many security failures
李魔佛 发表了文章 • 0 个评论 • 13591 次浏览 • 2017-02-23 17:28
在ubuntu中使用vnc连接win7, 出现错误:
Tue Feb 21 19:56:56 2017
CConn: connected to host 10.19.133.255 port 5900
CConnection: Server supports RFB protocol version 3.3
CConnection: Using RFB protocol version 3.3
main: Too many security failures
而另外一台win7由于之前设置过一次,ubuntu可以正常连接,不过这台新安装的vnc的机子就不行了。
出现上面的错误。
谷歌后得到里解决办法,亲测可以解决问题。
先到vnc server的设置选项中,选择专家模式中(Expect),在securityType中,把这个值改成RFB后,然后在再回到设置菜单的第一个安全选项,加密方式改成vnc,把windows登陆的方式清掉。如果不行,重复这个步骤多几次就可以了。
查看全部
在ubuntu中使用vnc连接win7, 出现错误:
Tue Feb 21 19:56:56 2017
CConn: connected to host 10.19.133.255 port 5900
CConnection: Server supports RFB protocol version 3.3
CConnection: Using RFB protocol version 3.3
main: Too many security failures
而另外一台win7由于之前设置过一次,ubuntu可以正常连接,不过这台新安装的vnc的机子就不行了。
出现上面的错误。
谷歌后得到里解决办法,亲测可以解决问题。
先到vnc server的设置选项中,选择专家模式中(Expect),在securityType中,把这个值改成RFB后,然后在再回到设置菜单的第一个安全选项,加密方式改成vnc,把windows登陆的方式清掉。如果不行,重复这个步骤多几次就可以了。
Ubuntu使用VNC连接windows错误: connection: no matahcing security types
李魔佛 发表了文章 • 0 个评论 • 6439 次浏览 • 2016-10-17 17:39
解决办法:
在windows下打开VNC Server的设置选项,选择“专家”,然后在右边的设置项中找到 Security Types, 手动把类型改成 RFB
然后确认,重新退出VNC,再重新连接,就可以了。
在win7+ubuntu12测试过,问题解决了。 查看全部
解决办法:
在windows下打开VNC Server的设置选项,选择“专家”,然后在右边的设置项中找到 Security Types, 手动把类型改成 RFB
然后确认,重新退出VNC,再重新连接,就可以了。
在win7+ubuntu12测试过,问题解决了。
git 比较两个分支的不同
李魔佛 发表了文章 • 0 个评论 • 6353 次浏览 • 2016-07-28 22:31
===================================
补充:找到答案:// >> 后加输出文件的路径、文件名和后缀名 git diff [branchA] [branchB] >>d:/diff/exportname.diff
查看全部
git diff [branchA] [branchB]用以上这个命令可输出两个分支的区别,但是不同的文件太多,在命令行查看不是很方便,想输出到文件中查看,不知道如何加参数?
===================================
补充:找到答案:// >> 后加输出文件的路径、文件名和后缀名 git diff [branchA] [branchB] >>d:/diff/exportname.diff
git冲突 解决
李魔佛 发表了文章 • 0 个评论 • 5320 次浏览 • 2016-07-28 22:06
在提交单个文件的时候出现这个错误.
意思是不能部分提交代码.
原因是git认为你有部分代码没有做好提交的准备,比如没有添加
解决方法是
1. 提交全部
git commit -a
2. 如果不想提交全部,那么可以通过添加 -i 选项
git commit file/to/path -i -m "merge"
上述情况一般出现在解决本地working copy冲突时出现, 本地文件修改(手工merge)完成后,要添加并提交,使得本地版本处于clean的状态.
这样以后git pull就不再会报错.
冲突处理
当两条分支对同一个文件的同一个文本块进行了不同的修改,并试图合并时,Git不能自动合并的,称之为冲突(conflict)。解决冲突需要人工处理。
比如当前在master分支,想把dev分支merge过来,结果产生了一个冲突,打开文件内容可以看到这么一个冲突:[复制代码]
<<<<<<< HEAD test in master ======= test in dev >>>>>>> dev
[复制代码]
<<<<<<<标记冲突开始,后面跟的是当前分支中的内容。
HEAD指向当前分支末梢的提交。
=======之后,>>>>>>>之前是要merge过来的另一条分支上的代码。
>>>>>>>之后的dev是该分支的名字。
对于简单的合并,手工编辑,然后去掉这些标记,最后像往常的提交一样先add再commit即可。 查看全部
在提交单个文件的时候出现这个错误.
意思是不能部分提交代码.
原因是git认为你有部分代码没有做好提交的准备,比如没有添加
解决方法是
1. 提交全部
git commit -a
2. 如果不想提交全部,那么可以通过添加 -i 选项
git commit file/to/path -i -m "merge"
上述情况一般出现在解决本地working copy冲突时出现, 本地文件修改(手工merge)完成后,要添加并提交,使得本地版本处于clean的状态.
这样以后git pull就不再会报错.
冲突处理
当两条分支对同一个文件的同一个文本块进行了不同的修改,并试图合并时,Git不能自动合并的,称之为冲突(conflict)。解决冲突需要人工处理。
比如当前在master分支,想把dev分支merge过来,结果产生了一个冲突,打开文件内容可以看到这么一个冲突:[复制代码]
<<<<<<< HEAD test in master ======= test in dev >>>>>>> dev
[复制代码]
<<<<<<<标记冲突开始,后面跟的是当前分支中的内容。
HEAD指向当前分支末梢的提交。
=======之后,>>>>>>>之前是要merge过来的另一条分支上的代码。
>>>>>>>之后的dev是该分支的名字。
对于简单的合并,手工编辑,然后去掉这些标记,最后像往常的提交一样先add再commit即可。
SQL 笔记 (新人会遇到的坑)
李魔佛 发表了文章 • 0 个评论 • 3263 次浏览 • 2016-07-18 22:31
这里记录下来,说不定除了能够提醒自己,还能够帮助别人。
1. SQL的表名命名规则跟C,C++的变量命名规则一样,只能包含数字,字母,下划线。 而且不能够以数字开头。
(之前曾经很傻的用日期作为表名,结果一堆报错的。
如果硬要用日期,不妨在前面放一个下划线。
)
查看全部
linux locate 搜索挂载的分区文件
李魔佛 发表了文章 • 0 个评论 • 3292 次浏览 • 2016-07-07 11:17
可以修改updatedb的配置文件来修改sudo gedit /etc/updatedb.conf
把文件中的PRUNEPATHS="/tmp /var/spool /media /home/.ecryptfs"
/media 去掉就可以了。
这个参数是设置忽略哪些查找的路径。
查看全部
一般linux的locate命令会忽略挂载分区的文件,所以即使你挂载分区后使用updatedb也没用。
可以修改updatedb的配置文件来修改
sudo gedit /etc/updatedb.conf
把文件中的
PRUNEPATHS="/tmp /var/spool /media /home/.ecryptfs"
/media 去掉就可以了。
这个参数是设置忽略哪些查找的路径。
win7下 设置 sourcetree full/fetch github文件
李魔佛 发表了文章 • 0 个评论 • 3951 次浏览 • 2016-06-23 16:48
因为之前win7系统安装的github使用的openssh来管理github的文件推送,所以在sourcetree中修改成openssh就可以了。
在Tool-> option, 在菜单下,把ssh key改成 openssh就可以了。 查看全部
因为之前win7系统安装的github使用的openssh来管理github的文件推送,所以在sourcetree中修改成openssh就可以了。
在Tool-> option, 在菜单下,把ssh key改成 openssh就可以了。
mac os x 下 git gui 好用的图形工具
李魔佛 发表了文章 • 0 个评论 • 5781 次浏览 • 2016-06-22 17:10
试了几个工具,最好用的还是sourcetree。 跨平台,win和mac都可以用,而且注册账号后还可以在云上同步。
https://www.sourcetreeapp.com/download/ 查看全部
试了几个工具,最好用的还是sourcetree。 跨平台,win和mac都可以用,而且注册账号后还可以在云上同步。
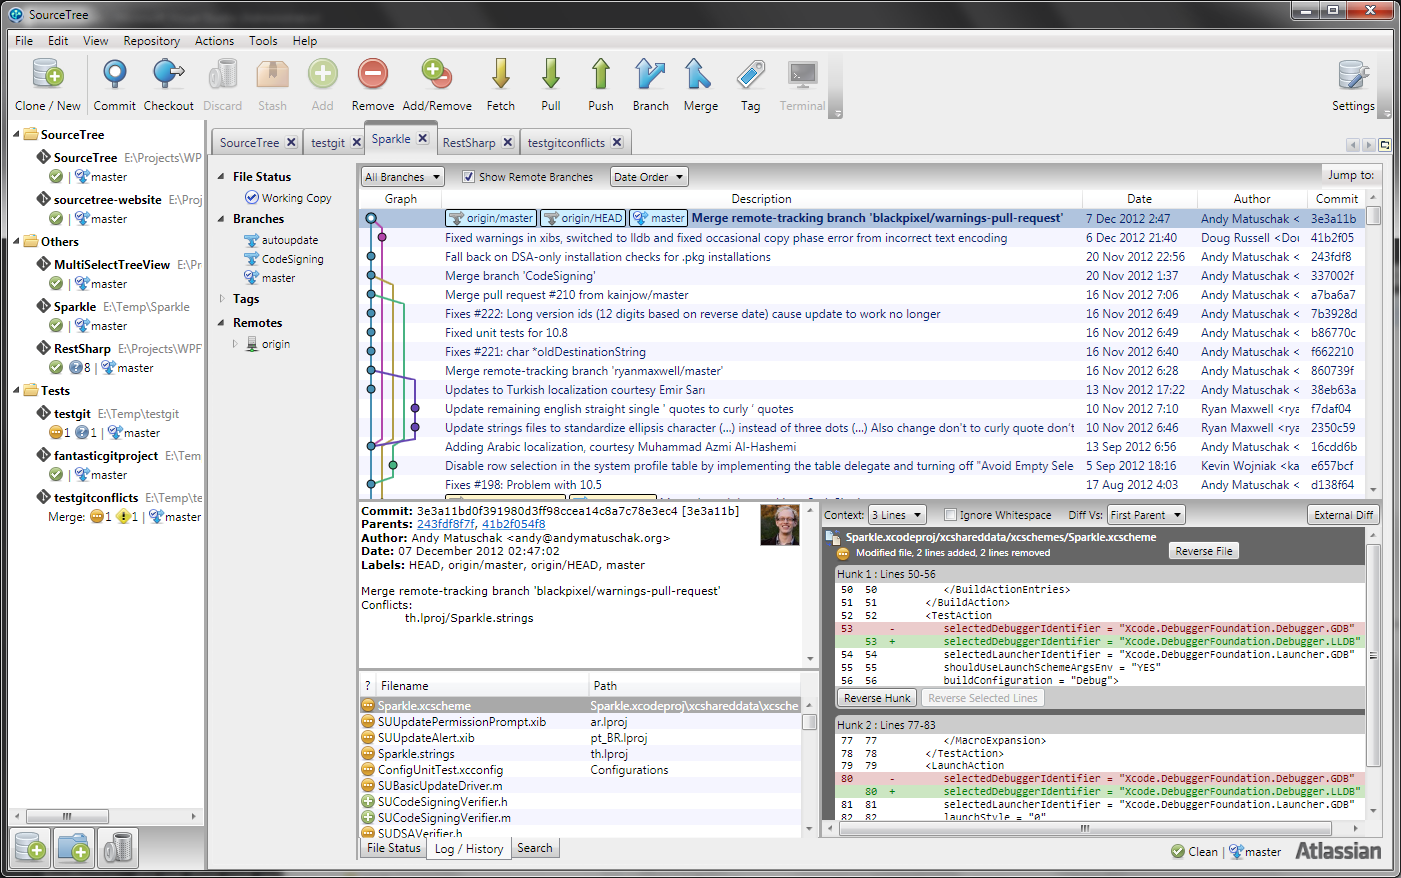

https://www.sourcetreeapp.com/download/
ubuntu git 彩色显示
李魔佛 发表了文章 • 0 个评论 • 3990 次浏览 • 2016-06-20 11:01
可以在终端里敲入以下命令


alec@PC$ git config --global color.status auto

alec@PC$ git config --global color.diff auto

alec@PC$ git config --global color.branch auto

alec@PC$ git config --global color.interactive auto 查看全部
可以在终端里敲入以下命令
alec@PC$ git config --global color.status auto
alec@PC$ git config --global color.diff auto
alec@PC$ git config --global color.branch auto
alec@PC$ git config --global color.interactive auto
linux目录跳转利器 z.sh
李魔佛 发表了文章 • 0 个评论 • 7665 次浏览 • 2016-06-17 17:32
浪费时间且效率低下。
推荐大家使用一个小脚本,可以快速切换目录,不需要经常cd了。
拷贝下面的代码,保存为z.sh,放在用户目录下,/home/xxxx, xxx为用户名, 然后 给予 777权限, chmod 777 z.sh
然后 修改 .bashrc 文件, vim ~/.bashrc
在文件的最后添加一句 source ~/z.sh
然后保存.bashrc
然后运行 source ~./bashrc , 然后就马上生效了。
然后你进入到某一个目录,比如 /home/user/build/data/bin/hello/, 运行 z
系统会纪录你的hello目录一次,
下一次在其他目录比如在/etc/apt/,如果要跳转到 /home/user/build/data/bin/hello/,
直接运行 z hello 就可以了。# Copyright (c) 2009 rupa deadwyler under the WTFPL license
# maintains a jump-list of the directories you actually use
#
# INSTALL:
# * put something like this in your .bashrc/.zshrc:
# . /path/to/z.sh
# * cd around for a while to build up the db
# * PROFIT!!
# * optionally:
# set $_Z_CMD in .bashrc/.zshrc to change the command (default z).
# set $_Z_DATA in .bashrc/.zshrc to change the datafile (default ~/.z).
# set $_Z_NO_RESOLVE_SYMLINKS to prevent symlink resolution.
# set $_Z_NO_PROMPT_COMMAND if you're handling PROMPT_COMMAND yourself.
# set $_Z_EXCLUDE_DIRS to an array of directories to exclude.
# set $_Z_OWNER to your username if you want use z while sudo with $HOME kept
#
# USE:
# * z foo # cd to most frecent dir matching foo
# * z foo bar # cd to most frecent dir matching foo and bar
# * z -r foo # cd to highest ranked dir matching foo
# * z -t foo # cd to most recently accessed dir matching foo
# * z -l foo # list matches instead of cd
# * z -c foo # restrict matches to subdirs of $PWD
[ -d "${_Z_DATA:-$HOME/.z}" ] && {
echo "ERROR: z.sh's datafile (${_Z_DATA:-$HOME/.z}) is a directory."
}
_z() {
local datafile="${_Z_DATA:-$HOME/.z}"
# bail if we don't own ~/.z and $_Z_OWNER not set
[ -z "$_Z_OWNER" -a -f "$datafile" -a ! -O "$datafile" ] && return
# add entries
if [ "$1" = "--add" ]; then
shift
# $HOME isn't worth matching
[ "$*" = "$HOME" ] && return
# don't track excluded directory trees
local exclude
for exclude in "${_Z_EXCLUDE_DIRS[@]}"; do
case "$*" in "$exclude*") return;; esac
done
# maintain the data file
local tempfile="$datafile.$RANDOM"
while read line; do
# only count directories
[ -d "${line%%\|*}" ] && echo $line
done < "$datafile" | awk -v path="$*" -v now="$(date +%s)" -F"|" '
BEGIN {
rank[path] = 1
time[path] = now
}
$2 >= 1 {
# drop ranks below 1
if( $1 == path ) {
rank[$1] = $2 + 1
time[$1] = now
} else {
rank[$1] = $2
time[$1] = $3
}
count += $2
}
END {
if( count > 9000 ) {
# aging
for( x in rank ) print x "|" 0.99*rank[x] "|" time[x]
} else for( x in rank ) print x "|" rank[x] "|" time[x]
}
' 2>/dev/null >| "$tempfile"
# do our best to avoid clobbering the datafile in a race condition
if [ $? -ne 0 -a -f "$datafile" ]; then
env rm -f "$tempfile"
else
[ "$_Z_OWNER" ] && chown $_Z_OWNER:$(id -ng $_Z_OWNER) "$tempfile"
env mv -f "$tempfile" "$datafile" || env rm -f "$tempfile"
fi
# tab completion
elif [ "$1" = "--complete" -a -s "$datafile" ]; then
while read line; do
[ -d "${line%%\|*}" ] && echo $line
done < "$datafile" | awk -v q="$2" -F"|" '
BEGIN {
if( q == tolower(q) ) imatch = 1
q = substr(q, 3)
gsub(" ", ".*", q)
}
{
if( imatch ) {
if( tolower($1) ~ tolower(q) ) print $1
} else if( $1 ~ q ) print $1
}
' 2>/dev/null
else
# list/go
while [ "$1" ]; do case "$1" in
--) while [ "$1" ]; do shift; local fnd="$fnd${fnd:+ }$1";done;;
-*) local opt=${1:1}; while [ "$opt" ]; do case ${opt:0:1} in
c) local fnd="^$PWD $fnd";;
h) echo "${_Z_CMD:-z} [-chlrtx] args" >&2; return;;
x) sed -i -e "\:^${PWD}|.*:d" "$datafile";;
l) local list=1;;
r) local typ="rank";;
t) local typ="recent";;
esac; opt=${opt:1}; done;;
*) local fnd="$fnd${fnd:+ }$1";;
esac; local last=$1; [ "$#" -gt 0 ] && shift; done
[ "$fnd" -a "$fnd" != "^$PWD " ] || local list=1
# if we hit enter on a completion just go there
case "$last" in
# completions will always start with /
/*) [ -z "$list" -a -d "$last" ] && cd "$last" && return;;
esac
# no file yet
[ -f "$datafile" ] || return
local cd
cd="$(while read line; do
[ -d "${line%%\|*}" ] && echo $line
done < "$datafile" | awk -v t="$(date +%s)" -v list="$list" -v typ="$typ" -v q="$fnd" -F"|" '
function frecent(rank, time) {
# relate frequency and time
dx = t - time
if( dx < 3600 ) return rank * 4
if( dx < 86400 ) return rank * 2
if( dx < 604800 ) return rank / 2
return rank / 4
}
function output(files, out, common) {
# list or return the desired directory
if( list ) {
cmd = "sort -n >&2"
for( x in files ) {
if( files[x] ) printf "%-10s %s\n", files[x], x | cmd
}
if( common ) {
printf "%-10s %s\n", "common:", common > "/dev/stderr"
}
} else {
if( common ) out = common
print out
}
}
function common(matches) {
# find the common root of a list of matches, if it exists
for( x in matches ) {
if( matches[x] && (!short || length(x) < length(short)) ) {
short = x
}
}
if( short == "/" ) return
# use a copy to escape special characters, as we want to return
# the original. yeah, this escaping is awful.
clean_short = short
gsub(/\[\(\)\[\]\|\]/, "\\\\&", clean_short)
for( x in matches ) if( matches[x] && x !~ clean_short ) return
return short
}
BEGIN {
gsub(" ", ".*", q)
hi_rank = ihi_rank = -9999999999
}
{
if( typ == "rank" ) {
rank = $2
} else if( typ == "recent" ) {
rank = $3 - t
} else rank = frecent($2, $3)
if( $1 ~ q ) {
matches[$1] = rank
} else if( tolower($1) ~ tolower(q) ) imatches[$1] = rank
if( matches[$1] && matches[$1] > hi_rank ) {
best_match = $1
hi_rank = matches[$1]
} else if( imatches[$1] && imatches[$1] > ihi_rank ) {
ibest_match = $1
ihi_rank = imatches[$1]
}
}
END {
# prefer case sensitive
if( best_match ) {
output(matches, best_match, common(matches))
} else if( ibest_match ) {
output(imatches, ibest_match, common(imatches))
}
}
')"
[ $? -gt 0 ] && return
[ "$cd" ] && cd "$cd"
fi
}
alias ${_Z_CMD:-z}='_z 2>&1'
[ "$_Z_NO_RESOLVE_SYMLINKS" ] || _Z_RESOLVE_SYMLINKS="-P"
if type compctl >/dev/null 2>&1; then
# zsh
[ "$_Z_NO_PROMPT_COMMAND" ] || {
# populate directory list, avoid clobbering any other precmds.
if [ "$_Z_NO_RESOLVE_SYMLINKS" ]; then
_z_precmd() {
_z --add "${PWD:a}"
}
else
_z_precmd() {
_z --add "${PWD:A}"
}
fi
[[ -n "${precmd_functions[(r)_z_precmd]}" ]] || {
precmd_functions[$(($#precmd_functions+1))]=_z_precmd
}
}
_z_zsh_tab_completion() {
# tab completion
local compl
read -l compl
reply=(${(f)"$(_z --complete "$compl")"})
}
compctl -U -K _z_zsh_tab_completion _z
elif type complete >/dev/null 2>&1; then
# bash
# tab completion
complete -o filenames -C '_z --complete "$COMP_LINE"' ${_Z_CMD:-z}
[ "$_Z_NO_PROMPT_COMMAND" ] || {
# populate directory list. avoid clobbering other PROMPT_COMMANDs.
grep "_z --add" <<< "$PROMPT_COMMAND" >/dev/null || {
PROMPT_COMMAND="$PROMPT_COMMAND"$'\n''_z --add "$(command pwd '$_Z_RESOLVE_SYMLINKS' 2>/dev/null)" 2>/dev/null;'
}
}
fi 查看全部
浪费时间且效率低下。
推荐大家使用一个小脚本,可以快速切换目录,不需要经常cd了。
拷贝下面的代码,保存为z.sh,放在用户目录下,/home/xxxx, xxx为用户名, 然后 给予 777权限, chmod 777 z.sh
然后 修改 .bashrc 文件, vim ~/.bashrc
在文件的最后添加一句 source ~/z.sh
然后保存.bashrc
然后运行 source ~./bashrc , 然后就马上生效了。
然后你进入到某一个目录,比如 /home/user/build/data/bin/hello/, 运行 z
系统会纪录你的hello目录一次,
下一次在其他目录比如在/etc/apt/,如果要跳转到 /home/user/build/data/bin/hello/,
直接运行 z hello 就可以了。
# Copyright (c) 2009 rupa deadwyler under the WTFPL license


# maintains a jump-list of the directories you actually use

#

# INSTALL:

#     * put something like this in your .bashrc/.zshrc:

#         . /path/to/z.sh

#     * cd around for a while to build up the db

#     * PROFIT!!

#     * optionally:

#         set $_Z_CMD in .bashrc/.zshrc to change the command (default z).

#         set $_Z_DATA in .bashrc/.zshrc to change the datafile (default ~/.z).

#         set $_Z_NO_RESOLVE_SYMLINKS to prevent symlink resolution.

#         set $_Z_NO_PROMPT_COMMAND if you're handling PROMPT_COMMAND yourself.

#         set $_Z_EXCLUDE_DIRS to an array of directories to exclude.

#         set $_Z_OWNER to your username if you want use z while sudo with $HOME kept

#

# USE:

#     * z foo     # cd to most frecent dir matching foo

#     * z foo bar # cd to most frecent dir matching foo and bar

#     * z -r foo  # cd to highest ranked dir matching foo

#     * z -t foo  # cd to most recently accessed dir matching foo

#     * z -l foo  # list matches instead of cd

#     * z -c foo  # restrict matches to subdirs of $PWD


[ -d "${_Z_DATA:-$HOME/.z}" ] && {

    echo "ERROR: z.sh's datafile (${_Z_DATA:-$HOME/.z}) is a directory."

}


_z() {


    local datafile="${_Z_DATA:-$HOME/.z}"


    # bail if we don't own ~/.z and $_Z_OWNER not set

    [ -z "$_Z_OWNER" -a -f "$datafile" -a ! -O "$datafile" ] && return


    # add entries

    if [ "$1" = "--add" ]; then

        shift


        # $HOME isn't worth matching

        [ "$*" = "$HOME" ] && return


        # don't track excluded directory trees

        local exclude

        for exclude in "${_Z_EXCLUDE_DIRS[@]}"; do

            case "$*" in "$exclude*") return;; esac

        done


        # maintain the data file

        local tempfile="$datafile.$RANDOM"

        while read line; do

            # only count directories

            [ -d "${line%%\|*}" ] && echo $line

        done < "$datafile" | awk -v path="$*" -v now="$(date +%s)" -F"|" '

            BEGIN {

                rank[path] = 1

                time[path] = now

            }

            $2 >= 1 {

                # drop ranks below 1

                if( $1 == path ) {

                    rank[$1] = $2 + 1

                    time[$1] = now

                } else {

                    rank[$1] = $2

                    time[$1] = $3

                }

                count += $2

            }

            END {

                if( count > 9000 ) {

                    # aging

                    for( x in rank ) print x "|" 0.99*rank[x] "|" time[x]

                } else for( x in rank ) print x "|" rank[x] "|" time[x]

            }

        ' 2>/dev/null >| "$tempfile"

        # do our best to avoid clobbering the datafile in a race condition

        if [ $? -ne 0 -a -f "$datafile" ]; then

            env rm -f "$tempfile"

        else

            [ "$_Z_OWNER" ] && chown $_Z_OWNER:$(id -ng $_Z_OWNER) "$tempfile"

            env mv -f "$tempfile" "$datafile" || env rm -f "$tempfile"

        fi


    # tab completion

    elif [ "$1" = "--complete" -a -s "$datafile" ]; then

        while read line; do

            [ -d "${line%%\|*}" ] && echo $line

        done < "$datafile" | awk -v q="$2" -F"|" '

            BEGIN {

                if( q == tolower(q) ) imatch = 1

                q = substr(q, 3)

                gsub(" ", ".*", q)

            }

            {

                if( imatch ) {

                    if( tolower($1) ~ tolower(q) ) print $1

                } else if( $1 ~ q ) print $1

            }

        ' 2>/dev/null


    else

        # list/go

        while [ "$1" ]; do case "$1" in

            --) while [ "$1" ]; do shift; local fnd="$fnd${fnd:+ }$1";done;;

            -*) local opt=${1:1}; while [ "$opt" ]; do case ${opt:0:1} in

                    c) local fnd="^$PWD $fnd";;

                    h) echo "${_Z_CMD:-z} [-chlrtx] args" >&2; return;;

                    x) sed -i -e "\:^${PWD}|.*:d" "$datafile";;

                    l) local list=1;;

                    r) local typ="rank";;

                    t) local typ="recent";;

                esac; opt=${opt:1}; done;;

             *) local fnd="$fnd${fnd:+ }$1";;

        esac; local last=$1; [ "$#" -gt 0 ] && shift; done

        [ "$fnd" -a "$fnd" != "^$PWD " ] || local list=1


        # if we hit enter on a completion just go there

        case "$last" in

            # completions will always start with /

            /*) [ -z "$list" -a -d "$last" ] && cd "$last" && return;;

        esac


        # no file yet

        [ -f "$datafile" ] || return


        local cd

        cd="$(while read line; do

            [ -d "${line%%\|*}" ] && echo $line

        done < "$datafile" | awk -v t="$(date +%s)" -v list="$list" -v typ="$typ" -v q="$fnd" -F"|" '

            function frecent(rank, time) {

                # relate frequency and time

                dx = t - time

                if( dx < 3600 ) return rank * 4

                if( dx < 86400 ) return rank * 2

                if( dx < 604800 ) return rank / 2

                return rank / 4

            }

            function output(files, out, common) {

                # list or return the desired directory

                if( list ) {

                    cmd = "sort -n >&2"

                    for( x in files ) {

                        if( files[x] ) printf "%-10s %s\n", files[x], x | cmd

                    }

                    if( common ) {

                        printf "%-10s %s\n", "common:", common > "/dev/stderr"

                    }

                } else {

                    if( common ) out = common

                    print out

                }

            }

            function common(matches) {

                # find the common root of a list of matches, if it exists

                for( x in matches ) {

                    if( matches[x] && (!short || length(x) < length(short)) ) {

                        short = x

                    }

                }

                if( short == "/" ) return

                # use a copy to escape special characters, as we want to return

                # the original. yeah, this escaping is awful.

                clean_short = short

                gsub(/\[\(\)\[\]\|\]/, "\\\\&", clean_short)

                for( x in matches ) if( matches[x] && x !~ clean_short ) return

                return short

            }

            BEGIN {

                gsub(" ", ".*", q)

                hi_rank = ihi_rank = -9999999999

            }

            {

                if( typ == "rank" ) {

                    rank = $2

                } else if( typ == "recent" ) {

                    rank = $3 - t

                } else rank = frecent($2, $3)

                if( $1 ~ q ) {

                    matches[$1] = rank

                } else if( tolower($1) ~ tolower(q) ) imatches[$1] = rank

                if( matches[$1] && matches[$1] > hi_rank ) {

                    best_match = $1

                    hi_rank = matches[$1]

                } else if( imatches[$1] && imatches[$1] > ihi_rank ) {

                    ibest_match = $1

                    ihi_rank = imatches[$1]

                }

            }

            END {

                # prefer case sensitive

                if( best_match ) {

                    output(matches, best_match, common(matches))

                } else if( ibest_match ) {

                    output(imatches, ibest_match, common(imatches))

                }

            }

        ')"

        [ $? -gt 0 ] && return

        [ "$cd" ] && cd "$cd"

    fi

}


alias ${_Z_CMD:-z}='_z 2>&1'


[ "$_Z_NO_RESOLVE_SYMLINKS" ] || _Z_RESOLVE_SYMLINKS="-P"


if type compctl >/dev/null 2>&1; then

    # zsh

    [ "$_Z_NO_PROMPT_COMMAND" ] || {

        # populate directory list, avoid clobbering any other precmds.

        if [ "$_Z_NO_RESOLVE_SYMLINKS" ]; then

            _z_precmd() {

                _z --add "${PWD:a}"

            }

        else

            _z_precmd() {

                _z --add "${PWD:A}"

            }

        fi

        [[ -n "${precmd_functions[(r)_z_precmd]}" ]] || {

            precmd_functions[$(($#precmd_functions+1))]=_z_precmd

        }

    }

    _z_zsh_tab_completion() {

        # tab completion

        local compl

        read -l compl

        reply=(${(f)"$(_z --complete "$compl")"})

    }

    compctl -U -K _z_zsh_tab_completion _z

elif type complete >/dev/null 2>&1; then

    # bash

    # tab completion

    complete -o filenames -C '_z --complete "$COMP_LINE"' ${_Z_CMD:-z}

    [ "$_Z_NO_PROMPT_COMMAND" ] || {

        # populate directory list. avoid clobbering other PROMPT_COMMANDs.

        grep "_z --add" <<< "$PROMPT_COMMAND" >/dev/null || {

            PROMPT_COMMAND="$PROMPT_COMMAND"$'\n''_z --add "$(command pwd '$_Z_RESOLVE_SYMLINKS' 2>/dev/null)" 2>/dev/null;'

        }

    }

fi
ubuntu的一条高危命令:sudo apt-get install -f
李魔佛 发表了文章 • 0 个评论 • 3990 次浏览 • 2016-06-14 13:16
本来这一条
本来这一条
树莓派2代 接通用usb摄像头
树莓派 • 李魔佛 发表了文章 • 0 个评论 • 9233 次浏览 • 2016-05-21 19:25
使用apt-get可以很方便下载到sudo apt-get install fswebcam
sudo apt-get install mplayer
sudo apt-get install alsamixer
安装后接入usb摄像头,在命令行下执行sudo ls /dev/video0
如果有这一个设备,说明你的usb摄像头兼容你的树莓派的驱动,不然还的额外去找第三方的摄像头驱动。
接着可以直接在命令行打开摄像头sudo mplayer tv://
然后选择一个画面进行拍摄sudo fswebcam -no-banner -r 640*480 image.jpg
大功告成。 查看全部
使用apt-get可以很方便下载到
sudo apt-get install fswebcam

sudo apt-get install mplayer

sudo apt-get install alsamixer
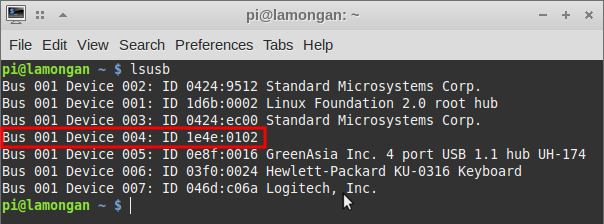
安装后接入usb摄像头,在命令行下执行
sudo ls /dev/video0
如果有这一个设备,说明你的usb摄像头兼容你的树莓派的驱动,不然还的额外去找第三方的摄像头驱动。
接着可以直接在命令行打开摄像头
sudo mplayer tv://
然后选择一个画面进行拍摄
sudo fswebcam -no-banner -r 640*480 image.jpg
大功告成。
如何在电脑使用网线直连树莓派? 树莓派没有连接显示器
树莓派 • 低调的哥哥 回复了问题 • 2 人关注 • 1 个回复 • 11568 次浏览 • 2016-05-14 13:02
