np.empty() 函数的用法 (有坑)
但是实际结果返回:
array([[4.67296746e-307, 1.69121096e-306, 9.34601642e-307,

        1.33511562e-306],

       [8.34447260e-308, 6.23043768e-307, 2.22522597e-306,

        1.33511969e-306],

       [1.37962320e-306, 9.34604358e-307, 9.79101082e-307,

        1.78020576e-306],

       [1.69119873e-306, 2.22522868e-306, 1.24611809e-306,

        8.06632139e-308]])
what ?
感觉里面的元素是随机生成的。
查了下官方文档,的确是。np.empty()返回一个随机元素的矩阵,大小按照参数定义。
所以使用的时候要小心。需要手工把每一个值重新定义,否则该值是一个随机数,调试起来会比较麻烦。
原创文章
转载请注明出处:
http://www.30daydo.com/article/376
收起阅读 »
Hbase thrift python3不兼容
无奈只好切换到py2的虚拟环境。
Hbase添加一个列族
alter 'tablename', 'columnfamily2'
然后就可以插入新的数据了。
docker下载的ElasticSearch镜像 web/postman访问时需要密码,如何去除
可是在postman中请求接口:
GET : 10.18.6.102:9200/_cat/indices?v
爆出下面的错误:
missing authentication token for REST request
然后使用浏览器查询:发现需要输入账户和密码。
账户名:elastic
密码:changeme
如何才能删除这个用户名和密码呢? 每次请求不需要密码。
进入docker容器
修改这个文件
/usr/share/elasticsearch/config/elasticssearch.yml
添加最后一行:
xpack.security.enabled: false
然后记得commit一下你的修改。
收起阅读 »
Docker ElasticSearch挂载本地数据 报错
挂载命令:
docker run -p 9200:9200 -e "http.host=0.0.0.0" -e "transport.host=127.0.0.1" -v /home/myuser/elastic_data/:/usr/share/elasticsearch/data docker.elastic.co/elasticsearch/elasticsearch:5.5.1
其中-v是指定的挂载路径
/home/myuser/elastic_data/
这个是本地路径
运行后报错:
[2018-11-13T02:23:33,994][INFO ][o.e.n.Node               ]  initializing ...

[2018-11-13T02:23:34,010][WARN ][o.e.b.ElasticsearchUncaughtExceptionHandler]  uncaught exception in thread [main]

org.elasticsearch.bootstrap.StartupException: java.lang.IllegalStateException: Failed to create node environment

        at org.elasticsearch.bootstrap.Elasticsearch.init(Elasticsearch.java:127) ~[elasticsearch-5.5.1.jar:5.5.1]

        at org.elasticsearch.bootstrap.Elasticsearch.execute(Elasticsearch.java:114) ~[elasticsearch-5.5.1.jar:5.5.1]

        at org.elasticsearch.cli.EnvironmentAwareCommand.execute(EnvironmentAwareCommand.java:67) ~[elasticsearch-5.5.1.jar:5.5.1]

        at org.elasticsearch.cli.Command.mainWithoutErrorHandling(Command.java:122) ~[elasticsearch-5.5.1.jar:5.5.1]

        at org.elasticsearch.cli.Command.main(Command.java:88) ~[elasticsearch-5.5.1.jar:5.5.1]

        at org.elasticsearch.bootstrap.Elasticsearch.main(Elasticsearch.java:91) ~[elasticsearch-5.5.1.jar:5.5.1]

        at org.elasticsearch.bootstrap.Elasticsearch.main(Elasticsearch.java:84) ~[elasticsearch-5.5.1.jar:5.5.1]

Caused by: java.lang.IllegalStateException: Failed to create node environment

        at org.elasticsearch.node.Node.<init>(Node.java:267) ~[elasticsearch-5.5.1.jar:5.5.1]

        at org.elasticsearch.node.Node.<init>(Node.java:244) ~[elasticsearch-5.5.1.jar:5.5.1]

        at org.elasticsearch.bootstrap.Bootstrap$5.<init>(Bootstrap.java:232) ~[elasticsearch-5.5.1.jar:5.5.1]

        at org.elasticsearch.bootstrap.Bootstrap.setup(Bootstrap.java:232) ~[elasticsearch-5.5.1.jar:5.5.1]

        at org.elasticsearch.bootstrap.Bootstrap.init(Bootstrap.java:351) ~[elasticsearch-5.5.1.jar:5.5.1]

        at org.elasticsearch.bootstrap.Elasticsearch.init(Elasticsearch.java:123) ~[elasticsearch-5.5.1.jar:5.5.1]

        ... 6 more

Caused by: java.nio.file.AccessDeniedException: /usr/share/elasticsearch/data/nodes

        at sun.nio.fs.UnixException.translateToIOException(UnixException.java:84) ~[?:?]

        at sun.nio.fs.UnixException.rethrowAsIOException(UnixException.java:102) ~[?:?]

        at sun.nio.fs.UnixException.rethrowAsIOException(UnixException.java:107) ~[?:?]

        at sun.nio.fs.UnixFileSystemProvider.createDirectory(UnixFileSystemProvider.java:384) ~[?:?]

        at java.nio.file.Files.createDirectory(Files.java:674) ~[?:1.8.0_141]

        at java.nio.file.Files.createAndCheckIsDirectory(Files.java:781) ~[?:1.8.0_141]

        at java.nio.file.Files.createDirectories(Files.java:767) ~[?:1.8.0_141]

        at org.elasticsearch.env.NodeEnvironment.<init>(NodeEnvironment.java:221) ~[elasticsearch-5.5.1.jar:5.5.1]

        at org.elasticsearch.node.Node.<init>(Node.java:264) ~[elasticsearch-5.5.1.jar:5.5.1]

        at org.elasticsearch.node.Node.<init>(Node.java:244) ~[elasticsearch-5.5.1.jar:5.5.1]

        at org.elasticsearch.bootstrap.Bootstrap$5.<init>(Bootstrap.java:232) ~[elasticsearch-5.5.1.jar:5.5.1]

        at org.elasticsearch.bootstrap.Bootstrap.setup(Bootstrap.java:232) ~[elasticsearch-5.5.1.jar:5.5.1]

        at org.elasticsearch.bootstrap.Bootstrap.init(Bootstrap.java:351) ~[elasticsearch-5.5.1.jar:5.5.1]

        at org.elasticsearch.bootstrap.Elasticsearch.init(Elasticsearch.java:123) ~[elasticsearch-5.5.1.jar:5.5.1]

        ... 6 more
原因是权限问题,需要把目录
/home/myuser/elastic_data/ 改为777, 然后问题就解决了
chmod 777 /home/myuser/elastic_data/
原创文章
转载请注明出处:
http://30daydo.com/article/369
收起阅读 »
MongoDB数据导入到ElasticSearch python代码实现
es = Elasticsearch(['10.18.6.26:9200'])

ret = collection.find({})


# 删除mongo的_id字段,否则无法把Object类型插入到Elastic

map(lambda x:(del x['_id']),ret)


actions=


for idx,item in enumerate(ret):

    i={

        "_index":"jsl",

     "_type":"text",

     "_id":idx,

        "_source":{

            # 需要提取的字段

            "title":item.get('title'),

            "url":item.get('url')

        }

    }

    actions.append(i)


start=time.time()

helpers.bulk(es,actions)


end=time.time()-start

print(end)
运行下来,20W条数据,大概用了15秒左右全部导入ElasticSearch 数据库中。 收起阅读 »
Elastic报错:Fielddata is disabled on text fields by default
{

    "error": {

        "root_cause": [

            {

                "type": "illegal_argument_exception",

                "reason": "Fielddata is disabled on text fields by default. Set fielddata=true on [state] in order to load fielddata in memory by uninverting the inverted index. Note that this can however use significant memory. Alternatively use a keyword field instead."

            }

        ],

        "type": "search_phase_execution_exception",

        "reason": "all shards failed",

        "phase": "query",

        "grouped": true,

        "failed_shards": [

            {

                "shard": 0,

                "index": "bank",

                "node": "HuFlhO8OSLSGr3RP6J2z6Q",

                "reason": {

                    "type": "illegal_argument_exception",

                    "reason": "Fielddata is disabled on text fields by default. Set fielddata=true on [state] in order to load fielddata in memory by uninverting the inverted index. Note that this can however use significant memory. Alternatively use a keyword field instead."

                }

            }

        ]

    },

    "status": 400

}
解决办法:
查询的时候添加keyword
如上面的查询使用的是:
{"size":0,

"aggs":{"group_by_state":

{

"terms":{"field":"state"}

}}

}
就会报错。
使用下面的语句就不会错误了
{"size":0,

"aggs":{"group_by_state":

{

"terms":{"field":"state.keyword"}

}}

}
原文链接:
http://30daydo.com/article/366
收起阅读 »
numpy logspace的用法
numpy.logspace
numpy.logspace(start, stop, num=50, endpoint=True, base=10.0, dtype=None)[source]
Return numbers spaced evenly on a log scale.
In linear space, the sequence starts at base ** start (base to the power of start) and ends with base ** stop (see endpoint below).
Parameters:
start : float
base ** start is the starting value of the sequence.
stop : float
base ** stop is the final value of the sequence, unless endpoint is False. In that case, num + 1 values are spaced over the interval in log-space, of which all but the last (a sequence of length num) are returned.
num : integer, optional
Number of samples to generate. Default is 50.
endpoint : boolean, optional
If true, stop is the last sample. Otherwise, it is not included. Default is True.
base : float, optional
The base of the log space. The step size between the elements in ln(samples) / ln(base) (or log_base(samples)) is uniform. Default is 10.0.
dtype : dtype
The type of the output array. If dtype is not given, infer the data type from the other input arguments.
Returns:
samples : ndarray
num samples, equally spaced on a log scale
上面是官方的文档,英文说的很明白,但网上尤其是csdn的解释,(其实都是你抄我,我抄你),实在让人看的一头雾水
numpy.logspace(start, stop, num=50, endpoint=True, base=10.0, dtype=None)
比如 np.logspace(0,10,9)
那么会有结果是:
array([1.00000000e+00, 1.77827941e+01, 3.16227766e+02, 5.62341325e+03,

       1.00000000e+05, 1.77827941e+06, 3.16227766e+07, 5.62341325e+08,

       1.00000000e+10])
第一位是开始值0,第二位是结束值10,然后在这0-10之间产生9个值,这9个值是均匀分布的,默认包括最后一个结束点,就是0到10的9个等产数列,那么根据等差数列的公式,a1+(n-1)*d=an,算出,d=1.25,那么a1=0,接着a2=1.25,a3=2.5,。。。。。a9=10,然后再对这9个值做已10为底的指数运算,也就是10^0, 10^1.25 , 10^2.5 这样的结果 收起阅读 »
统一社会信用代码真伪校验
一是嵌入了组织机构代码作为主体标识码。通过组织机构代码的唯一性确保社会信用代码不会重码。换言之,组织机构代码的唯一性完美“遗传”给统一社会信用代码。
二是在组织机构代码前增加行政区划代码,这个组合不难发现就是税务登记证号码。这样就提高了统一社会代码的兼容性,在过渡期内税务机关可以利用这种嵌套规则更加便利地升级到新的信用代码系统。
三是预留前两位给登记机关和机构类别,这样统一社会信用代码在应用中更加清晰高效,第一位便于登记机关管理,可以作为检索条目,第二位可以准确给组织机构归类,方便细化分管。
四是统一社会信用代码的主体标识码天生具有的大容量。通过数字字母组合,加上指数级增长,可以确保在很长一段时间内无需升位就可容纳大量组织机构。
五是统一社会信用代码位数为18位,和身份证的位数相同,这一巧妙设计在未来“两码管两人”的应用中可以实现登记、检索、填表等统一。
六是统一社会信用代码中内嵌的主体标识码具有校验位,同时自身第十八位也是校验位,与身份证号相比是双校验,确保了号码准确性
第17,18位是校验位,具体的校验规则如下:
# -*-coding=utf-8-*-


# @Time : 2018/10/30 15:23

# @File : social_code_gen2.py


# -*- coding: utf-8 -*-

'''

Created on 2017年4月5日

18位统一社会信用代码从2015年10月1日正式实行


@author: rocky

'''

# 统一社会信用代码中不使用I,O,Z,S,V


SOCIAL_CREDIT_CHECK_CODE_DICT = {

                '0':0,'1':1,'2':2,'3':3,'4':4,'5':5,'6':6,'7':7,'8':8,'9':9,

                'A':10,'B':11,'C':12, 'D':13, 'E':14, 'F':15, 'G':16, 'H':17, 'J':18, 'K':19, 'L':20, 'M':21, 'N':22, 'P':23, 'Q':24,

               'R':25, 'T':26, 'U':27, 'W':28, 'X':29, 'Y':30}

# GB11714-1997全国组织机构代码编制规则中代码字符集

ORGANIZATION_CHECK_CODE_DICT = {

                '0':0,'1':1,'2':2,'3':3,'4':4,'5':5,'6':6,'7':7,'8':8,'9':9,

                'A':10,'B':11,'C':12, 'D':13, 'E':14, 'F':15, 'G':16, 'H':17,'I':18, 'J':19, 'K':20, 'L':21, 'M':22, 'N':23, 'O':24,'P':25, 'Q':26,

               'R':27,'S':28, 'T':29, 'U':30,'V':31, 'W':32, 'X':33, 'Y':34,'Z':35}


class UnifiedSocialCreditIdentifier(object):

    '''

    统一社会信用代码

    '''


    def __init__(self):

        '''

        Constructor

        '''

    def check_social_credit_code(self,code):

        '''

        校验统一社会信用代码的校验码

        计算校验码公式:

            C9 = 31-mod(sum(Ci*Wi),31),其中Ci为组织机构代码的第i位字符,Wi为第i位置的加权因子,C9为校验码

        '''

        # 第i位置上的加权因子

        weighting_factor = [1,3,9,27,19,26,16,17,20,29,25,13,8,24,10,30,28]

        # 本体代码

        ontology_code = code[0:17]

        # 校验码

        check_code = code[17]

        # 计算校验码

        tmp_check_code = self.gen_check_code(weighting_factor, ontology_code, 31, SOCIAL_CREDIT_CHECK_CODE_DICT)

        if tmp_check_code==check_code:

            return True

        else:

            return False


    def check_organization_code(self,code):

        '''

        校验组织机构代码是否正确,该规则按照GB 11714编制

        统一社会信用代码的第9~17位为主体标识码(组织机构代码),共九位字符

        计算校验码公式:

            C9 = 11-mod(sum(Ci*Wi),11),其中Ci为组织机构代码的第i位字符,Wi为第i位置的加权因子,C9为校验码

        @param  code: 统一社会信用代码

        '''

        # 第i位置上的加权因子

        weighting_factor = [3,7,9,10,5,8,4,2]

        # 第9~17位为主体标识码(组织机构代码)

        organization_code = code[8:17]

        # 本体代码

        ontology_code=organization_code[0:8]

        # 校验码

        check_code = organization_code[8]

        #

        print(organization_code,ontology_code,check_code)

        # 计算校验码

        tmp_check_code = self.gen_check_code(weighting_factor, ontology_code, 11, ORGANIZATION_CHECK_CODE_DICT)

        if tmp_check_code==check_code:

            return True

        else:

            return False


    def gen_check_code(self,weighting_factor,ontology_code, modulus,check_code_dict):

        '''

        @param weighting_factor: 加权因子

        @param ontology_code:本体代码

        @param modulus:  模数

        @param check_code_dict: 字符字典

        '''

        total = 0

        for i in range(len(ontology_code)):

            if ontology_code[i].isdigit():

                print(ontology_code[i] ,weighting_factor[i])

                total += int(ontology_code[i]) * weighting_factor[i]

            else:

                total += check_code_dict[ontology_code[i]]*weighting_factor[i]

        diff = modulus - total % modulus

        print(diff)

        return list(check_code_dict.keys())[list(check_code_dict.values())[diff]]


if __name__ == '__main__':

    u = UnifiedSocialCreditIdentifier()

    print(u.check_organization_code(code='91421126331832178C'))

    print(u.check_social_credit_code(code='91420100052045470K'))
更新:
引用具体的生成规则

如下是《法人和其他组织统一社会信用代码编码规则》的说明。
1 范围
本标准规定了法人和其他组织统一社会信用代码(以下简称统一代码)的术语和定义、构成。本标准适用于对统一代码的编码、信息处理和信息共享交换。
2 规范性引用文件
下列文件对于本文件的应用是必不可少的。凡是注日期的引用文件,仅注日期的版本适用于本文件。凡是不注日期的引用文件,其最新版本(包括所有的修改单)适用于本文件。
GB/T 2260 中华人民共和国行政区划代码GB 11714 全国组织机构代码编制规则GB/T 17710 信息技术 安全技术 校验字符系统
3 术语和定义
下列术语和定义适用于本文件。
3.1 组织机构 organization
企业、事业单位、机关、社会团体及其他依法成立的单位的通称。[GB/T 20091-2006, 定义2.2]
3.2 法人 legal entities
具有民事权利能力和民事行为能力,依法独立享有民事权利和承担民事义务的组织。
3.3 其他组织 other organizations
合法成立、有一定的组织机构和财产,不具备法人资格的组织。
3.4 组织机构代码 organization code
主体标识码 subject identification code按照GB 11714编制,赋予每一个组织机构在全国范围内唯一的,始终不变的识别标识码。
3.5 统一社会信用代码 unified social credit identifier
每一个法人和其他组织在全国范围内唯一的,终身不变的法定身份识别码。
4 统一代码的构成
4.1 结构
统一代码由十八位的阿拉伯数字或大写英文字母(不使用I、O、Z、S、V)组成。
第1位:登记管理部门代码(共一位字符)第2位:机构类别代码(共一位字符)第3位~第8位:登记管理机关行政区划码(共六位阿拉伯数字)第9位~第17位:主体标识码(组织机构代码)(共九位字符)第18位:校验码(共一位字符)
4.2 代码及说明
登记管理部门代码:使用阿拉伯数字或大写英文字母表示。
机构编制:1民政:5工商:9其他:Y
机构类别代码:使用阿拉伯数字或大写英文字母表示。
机构编制机关:11打头机构编制事业单位:12打头机构编制中央编办直接管理机构编制的群众团体:13打头机构编制其他:19打头民政社会团体:51打头民政民办非企业单位:52打头民政基金会:53打头民政其他:59打头工商企业:91打头工商个体工商户:92打头工商农民专业合作社:93打头其他:Y1打头
登记管理机关行政区划码:只能使用阿拉伯数字表示。按照GB/T 2260编码。
主体标识码(组织机构代码):使用阿拉伯数字或英文大写字母表示。按照GB 11714编码。
在实行统一社会信用代码之前,以前的组织机构代码证上的组织机构代码由九位字符组成。格式为XXXXXXXX-Y。前面八位被称为“本体代码”;最后一位被称为“校验码”。校验码和本体代码由一个连字号(-)连接起来。以便让人很容易的看出校验码。但是三证合一后,组织机构的九位字符全部被纳入统一社会信用代码的第9位至第17位,其原有组织机构代码上的连字号不带入统一社会信用代码。
原有组织机构代码上的“校验码”的计算规则是:
例如:某公司的组织机构代码是:59467239-9。那其最后一位的组织机构代码校验码9是如何计算出来的呢?
第一步:取组织机构代码的前八位本体代码为基数。5 9 4 6 7 2 3 9提示:如果本体代码中含有英文大写字母。则A的基数是10,B的基数是11,C的基数是12,依此类推,直到Z的基数是35。
第二步:取加权因子数值。因为组织机构代码的本体代码一共是八位字符。则这八位的加权因子数值从左到右分别是:3、7、9、10、5、8、4、2。
第三步:本体代码基数与对应位数的因子数值相乘。5×3=15,9×7=63,4×9=36,6×10=60,7×5=35,2×8=16,3×4=12,9×2=18第四步:将乘积求和相加。15+63+36+60+35+16+12+18=255第五步:将和数除以11,求余数。255÷11=33,余数是2。第六步:用阿拉伯数字11减去余数,得求校验码的数值。当校验码的数值为10时,校验码用英文大写字母X来表示;当校验码的数值为11时,校验码用0来表示;其余求出的校验码数值就用其本身的阿拉伯数字来表示。11-2=9,因此此公司完整的组织机构代码为 59467239-9。
校验码:使用阿拉伯数字或大写英文字母来表示。校验码的计算方法参照 GB/T 17710。
例如:某公司的统一社会信用代码为91512081MA62K0260E,那其最后一位的校验码E是如何计算出来的呢?
第一步:取统一社会信用代码的前十七位为基数。9 1 5 1 2 0 8 1 21 10 6 2 19 0 2 6 0提示:如果前十七位统一社会信用代码含有英文大写字母(不使用I、O、Z、S、V这五个英文字母)。则英文字母对应的基数分别为:A=10、B=11、C=12、D=13、E=14、F=15、G=16、H=17、J=18、K=19、L=20、M=21、N=22、P=23、Q=24、R=25、T=26、U=27、W=28、X=29、Y=30
第二步:取加权因子数值。因为统一社会信用代码前面前面有十七位字符。则这十七位的加权因子数值从左到右分别是:1、3、9、27、19、26、16、17、20、29、25、13、8、24、10、30、28
第三步:基数与对应位数的因子数值相乘。9×1=9,1×3=3,5×9=45,1×27=27,2×19=38,0×26=0,8×16=1281×17=17,21×20=420,10×29=290,6×25=150,2×13=26,19×8=1520×23=0,2×10=20,6×30=180,0×28=0
第四步:将乘积求和相加。9+3+45+27+38+0+128+17+420+290+150+26+152+0+20+180+0=1495
第五步:将和数除以31,求余数。1495÷31=48,余数是17。
第六步:用阿拉伯数字31减去余数,得求校验码的数值。当校验码的数值为0~9时,就直接用该校验码的数值作为最终的统一社会信用代码的校验码;如果校验码的数值是10~30,则校验码转换为对应的大写英文字母。对应关系为:A=10、B=11、C=12、D=13、E=14、F=15、G=16、H=17、J=18、K=19、L=20、M=21、N=22、P=23、Q=24、R=25、T=26、U=27、W=28、X=29、Y=30
因为,31-17=14,所以该公司完整的统一社会信用代码为 91512081MA62K0260E。
————————————————
统一社会信用代码与原来营业执照注册号、税务登记号、组织机构代码的转换关系
由于18位统一社会信用代码从2015年10月1日才正式实行。当前还有很多系统并没有完全转换到统一社会信用代码上。当您遇到需要让您填写组织机构代码或者税务登记号的时候,您应该如何从统一社会信用代码获取信息呢?
实质上:统一社会信用代码的第九位到第十七位就是原来的组织机构代码。统一社会信用代码的第三位到第十七位绝大多数的情况都是原来的税务登记证号。(不过由于少数发证机构对地方行政区划代码做了规范。所以,有少部分企业的新的统一社会信用代码并不一定的第3位到第8位的阿拉伯数字并一定能完全对应以前的税务登记证号的前六位。)统一社会信用代码无法对应原来营业执照的注册号。当遇到非要您填写营业执照的注册号,又暂时无法识别统一社会信用代码的场合。你则只有拿出以前旧的营业执照查看上面的注册号。
例如:91370200163562681G这个统一社会信用代码。
其组织机构代码是:16356268-1其税务登记号是:370200163562681 如果与之前的税务登记号稍微有所出入,则一般是370200不一致。尤其是00这两位
原创文章,转载请注明出处
http://30daydo.com/article/364
收起阅读 »
报错 ImportError cannot import name patterns Django版本兼容问题
百度出来的csdn上的结果:https://blog.csdn.net/xudailong_blog/article/details/78313568
就是不对的,我把django降级到1.10,也是报错,明显不对嘛。
官方上说的1.8之后不建议使用,所以应该降级到1.8才可以。
降级命令:
pip install django==1.8
即可。
收起阅读 »
python数据分析入门 --分析雪球元卫南每个月打赏收入
最近居然被元神拉黑了。因为帖子不知道被哪位挖坟,估计被元神看到了。
重新跑了下原来的代码,还能跑通,看来雪球并没有改动什么代码。但是雪球经历了一波app下架风波,2019年前的帖子全部无法见到了。
重新获取数据:
点击查看大图
统计数据:
点击查看大图
2019年1月到现在(8月),元神收到的赏金为31851.6,数额比他2019年前所有的金额都要多,虽然总额不高,但是说明了元神这一年影响力大增了。
************************* 写于 2018-11 *******************************
在上一篇 雪球的元卫南靠打赏收割了多少钱 ? python爬虫实例 中,统计出来元卫南所有打赏收入为 24128.13 ,这个数字出乎不少人的意料。因为不少人看到元卫南最近收到的打赏都很多,不少都是100,200的。 那么接下来我就顺便带大家学一下,如何用python做数据分析。
数据来源于上一篇文章中获取到的数据。
首先,从数据库mongodb中读取数据
(点击查看大图)
上面显示数据的前10条,确保数据被正常载入。
观察到列 created_at 是打赏的时间, 导入的数据是字符类型,那么对列 created_at 进行换算, 转化为dataframe中的datetime类型。重新定义一列 pub_date 为打赏时间,设为index,因为dataframe可以对时间index做很多丰富的操作。
(点击查看大图)
可以看到转换后的时间精确到小时,分,秒,而我们需要统计的是每个月(或者每周,每季度,每年都可以)的数据,那么我们就需要重新采样, pandas提供了很好的resample函数,可以对数据按照时间频次进行重新采样。
(点击查看大图)
现在可以看到获取到2018年9月的所有打赏金额的数据。
那么现在就对所有数据进行重采样,并打赏金额进行求和
(点击查看大图)
现在可以看到,每个月得到的打赏金额的总和都可以看到了。从2016年7月到现在2018年10月,最多的月份是这个月,共1.4万,占了所有金额的60%多,所以才让大家造成一个错觉,元兄靠打赏赚了不少粉丝的打赏钱,其实只是最近才多起来的。
还可以绘制条形图。
(点击查看大图)
不过因为月份金额差距过大,导致部分月份的条形显示很短。
不过对于赏金的分布也一目了然了吧。
原创文章
转载请注明出处:
http://30daydo.com/article/362
个人公众号:
 收起阅读 »
雪球的元卫南靠打赏收割了多少钱 ? python爬虫实例
今天重新爬了一下,元卫南今年的人气暴涨,在2019年开始到现在,已经获取了31851.6元的打赏金额,虽然金额也不是特别高,但是已经比他2019年前所有打赏金额之和还要高了。 具体分析过程见 http://30daydo.com/article/362
********* 2019-08-05 更新 ***********
文章是去年写的,没想到最近居然在雪球火了。 后续会更新下最新的数据,还有趴一趴释老毛的打赏金额。
雪球的元卫南每天坚持发帖,把一个股民的日常描述的栩栩如生,让人感叹股民的无助与悲哀。 同时也看到上了严重杠杆后,对生活造成的压力,靠着借债来给股票续命。
元卫南雪球链接:https://xueqiu.com/u/2227798650
而且不断有人质疑元卫南写文章,靠打赏金来消费粉丝。 刚开始我也这么觉得,毕竟不少人几十块,一百块的打赏,十几万的粉丝,那每天的收入都很客观呀。 于是抱着好奇心,把元卫南的所有专栏的文章都爬下来,获取每个文章的赏金金额,然后就知道元兄到底靠赏金拿了多少钱。
撸起袖子干。 代码不多,在python3的环境下运行,隐去了header的个人信息,如果在电脑上运行,把你个人的header和cookie加上即可
# -*-coding=utf-8-*-


# @Time : 2018/10/23 9:26

# @File : money_reward.py

import requests

from collections import OrderedDict

import time

import datetime

import pymongo

import config


session = requests.Session()

def get_proxy(retry=10):

    proxyurl = 'http://{}:8081/dynamicIp/common/getDynamicIp.do'.format(config.PROXY)

    count = 0

    for i in range(retry):

        try:

            r = requests.get(proxyurl, timeout=10)

        except Exception as e:

            print(e)

            count += 1

            print('代理获取失败,重试' + str(count))

            time.sleep(1)


        else:

            js = r.json()

            proxyServer = 'http://{0}:{1}'.format(js.get('ip'), js.get('port'))

            proxies_random = {

                'http': proxyServer

            }

            return proxies_random


def get_content(url):

    headers = {

        # 此处添加个人的header信息

    }

    try:

        proxy = get_proxy()

    except Exception as e:

        print(e)

        proxy = get_proxy()


    try:

        r = session.get(url=url, headers=headers,proxies=proxy,timeout=10)

    except Exception as e:

        print(e)

        proxy = get_proxy()

        r = session.get(url=url, headers=headers,proxies=proxy,timeout=10)


    return r


def parse_content(post_id):

    url = 'https://xueqiu.com/statuses/reward/list_by_user.json?status_id={}&page=1&size=99999999'.format(post_id)

    r = get_content(url)

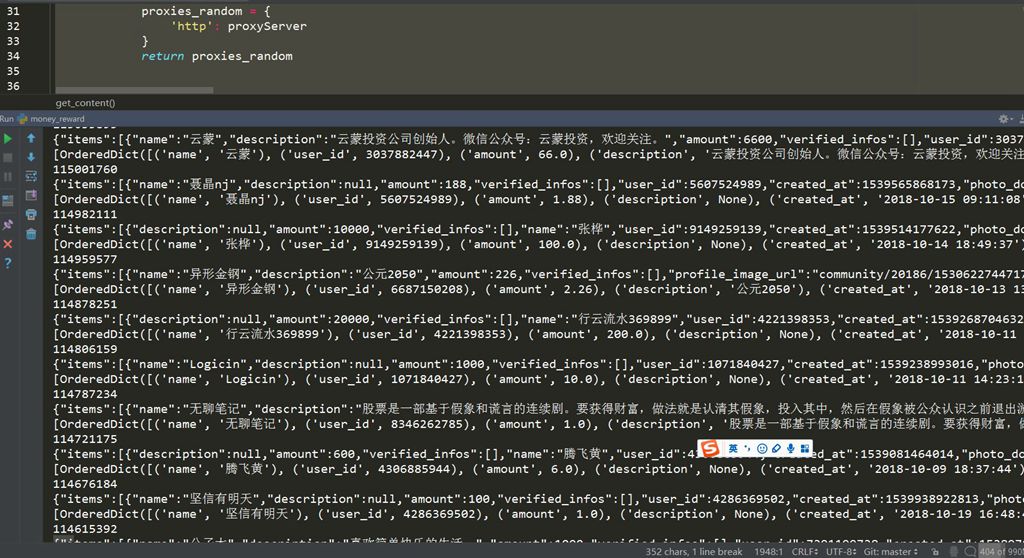
    print(r.text)

    if r.status_code != 200:

        print('status code != 200')

        failed_doc.insert({'post_id':post_id,'status':0})

        return None


    try:


        js_data = r.json()

    except Exception as e:

        print(e)

        print('can not parse to json')

        print(post_id)

        failed_doc.insert({'post_id': post_id, 'status': 0})

        return


    ret =

    been_reward_user = '元卫南'

    for item in js_data.get('items'):

        name = item.get('name')

        amount = item.get('amount')

        description = item.get('description')

        user_id = item.get('user_id')

        created_at = item.get('created_at')

        if created_at:

            created_at = datetime.datetime.fromtimestamp(int(created_at) / 1000).strftime('%Y-%m-%d %H:%M:%S')


        d = OrderedDict()

        d['name'] = name

        d['user_id'] = user_id

        d['amount'] = amount / 100

        d['description'] = description

        d['created_at'] = created_at

        d['been_reward'] = been_reward_user

        ret.append(d)


    print(ret)

    if ret:

        doc.insert_many(ret)

        failed_doc.insert({'post_id':post_id,'status':1})


def get_all_page_id(user_id):

    doc = db['db_parker']['xueqiu_zhuanglan']


    get_page_url = 'https://xueqiu.com/statuses/original/timeline.json?user_id={}&page=1'.format(user_id)

    r = get_content(get_page_url)

    max_page = int(r.json().get('maxPage'))


    for i in range(1, max_page + 1):

        url = 'https://xueqiu.com/statuses/original/timeline.json?user_id=2227798650&page={}'.format(i)

        r = get_content(url)

        js_data = r.json()

        ret =


        for item in js_data.get('list'):

            d = OrderedDict()


            d['article_id'] = item.get('id')

            d['title'] = item.get('title')

            d['description'] = item.get('description')

            d['view_count'] = item.get('view_count')

            d['target'] = 'https://xueqiu.com/' + item.get('target')

            d['user_id']= item.get('user_id')

            d['created_at'] = datetime.datetime.fromtimestamp(int(item.get('created_at')) / 1000).strftime(

                '%Y-%m-%d %H:%M:%S')


            ret.append(d)

        print(d)

        doc.insert_many(ret)


def loop_page_id():

    doc = db['db_parker']['xueqiu_zhuanglan']

    ret = doc.find({},{'article_id':1})

    failed_doc = db['db_parker']['xueqiu_reward_status']

    failed_ret = failed_doc.find({'status':1})

    article_id_list =

    for i in failed_ret:

        article_id_list.append(i.get('article_id'))


    for item in ret:

        article_id = item.get('article_id')

        print(article_id)

        if article_id in article_id_list:

            continue

        else:

            parse_content(article_id)


loop_page_id()
然后就是开始爬。
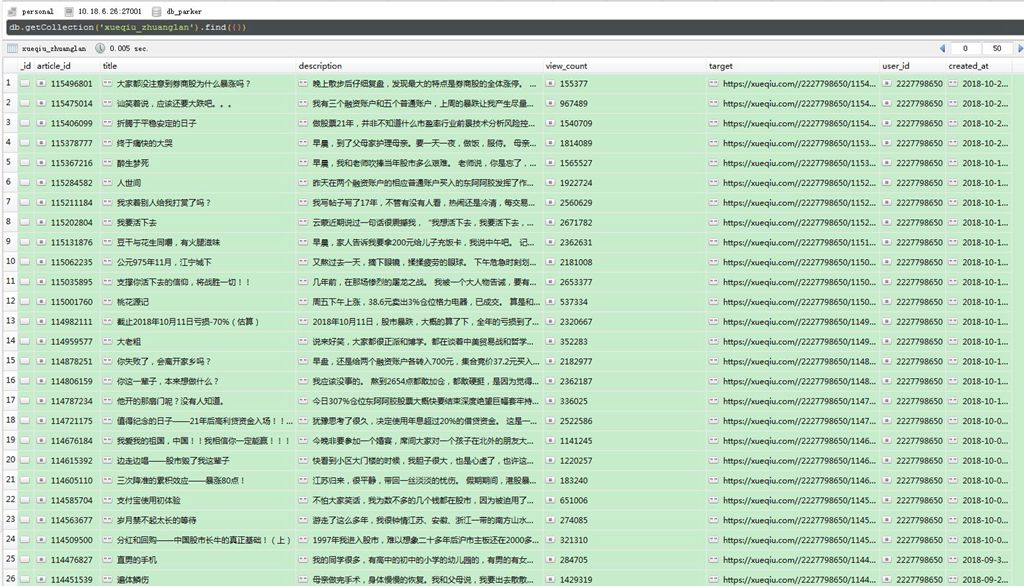
因为使用了代理,所有速度回有点慢,大概10分钟就把所有内容爬完了。
点击查看大图
数据是存储在mongodb数据库中,打开mongodb,可以查看每一条数据,还可以做统计。
点击查看大图
从今天(2018-10-23)追溯到元兄第一篇专栏文章(2014-2-17),元兄总共发了1144篇文章。
点击查看大图
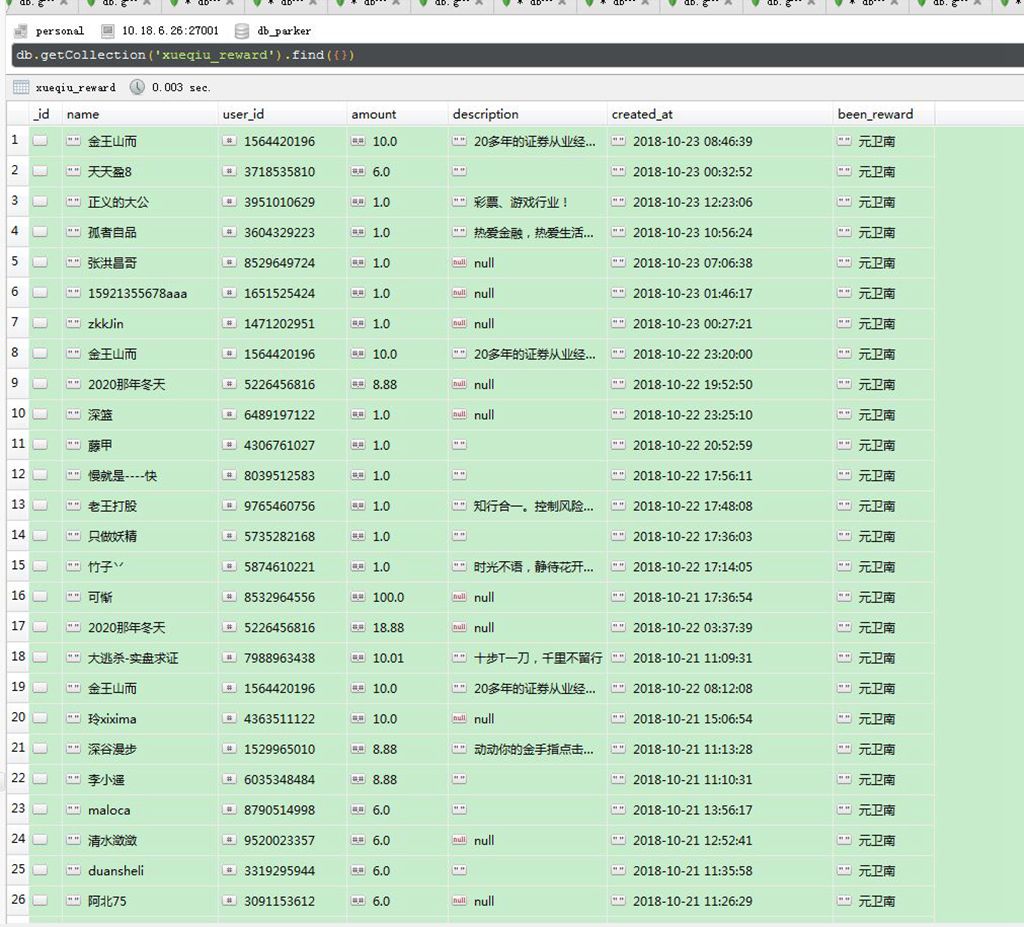
然后再看另外一个打赏的列表
点击查看大图
从最新的开始日期(2018-10-23),这位 金王山而 的用户似乎打赏的很多次,看了是元兄的忠实粉丝。
统计了下,元神共有4222次打赏。
点击查看大图
打赏总金额为:
24128.13
点击查看大图
好吧,太出乎意料了!!! 还以为会有几百万的打赏金额呀,最后算出来才只有24128,这点钱,元兄只够补仓5手东阿阿胶呀。
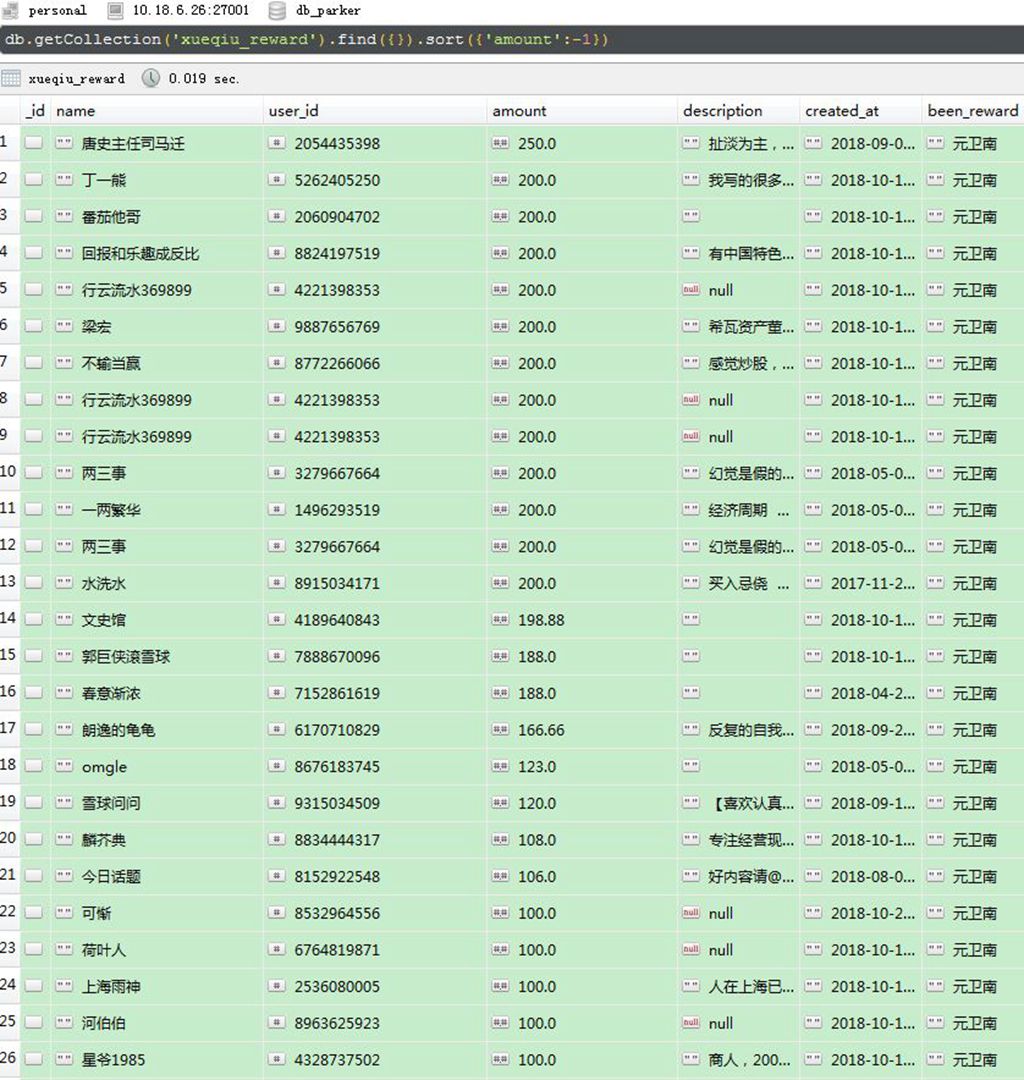
然后按照打赏金额排序:
点击查看大图
打赏最高金额的是唐史主任,金额为250元,200元的有十来个, 还看到之前梁大师打赏的200元,可以排在并列前10了。
其实大部分人都是拿小钱来打赏下,2元以下就有2621,占了50%了。
还是很支持元神每天坚持发帖,在当前的行情下或可以聊以慰藉,或娱乐大家,或引以为戒,让大家看到股市对散户生活造成的影响,避免重蹈覆辙。
原创文章
转载请注明出处:
http://30daydo.com/article/361
个人公众号:

下篇:
python数据分析入门 分析雪球元卫南每个月打赏收入 收起阅读 »
盘中交易随机性的危害!
盘中没有按照计划交易必然导致不断看盘不断操作让系统变形,让操作变味,最终导致亏损或者回报不足。
人类本性是追涨杀跌,抱团行动的!盘中的随意交易必然导致回归人类本性,变成群体动物。而恐惧和贪婪自然会找上自己!
投资的比较大的危害在于知道没有做到,还是缺乏纪律,导致盘中随意交易。
以上两点是导致亏损或者回报不足的根源!我自己以前几年一直如此,希望从今天开始改变,彻底改变!
今年现在思路慢慢清晰,建立自己的交易系统。希望探讨下让自己认识随机交易的危害!
给自己一条规则就是当天晚上下单明天的交易,盘中只看盘不操作,尽量做到少看盘,能一个月看一次最佳!
以上思考也源自于不预测,只应对。
盘面怎么走具有很大的随机性,而操作不能依赖于当时的感觉,否则就会掉入频繁交易和随机交易的陷阱!
投资需要大格局,先从战略上判断当时市场的水位,这样才能不会迷失在盘面变化和随机交易的细节当中。否则必将导致一叶障目,只见树木不见森林。放弃不必要的小收益,抓住低估修复的大周期,这样才能做到应对有如,进退自若!
投资是为了更好的生活,如果每天为了追涨杀跌,迷失交易导致惶惶不可终日,确实失去了投资的意义!
金钱很重要,但是不是最重要的,良好的心态需要修炼,也需要技术上的远离市场先生,最终才能获得投资真迹!
之前听过计划你的交易,交易你的计划,现在仔细想想觉得说得真好,也告知各位共勉!
欢迎讨论! 收起阅读 »
中年 鲁先圣 (摘录至智慧与思维)
现在我明白,很多事情不可为,纵使你多么努力也于事无补,所以就不去做。我也明白,世界的规则是如此神奇,你的努力成长,时间最终赋予你的,必将是一种气定神闲的超凡气质。
著名的心理学家津巴多和博弈德有一个关于“时间商”的理论:对待时间的态度,以及运用时间创造价值的能力。
这是真知灼见,看看世界上所有那些卓有建树的人,有哪一个不是时间的主人?俄国作家托尔斯泰,日本作家村上春树,都是每日凌晨四点起床,每天早晨写作五、六个小时,日积月累,成为著作等身的文学巨匠。
相反的是,那些一事无成的人,又有哪一个不是放纵时间、蹉跎岁月的人?
我很庆幸自己,在这么多的人生选择当中,我选择了勤奋与真诚,选择了梦想和远方。而这种选择,到了今天,全部沉淀成一种坚不可摧的超越青春的力量。我从故乡起步,经由无数的山山水水,经由一个个悲欢离合,也经由无数的人和事,把思索与梦想最终塑造成今天的我。
昂首阔步,需要底气;敢于说不,不仅要有底气,还需要资格。
只有每天都走陌生的路,每天都向未知的世界进发,你的领地才会不断扩大;如果每天都在重复自己,你的人生,就永远只能在原点踱步。
其实观察一个人是否强大,只看两点就足够:看他是否总是唉声叹气,看他走路是否昂首挺胸。
如果你总是在意别人是否关注你,那是你把自己看轻了。如果你足够强大,你的光芒,自会照亮整个世界。
北宋朱熹说:“不奋发,则心日颓废;不检束,则心日恣势。”如果一个人不努力,不严格要求自己的行为,则必将放纵而日渐迷惘,也就渐渐迷失了人生的方向。
一直喜欢刘禹锡的《乌衣巷》:“朱雀桥边野草花,乌衣巷口夕阳斜。旧时王谢堂前燕,飞入寻常百姓家。
”当年晋朝的王导、谢安两位宰相府就在乌衣巷里,到了唐朝,相府早已经不知所踪,而那曾经在相府筑巢的紫燕的后代,又在这里的百姓家筑巢了。沧海桑田,白驹过隙,所谓的荣华富贵,不过都是过眼烟云啊。
奥地利作家茨威格说:“所有命运赠送的礼物,都早已在暗中标好了价格。”这话我坚信不疑,我从来不相信天上会掉馅饼,更不相信有什么救世主。我也知道,任何所谓的幸运,背后一定潜藏着代价。
生活总是让我们与各种各样的人相遇,几乎每一天都不断有别样的人生出现在我们的视野里。每一次,当面对一个人的时候,我都在想,这个人怎么把自己的人生打造得这样华丽?或者,这个人怎么把自己弄得这样灰头灰脸、狼败不堪?而我,为什么是目前的我,而没有成为他们中的一个?
一切都不是偶然的,这就是人生的况味吧?
孩子渐渐长大了,我对孩子说,爸爸并没有什么人生的秘诀要告诉你,但是有两句话要你切记:你一定要远离那些每天苦大仇深的人,因为这些人会慢慢侵蚀掉你的正气和阳光;你要与朝气蓬勃、锐气凛凛的人在一起,他们不仅仅会不断激发你的才华,更会给你的人生注入不竭的正能量。 收起阅读 »
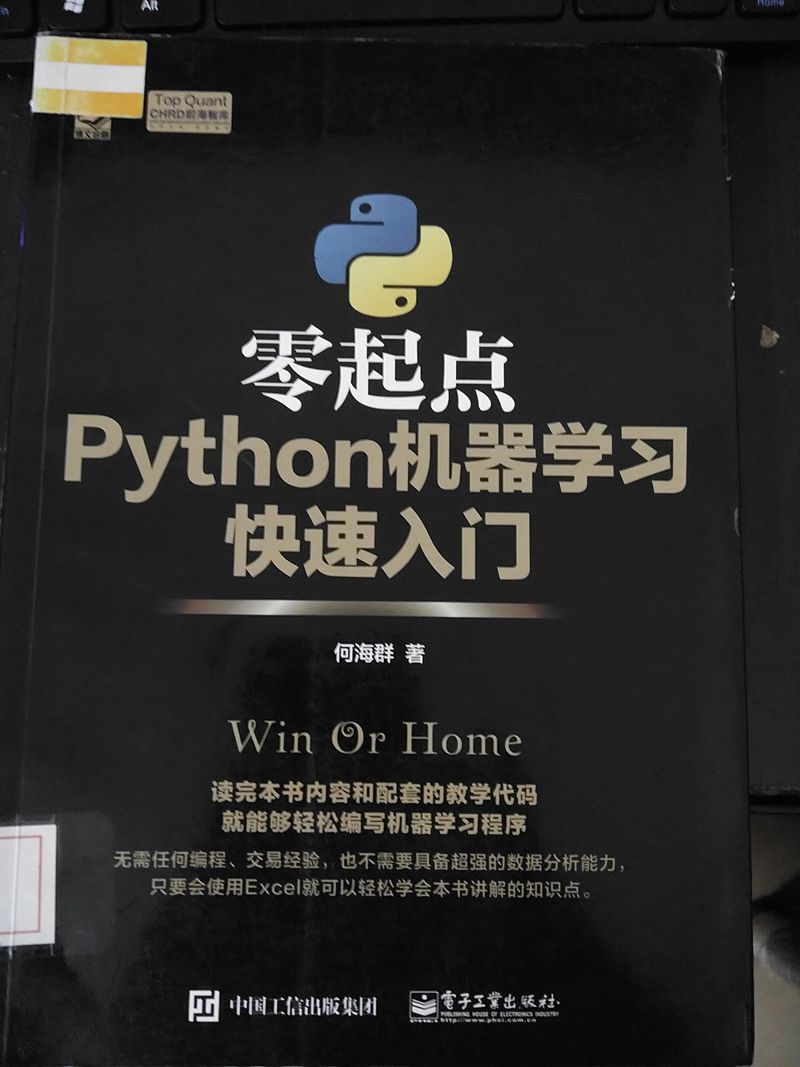
零起点python机器学习快速入门 读后感
这是第二次读零起点系列的书,这个系列的书没有最烂,只有更烂。
没想到出书还能够出成这个样子的。书的内容如果压缩一下,估计也就30-40页的内容,因为大部分都是不断的重复垃圾代码。
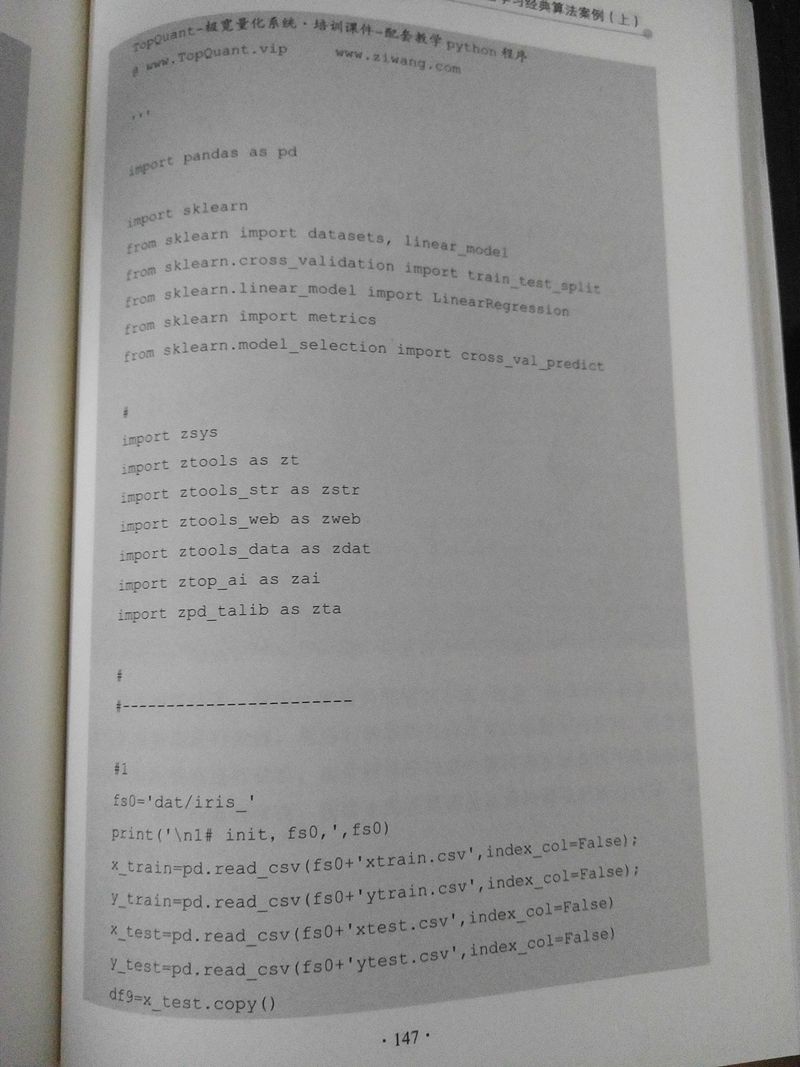
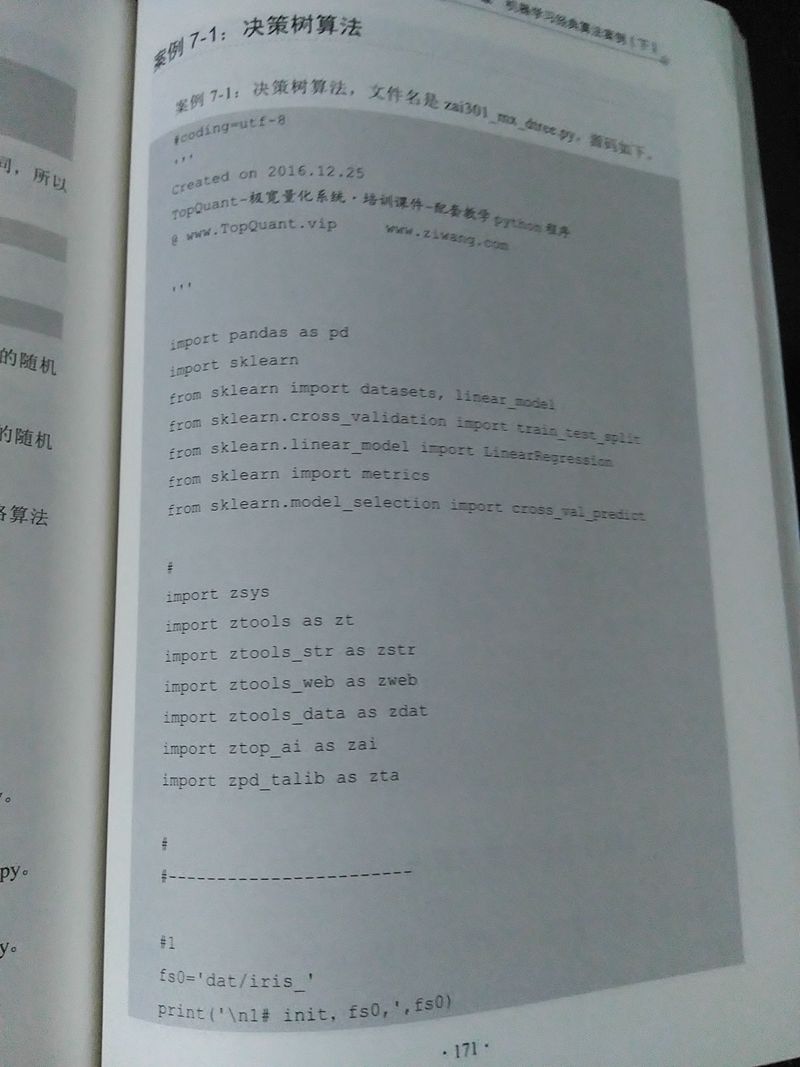
像import库,代码作者等信息,居然可以占了一页,关键是,这些无用的信息居然还在每个项目中都重复出现。
核心代码就没几句,大部分是输出信息,看起来书本大部分内容都是一样的,只是输出的具体内容不一样。
通篇都是输出 print (df.tail()) 这种格式的。
说实在,大部分内容都是在网上抄袭sklearn官网的,图也是截取官网的。很无趣的一本书,还好是在图书馆借的,花了2小时左右就把书看完了。
想看的真心建议不要买了。上几页样本让大家体验一下。
上面是不同的页,但是内容却无比的相似。
还有代码第一次见这么奇葩的,一行里面写几句python语句;
对训练结果集不做任何的归一化处理。
收起阅读 »
斐讯天天链app 影视中心无法下载电影了
python3 pytesseract Tesseract-OCR 验证码识别工具的安装
1. 首先安装Tesseract-OCR
可以google或者百度搜索,实在找不到可以到百度网盘下载:
https://pan.baidu.com/s/1Y7nLk5QKioK2DG5oxrMFlQ
下载后就直接安装, 安装时记住安装的路径,默认是在 C:\Program Files (x86)\Tesseract-OCR
2. 安装 pytesseract
使用pip命令安装
pip install pytesseract
3. 配置环境变量:
我的电脑 右键,点击属性
有个环境变量的选项:
然后添加一个环境变量:
名字叫:TESSDATA_PREFIX
它的值就是Tesseract-OCR安装路径
比如我的就是 C:\Program Files (x86)\Tesseract-OCR
4. 一般按照前三步就可以正常使用pytesseract了。
如果还是无法使用,那么可以找到文件 pytesseract.py,这个文件看你是安装的python2还是python3,
假如是python3,那么文件路径大概就是在 C:\python3_64\Lib\site-packages\pytesseract (具体位置根据你的python安装路径为准), 然后打开这个文件, 大概在28行的位置:
把这个tesseract_cmd的路径修改为 tesseract_cmd = r'C:\Program Files (x86)\Tesseract-OCR\tesseract.exe'
然后最重要的一部就是。 关掉你的pycharm或者IDE,或者cmd命令行。
重新打开pycharm或者新开一个cmd窗口, 然后运行一下pytesseract的识别代码,就可以正常识别拉。
from PIL import Image

im = Image.open('test_0.jpg')

pytesseract.image_to_string(im)
收起阅读 »
np.asfarray的用法
numpy.asfarray(a, dtype=<class 'numpy.float64'>)


Return an array converted to a float type.


Parameters:

a : array_like

The input array.


dtype : str or dtype object, optional

Float type code to coerce input array a. If dtype is one of the ‘int’ dtypes, it is replaced with float64.


Returns:

out : ndarray

The input a as a float ndarray.
用法就是把一个普通的数组转为一个浮点类型的数组:
Examples收起阅读 »
>>>
>>> np.asfarray([2, 3])
array([ 2., 3.])
>>> np.asfarray([2, 3], dtype='float')
array([ 2., 3.])
>>> np.asfarray([2, 3], dtype='int8')
array([ 2., 3.])
python爬虫集思录所有用户的帖子 scrapy写入mongodb数据库
项目采用scrapy的框架,数据写入到mongodb的数据库。 整个站点爬下来大概用了半小时,数据有12w条。
项目中的主要代码如下:
主spider
# -*- coding: utf-8 -*-

import re

import scrapy

from scrapy import Request, FormRequest

from jsl.items import JslItem

from jsl import config

import logging


class AllcontentSpider(scrapy.Spider):

    name = 'allcontent'


    headers = {

        'Host': 'www.jisilu.cn', 'Connection': 'keep-alive', 'Pragma': 'no-cache',

        'Cache-Control': 'no-cache', 'Accept': 'application/json,text/javascript,*/*;q=0.01',

        'Origin': 'https://www.jisilu.cn', 'X-Requested-With': 'XMLHttpRequest',

        'User-Agent': 'Mozilla/5.0(WindowsNT6.1;WOW64)AppleWebKit/537.36(KHTML,likeGecko)Chrome/67.0.3396.99Safari/537.36',

        'Content-Type': 'application/x-www-form-urlencoded;charset=UTF-8',

        'Referer': 'https://www.jisilu.cn/login/',

        'Accept-Encoding': 'gzip,deflate,br',

        'Accept-Language': 'zh,en;q=0.9,en-US;q=0.8'

    }


    def start_requests(self):

        login_url = 'https://www.jisilu.cn/login/'

        headers = {

            'Accept': 'text/html,application/xhtml+xml,application/xml;q=0.9,image/webp,image/apng,*/*;q=0.8',

            'Accept-Encoding': 'gzip,deflate,br', 'Accept-Language': 'zh,en;q=0.9,en-US;q=0.8',

            'Cache-Control': 'no-cache', 'Connection': 'keep-alive',

            'Host': 'www.jisilu.cn', 'Pragma': 'no-cache', 'Referer': 'https://www.jisilu.cn/',

            'Upgrade-Insecure-Requests': '1',

            'User-Agent': 'Mozilla/5.0(WindowsNT6.1;WOW64)AppleWebKit/537.36(KHTML,likeGecko)Chrome/67.0.3396.99Safari/537.36'}


        yield Request(url=login_url, headers=headers, callback=self.login,dont_filter=True)


    def login(self, response):

        url = 'https://www.jisilu.cn/account/ajax/login_process/'

        data = {

            'return_url': 'https://www.jisilu.cn/',

            'user_name': config.username,

            'password': config.password,

            'net_auto_login': '1',

            '_post_type': 'ajax',

        }


        yield FormRequest(

            url=url,

            headers=self.headers,

            formdata=data,

            callback=self.parse,

            dont_filter=True

        )


    def parse(self, response):

        for i in range(1,3726):

            focus_url = 'https://www.jisilu.cn/home/explore/sort_type-new__day-0__page-{}'.format(i)

            yield Request(url=focus_url, headers=self.headers, callback=self.parse_page,dont_filter=True)


    def parse_page(self, response):

        nodes = response.xpath('//div[@class="aw-question-list"]/div')

        for node in nodes:

            each_url=node.xpath('.//h4/a/@href').extract_first()

            yield Request(url=each_url,headers=self.headers,callback=self.parse_item,dont_filter=True)


    def parse_item(self,response):

        item = JslItem()

        title = response.xpath('//div[@class="aw-mod-head"]/h1/text()').extract_first()

        s = response.xpath('//div[@class="aw-question-detail-txt markitup-box"]').xpath('string(.)').extract_first()

        ret = re.findall('(.*?)\.donate_user_avatar', s, re.S)


        try:

            content = ret[0].strip()

        except:

            content = None


        createTime = response.xpath('//div[@class="aw-question-detail-meta"]/span/text()').extract_first()


        resp_no = response.xpath('//div[@class="aw-mod aw-question-detail-box"]//ul/h2/text()').re_first('\d+')


        url = response.url

        item['title'] = title.strip()

        item['content'] = content

        try:

            item['resp_no']=int(resp_no)

        except Exception as e:

            logging.warning('e')

            item['resp_no']=None


        item['createTime'] = createTime

        item['url'] = url.strip()

        resp =

        for index,reply in enumerate(response.xpath('//div[@class="aw-mod-body aw-dynamic-topic"]/div[@class="aw-item"]')):

            replay_user = reply.xpath('.//div[@class="pull-left aw-dynamic-topic-content"]//p/a/text()').extract_first()

            rep_content = reply.xpath(

                './/div[@class="pull-left aw-dynamic-topic-content"]//div[@class="markitup-box"]/text()').extract_first()

            # print rep_content

            agree=reply.xpath('.//em[@class="aw-border-radius-5 aw-vote-count pull-left"]/text()').extract_first()

            resp.append({replay_user.strip()+'_{}'.format(index): [int(agree),rep_content.strip()]})


        item['resp'] = resp

        yield item
login函数是模拟登录集思录,通过抓包就可以知道一些上传的data。
然后就是分页去抓取。逻辑很简单。
然后pipeline里面写入mongodb。
import pymongo

from collections import OrderedDict

class JslPipeline(object):

    def __init__(self):

        self.db = pymongo.MongoClient(host='10.18.6.1',port=27017)

        # self.user = u'neo牛3' # 修改为指定的用户名 如 毛之川 ,然后找到用户的id,在用户也的源码哪里可以找到 比如持有封基是8132

        self.collection = self.db['db_parker']['jsl']

    def process_item(self, item, spider):

        self.collection.insert(OrderedDict(item))

        return item
抓取到的数据入库mongodb:
点击查看大图
原创文章
转载请注明出处:http://30daydo.com/publish/article/351
收起阅读 »
docker里运行mongodb,保存的数据在外部使用mongoexport不能导出:提示错误Unrecognized field 'snapshot'
很无语。 目前还找不到原因。
docker里面运行的mongodb, mongodb的数据挂载到宿主机。 开放了27017端口。
在windows下使用mongoexport工具导出数据:
错误信息:
C:\Program Files\MongoDB\Server\3.4\bin>mongoexport.exe /h 10.18.6.102 /d stock

/c company /o company.json /type json

2018-08-31T14:13:47.841+0800    connected to: 10.18.6.102

2018-08-31T14:13:47.854+0800    Failed: Failed to parse: { find: "company", filt

er: {}, sort: {}, skip: 0, snapshot: true, $readPreference: { mode: "secondaryPr

eferred" }, $db: "stock" }. Unrecognized field 'snapshot'.


C:\Program Files\MongoDB\Server\3.4\bin>
目前这个问题已经解决:
需要进去docker容器里面,然后在容器里面操作,把数据导出来到挂载的目录下,然后可以直接获取到数据了。 收起阅读 »
django不同版本的兼容性太麻烦了
哪些淘宝店铺被你列入了黑名单? 让我们一起来曝光
1. 以尚牛仔
转至知乎的:
让我来一个。
买了一条牛仔裤,收到货没及时拆开,过了一个多星期再拆发现拉链是坏的,于是就去找卖家。
上来就说我买的时间太久了,一句道歉的话都没说。后面再回她干脆不鸟我了...然后我就给了差评“坏了就是坏了,态度还那么差!连句道歉都没有,现在鸟都不鸟了”。接着又过十天,也就是今天下午,打电话给我让我删了差评,然后再给我退20块赔偿,当时刚睡醒,听她态度还行就同意了。然后挂完电话想说晚点再删,没想到她就开始在淘宝上连环call!我就给她删了。


当时也想过会不会删了就被拉黑名单,但想说刚刚态度不错就没继续怀疑!但是!果然!删完以后态度依旧很十多天前一个样!依旧是保持高冷的态度鸟都不鸟,打电话也不接了!呵呵!然后百度了一下,说这是许多卖家惯用的手段,让你先删了评论给你赔偿,然后等你删了就不理你。
告诫各位下次在淘宝上买的东西不好就是不好,该差评就差评,别被卖家骗了!
告诫各位下次在淘宝上买的东西不好就是不好,该差评就差评,别被卖家骗了!
告诫各位下次在淘宝上买的东西不好就是不好,该差评就差评,别被卖家骗了! 收起阅读 »
how to use proxy in scrapy_splash ?
yield scrapy.Request(

                url=self.base_url.format(i),

                meta={'page':str(i),

                    'splash': {

                        'args': {

                            'images':0,

                            'wait': 15,

                            'proxy': self.get_proxy(),

                        },

                        'endpoint': 'render.html',

                        },

            },

            )
其中get_proxy() 返回的是 字符创,类似于 http://8.8.8.8.8:8888 这样的格式代理数据。
这个方式自己试过是可以使用的。
当然也可以使用 scrapy_splash 中的 SplashRequest方法进行调用,参数一样,只是位置有点变化。
方法二是写中间件,不过自己试了很多次,没有成功。 感觉网上的都是忽悠。
就是在 process_request中修改 request['splash']['args']['proxy']=xxxxxxx
无效,另外一个朋友也沟通过,也是说无法生效。
如果有人成功了的话,可以私信交流交流。
收起阅读 »
python mongodb大数据(>3GB)转移Mysql数据库
for i in doc.find({})进行逐行遍历的话,游标就会超时,而且越到后面速度越慢.于是使用了分段遍历的方法.
# -*-coding=utf-8-*-

import pandas as pd

import json

import pymongo

from sqlalchemy import create_engine


# 将mongo数据转移到mysql


client = pymongo.MongoClient('xxx')

doc = client['spider']['meituan']

engine = create_engine('mysql+pymysql://xxx:xxx@xxx:/xxx?charset=utf8')


def classic_method():

    temp =

    start = 0

    # 数据太大还是会爆内存,或者游标丢失

    for i in doc.find().batch_size(500):

        start += 1

        del i['_id']

        temp.append(i)

        print(start)


    print('start to save to mysql')

    df = pd.read_json(json.dumps(temp))

    df = df.set_index('poiid', drop=True)

    df.to_sql('meituan', con=engine, if_exists='replace')

    print('done')


def chunksize_move():

    block = 10000

    total = doc.find({}).count()

    iter_number = total // block


    for i in range(iter_number + 1):

        small_part = doc.find({}).limit(block).skip(i * block)

        list_data =


        for item in small_part:

            del item['_id']

            del item['crawl_time']

            item['poiid'] = int(item['poiid'])

            for k, v in item.items():

                if isinstance(v, dict) or isinstance(v, list):


                    item[k] = json.dumps(v, ensure_ascii=False)


            list_data.append(item)


        df = pd.DataFrame(list_data)

        df = df.set_index('poiid', drop=True)


        try:

            df.to_sql('meituan', con=engine, if_exists='append')

            print('to sql {}'.format(i))

        except Exception as e:

            print(e)


chunksize_move()
速度比一次批量的要快不少. 收起阅读 »

