python django3 跨域问题解决
一个旧的项目,本来用的MVC的模式,后面需要拆分,前端换成React,所以django部分就换成只有api,不负责渲染了。
然后react范围django api,会有跨域问题,所以需要额外配置一下。
网上很多教程都是基于最新的django4或者更新。
本文只针对django3 解决。
然后在setting里面配置这个
如果需要更加细致的配置,比如只要求某个IP的机子才能访问,或者只能某个GET方法运行跨域。
就可以了 收起阅读 »
然后react范围django api,会有跨域问题,所以需要额外配置一下。
网上很多教程都是基于最新的django4或者更新。
本文只针对django3 解决。
如果用的django3.10不然大概率是装不上的。
需要对应的版本的cors库:
pip install django-cors-headers==3.10.0
然后在setting里面配置这个
然后就OK了。
CORS_ORIGIN_ALLOW_ALL = True


INSTALLED_APPS = [


    'corsheaders',

]


MIDDLEWARE = [


    'corsheaders.middleware.CorsMiddleware',

]
如果需要更加细致的配置,比如只要求某个IP的机子才能访问,或者只能某个GET方法运行跨域。
# 允许跨域源

CORS_ORIGIN_ALLOW_ALL = True

CORS_ALLOW_CREDENTIALS = True

CORS_ORIGIN_WHITELIST = (

	'*'

)


# 允许的请求方式

CORS_ALLOW_METHODS = (

    'DELETE',

    'GET',

    'OPTIONS',

    'PATCH',

    'POST',

    'PUT',

    'VIEW',

)


# 允许的请求头

CORS_ALLOW_HEADERS = (

    'XMLHttpRequest',

    'X_FILENAME',

    'accept-encoding',

    'authorization',

    'content-type',

    'dnt',

    'origin',

    'user-agent',

    'x-csrftoken',

    'x-requested-with',

    'Pragma',

    # 额外允许的请求头

    'token',

)
就可以了 收起阅读 »
python自动生成网站sitemap.xml 代码
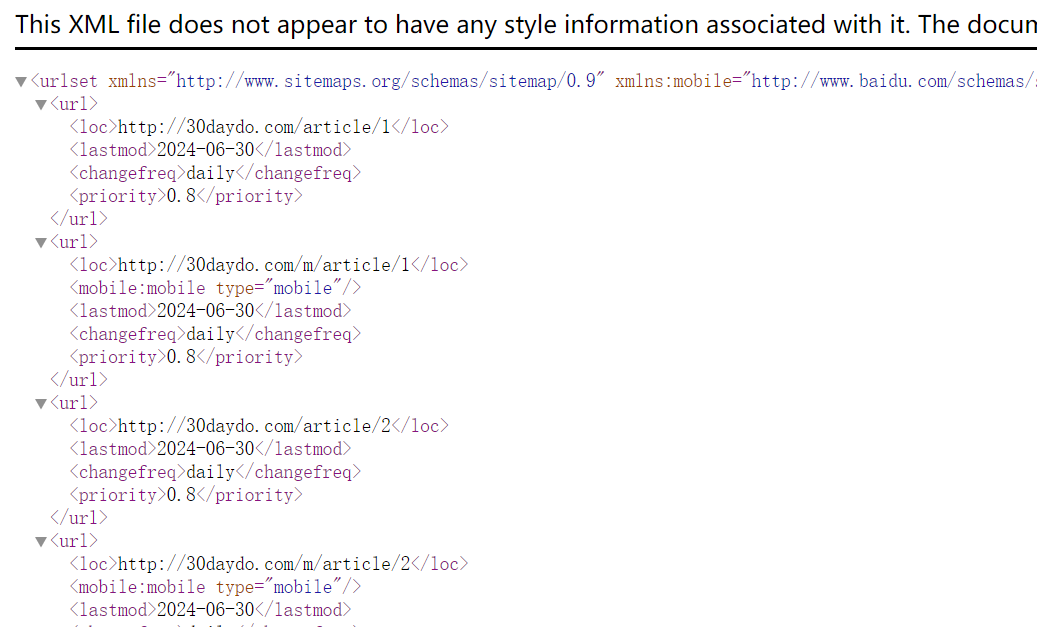
sitemap格式为:
然后我们要做的就是拿到我们页面上所有的链接地址,填充到这里:
只需要替换上面的http://30daydo.com/article/1 地址就可以了。这个你跟你的完整url规律生成,或者从数据库读取就好了。
然后生成一个文件,自动复制到文章目录就可以了。
完整源码:
https://github.com/Rockyzsu/sitemap_generator
欢迎star,有问题留言。
收起阅读 »
<urlset xmlns="http://www.sitemaps.org/schemas/sitemap/0.9" xmlns:mobile="http://www.baidu.com/schemas/s ... gt%3B

<url>

<loc>http://30daydo.com/article/1</loc>

<mobile:mobile type="mobile"/>

<lastmod>2024-06-30</lastmod>

<changefreq>daily</changefreq>

<priority>0.8</priority>

</url>

</urlset>
然后我们要做的就是拿到我们页面上所有的链接地址,填充到这里:
<url>

<loc>http://30daydo.com/article/1</loc>

<mobile:mobile type="mobile"/>

<lastmod>2024-06-30</lastmod>

<changefreq>daily</changefreq>

<priority>0.8</priority>

</url>
只需要替换上面的http://30daydo.com/article/1 地址就可以了。这个你跟你的完整url规律生成,或者从数据库读取就好了。
然后生成一个文件,自动复制到文章目录就可以了。
完整源码:
https://github.com/Rockyzsu/sitemap_generator
欢迎star,有问题留言。
收起阅读 »
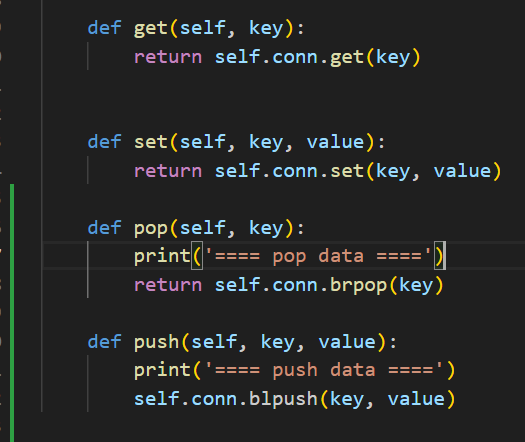
python redis 是没有 blpush这个操作的
上面的redis代码里面:
报错:
问题在于这一句:
self.conn.blpush(key, value)
python redis里面是没有blpush这个操作的。
也就是没有阻塞插入这个动作。 比如一个list满了,就阻塞插入数据,在python redis里面是没有这个操作。
你可以用llen 先判读一下长度,然后再决定是否插入就可以了。
收起阅读 »
class RedisCls:


    def __init__(self):

        self.conn = self.getConn()


    def getConn(self):

        try:

            r = redis.Redis(host=redisconfig['redis']['host'], port=redisconfig['redis']['port'], db=0,

                            decode_responses=True, password=redisconfig['redis']['password'], socket_connect_timeout=5)

        except Exception as e:

            print(e)

            raise IOError('connect redis failed')

        else:

            return r


    def get(self, key):

        return self.conn.get(key)


    def set(self, key, value):

        return self.conn.set(key, value)


    def pop(self, key):

        print('==== pop data ====')

        return self.conn.brpop(key)


    def push(self, key, value):

        print('==== push data ====')

        self.conn.blpush(key, value)
报错:
AttributeError: 'Redis' object has no attribute 'blpush'. Did you mean: 'lpush'?
问题在于这一句:
self.conn.blpush(key, value)
python redis里面是没有blpush这个操作的。
也就是没有阻塞插入这个动作。 比如一个list满了,就阻塞插入数据,在python redis里面是没有这个操作。
你可以用llen 先判读一下长度,然后再决定是否插入就可以了。
收起阅读 »
anaconda安装python报错 缺少:api-ms-win-core-path-l1-1-0.dll
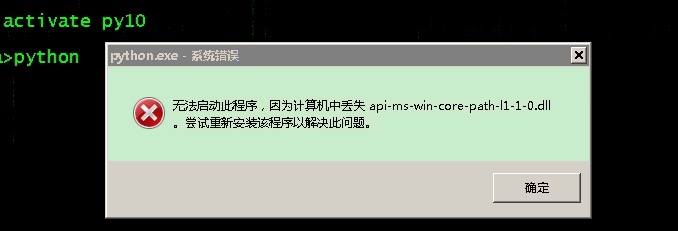
在win7的系统里面,使用anaconda安装python10,安装上了之后,激活虚拟环境: 然后运行python结果报错:
少了dll文件。
于是学网上(csdn)的方法进行修复,把缺的dll下载下来复制到system32的目录。
但是后面还是报错。
后面才发现,win7的机子只能安装python3.8以下的版本,高版本会报错。
收起阅读 »
少了dll文件。
于是学网上(csdn)的方法进行修复,把缺的dll下载下来复制到system32的目录。
但是后面还是报错。
Python path configuration:

  PYTHONHOME = (not set)

  PYTHONPATH = (not set)

  program name = 'python'

  isolated = 0

  environment = 1

  user site = 1

  import site = 1

  sys._base_executable = '\u0158\x06'

  sys.base_prefix = '.'

  sys.base_exec_prefix = '.'

  sys.executable = '\u0158\x06'

  sys.prefix = '.'

  sys.exec_prefix = '.'

  sys.path = [

    'C:\\anaconda\\python38.zip',

    '.\\DLLs',

    '.\\lib',

    '',

  ]

Fatal Python error: init_fs_encoding: failed to get the Python codec of the filesystem encodin

Python runtime state: core initialized

ModuleNotFoundError: No module named 'encodings'


Current thread 0x000013a8 (most recent call first):
后面才发现,win7的机子只能安装python3.8以下的版本,高版本会报错。
收起阅读 »
linux下自制护眼,久坐提醒 python小程序
很简单,在任意linux版本均可运行,python3环境;
保存为app.py
运行; python app.py
然后写到系统的crontab计划任务里面,每个40分钟执行几次,
屏幕会黑屏60s , 60可以自行设置。
挺好用的。
PS: AI生成的image还真心不错呢。 就是太吃显存了
收起阅读 »
保存为app.py
运行; python app.py
然后写到系统的crontab计划任务里面,每个40分钟执行几次,
屏幕会黑屏60s , 60可以自行设置。
挺好用的。
import datetime as dt

import tkinter as tk

# Linux 护眼程序

sec = 60 # 休息时间 秒


root = tk.Tk()

root.config(bg='black')

root.wm_attributes('-topmost',1)

root.wm_attributes('-fullscreen',1)

L = tk.Label(root,font=('Consolas', 50), bg='black')

L.place(relx=0.5,rely=0.5,anchor=tk.CENTER)


# 改变的内容

msg = "{}\n 站起来 {} \n 动一动 {}\n{}"

now = dt.datetime.now()

aa = {0:'↑',1:'→',2:'↓',3:'←'}

bb = {0:'~~_↑_~~',1:'~_↑ ↑_~'}


for i in range(sec):

    t = msg.format(sec-i,aa[i%4],bb[i%2],(now+dt.timedelta(seconds=i)).ctime())

    c = 'Black' # 颜色可以搞随机换

    root.after(i*1000,L.config,{'text':t,'fg':c})

    root.after(sec*1000,root.destroy)


root.mainloop()
PS: AI生成的image还真心不错呢。 就是太吃显存了
收起阅读 »
python父类如何判断子类时候实现了某个方法或者属性赋值
用hasattr内置函数即可
看看下面的例子
obj.run调用的是parent里面的方法。
而parent的run里面调用一个hasattr, 来判断self 是否有get_salary这个函数。
因为self是从子类传进去的,所以self实际是 child的实例。
因为child里面是有get_salary方法(属性)的,所以hasatrr 是返回true, 然后调用子类的self.get_salary
从而程序没有报错。打印正确的返回数据
收起阅读 »
看看下面的例子
 class Parent:


        def __init__(self):

            self.name='parent'

            self.age=10


        def run(self):

            if hasattr(self,'get_salary'):

                print('has func')

                print(self.get_salary())


class Child(Parent):


    def __init__(self):

        # self.name='child'

        Parent.__init__(self)

        self.salary=100


    def get_salary(self):

        return self.salary


obj = Child()

obj.run()
obj.run调用的是parent里面的方法。
而parent的run里面调用一个hasattr, 来判断self 是否有get_salary这个函数。
因为self是从子类传进去的,所以self实际是 child的实例。
因为child里面是有get_salary方法(属性)的,所以hasatrr 是返回true, 然后调用子类的self.get_salary
从而程序没有报错。打印正确的返回数据
收起阅读 »
国庆节 微信头像红旗 制作 附 python代码 和 红旗素材
国庆节的时候,很多地方都会升挂国旗,庆祝祖国一年一度的节日。
给自己制作国旗头像,是一件很有意义的事。微信官方就曾经举办过活动。
制作国旗头像的方法有很多,本文给大家介绍用Python制作渐变的微信国旗头像。
渐变的国旗头像效果非常好看。
制作方式也很简单,下面介绍实现方法,可以复制本文的代码,制作属于自己的国旗头像。
1.准备国旗图片
声明:严禁非法使用国旗图片。在国旗图片下载页面下方有《国旗法》等相关规定。
本文使用1024像素的图片。
2.准备头像图片
登录自己的微信,打开个人信息,点击头像,点击右上角的三个点,将图片保存到手机,
然后将图片传到电脑上。
为了不失一般性,本文使用的图片是我从网络上获取的一张600*600像素的头像图片。
准备好后,将国旗图片和头像图片拷贝到代码同一个目录下。
代码实现
先安装Python中用于处理图片的pillow库。
安装完成后,使用pillow库来制作国旗头像。
只需要十几行代码就能实现。完整代码如下。
到此为止,已经制作好了国旗头像了。
下面是代码的详细结束:
代码介绍:
本文介绍了用Python制作微信国旗头像的方法。在本文的代码中,以左上角为圆心,离圆心越远越透明,可以修改key值,调整国旗透明变化的范围。
如果需要制作其他渐变类型,如以右上角为圆心逐渐透明、从左侧向右侧逐渐透明、从上到下逐渐透明等,可以修改国旗渐变部分的代码、翻转图片等。
收起阅读 »
给自己制作国旗头像,是一件很有意义的事。微信官方就曾经举办过活动。
制作国旗头像的方法有很多,本文给大家介绍用Python制作渐变的微信国旗头像。
渐变的国旗头像效果非常好看。
制作方式也很简单,下面介绍实现方法,可以复制本文的代码,制作属于自己的国旗头像。
1.准备国旗图片
声明:严禁非法使用国旗图片。在国旗图片下载页面下方有《国旗法》等相关规定。
本文使用1024像素的图片。
2.准备头像图片
登录自己的微信,打开个人信息,点击头像,点击右上角的三个点,将图片保存到手机,
然后将图片传到电脑上。
为了不失一般性,本文使用的图片是我从网络上获取的一张600*600像素的头像图片。
准备好后,将国旗图片和头像图片拷贝到代码同一个目录下。
代码实现
先安装Python中用于处理图片的pillow库。
pip install pillow
安装完成后,使用pillow库来制作国旗头像。
只需要十几行代码就能实现。完整代码如下。
# coding=utf-8

from PIL import Image

import math


key = 3.2# 修改key值可以调整国旗的范围,推荐2~4之间的数字,支持小数

motherland_flag = Image.open('flag-1024.png')

head_picture = Image.open('mmexport1663893338571.png')

# 截图国旗上的五颗五角星

flag_width, flag_height = motherland_flag.size

crop_flag = motherland_flag.crop((66, 0, flag_height+66, flag_height))

# 将国旗截图处理成颜色渐变

for i in range(flag_height):

    for j in range(flag_height):

            color = crop_flag.getpixel((i, j))

            distance = int(math.sqrt(i*i + j*j))

            alpha = 255 - int(distance//key)

            new_color = (*color[0:-1], alpha if alpha > 0 else 0)

            crop_flag.putpixel((i, j), new_color)

# 修改渐变图片的尺寸,适应头像大小,粘贴到头像上

new_crop_flag = crop_flag.resize(head_picture.size)

head_picture.paste(new_crop_flag, (0, 0), new_crop_flag)

# 保存自己的国旗头像

head_picture.save('国旗头像.png')
到此为止,已经制作好了国旗头像了。
下面是代码的详细结束:
代码介绍:
代码介绍:


导入需要使用的Python库,pillow库用于对图片进行截取、大小修改、粘贴等处理。math库用于计算像素点的距离。


使用Image.open()方法,读取准备好的国旗图片和头像图片到代码中。


对国旗图片进行截取,获取一张正方形的图片,截取时调整截取位置,保证5颗五角星完整展示在截图中。


crop()方法中传入的是一个(left, upper, right, lower)的元组,分别是截图的左、上、右、下像素位置。

将正方形国旗截图设置成透明度渐变的图片。国旗图片的模式默认是RGBA,本文需要的刚好是RGBA(red,green,blue,alpha)模式的图片,RGBA模式的图片颜色值是一个长度为4的元组,我们修改不同像素点的A值即可将图片设置成渐变。


本文是以国旗左上角为圆心,离圆心越远的像素点A值越小,像素点越透明。使用getpixel()和putpixel()两个方法来获取和重设像素点的颜色值,使用math.sqrt()计算像素点距离。


将渐变图片的大小转换成和头像的大小一样,然后粘贴到图片顶层。使用resize()方法重设图片大小,使用paste()方法粘贴图片。


保存图片,此时的微信头像图片上已经粘贴了透明渐变的国旗图片,微信国旗头像制作完成。
本文介绍了用Python制作微信国旗头像的方法。在本文的代码中,以左上角为圆心,离圆心越远越透明,可以修改key值,调整国旗透明变化的范围。
如果需要制作其他渐变类型,如以右上角为圆心逐渐透明、从左侧向右侧逐渐透明、从上到下逐渐透明等,可以修改国旗渐变部分的代码、翻转图片等。
收起阅读 »
ciso8601 性能对比 datetime 默认库
In [1]: import datetime, aniso8601, iso8601, isodate, dateutil.parser, arrow, ciso8601


In [2]: ds = u'2014-01-09T21:48:00.921000'


In [3]: %timeit ciso8601.parse_datetime(ds)

1000000 loops, best of 3: 204 ns per loop


In [4]: %timeit datetime.datetime.strptime(ds, "%Y-%m-%dT%H:%M:%S.%f")

100000 loops, best of 3: 15 µs per loop


In [5]: %timeit dateutil.parser.parse(ds)

10000 loops, best of 3: 122 µs per loop


In [6]: %timeit aniso8601.parse_datetime(ds)

10000 loops, best of 3: 28.9 µs per loop


In [7]: %timeit iso8601.parse_date(ds)

10000 loops, best of 3: 42 µs per loop


In [8]: %timeit isodate.parse_datetime(ds)

10000 loops, best of 3: 69.4 µs per loop


In [9]: %timeit arrow.get(ds).datetime

10000 loops, best of 3: 87 µs per loop
In [1]: import datetime, aniso8601, iso8601, isodate, dateutil.parser, arrow, ciso8601


In [2]: ds = u'2014-01-09T21:48:00.921000+05:30'


In [3]: %timeit ciso8601.parse_datetime(ds)

1000000 loops, best of 3: 525 ns per loop


In [4]: %timeit dateutil.parser.parse(ds)

10000 loops, best of 3: 162 µs per loop


In [5]: %timeit aniso8601.parse_datetime(ds)

10000 loops, best of 3: 36.8 µs per loop


In [6]: %timeit iso8601.parse_date(ds)

10000 loops, best of 3: 53.5 µs per loop


In [7]: %timeit isodate.parse_datetime(ds)

10000 loops, best of 3: 82.6 µs per loop


In [8]: %timeit arrow.get(ds).datetime

10000 loops, best of 3: 104 µs per loop
Even with time zone information, ciso8601 is 70x as fast as aniso8601.
Tested on Python 2.7.10 on macOS 10.12.6 using the following modules:
ciso8601 是纳秒级别的,如果要对上千万的数据操作,建议使用ciso这个C库。
收起阅读 »
python sqlite3 多线程 批量写入 【代码】
1. 随机生成一个数组数据
2. 在多线程里面批量插入数据
几个关注点:
sqlite3.connect(_type, check_same_thread=False) 要设置为False
批量写的时候,记得要加锁
假如不加锁会出错:
收起阅读 »
2. 在多线程里面批量插入数据
几个关注点:
sqlite3.connect(_type, check_same_thread=False) 要设置为False
批量写的时候,记得要加锁
import datetime

import random

import sqlite3

import threading

import logging as log

import time


lock = threading.Lock()

class SQLiteDBCls:


    def __init__(self, cache=True):

        _type = ":memory:"


        self.db = sqlite3.connect(_type, check_same_thread=False)


        self.table_name = 'tick_data'


    def create_index(self):


        cmd = 'CREATE INDEX code_ix ON {} (current)'.format(self.table_name)

        with lock:

            try:


                cursor = self.db.cursor()

                cursor.execute(cmd)

            except Exception as e:

                log.info(e)

                self.db.rollback()

            else:

                self.db.commit()


    def create_table(self):

        # cursor = self.db.cursor()

        cmd = 'create table if not exists {} (id INTEGER PRIMARY KEY AUTOINCREMENT,code text,open double,current time)'.format(

            self.table_name)

        with lock:

            try:

                cursor = self.db.cursor()

                cursor.execute(cmd)

            except Exception as e:

                log.info(e)

                self.db.rollback()

            else:

                self.db.commit()


    def add(self, code, price, t):

        cmd = 'insert into {} (code,open,current) values (?,?,?);'.format(self.table_name)

        with lock:

            try:

                cursor = self.db.cursor()

                cursor.execute(cmd, (code, price, t))

            except Exception as e:

                log.info(e)

                self.db.rollback()

            else:

                self.db.commit()


    def batch_add(self, data):


        # 批量加入

        print('===========',threading.current_thread().getName())

        # log.info(threading.current_thread().getName())

        cmd = 'insert into {} (code,open,current) values (?,?,?)'.format(self.table_name)

        with lock:

            try:

                cursor = self.db.cursor()

                cursor.executemany(cmd, data)

            except Exception as e:

                log.info(e)

                self.db.rollback()

            else:

                self.db.commit()


    def result(self):

        cmd = 'select count(*) from `{}`'.format(self.table_name)


        with lock:


            try:

                cursor = self.db.cursor()

                cursor.execute(cmd)

            except Exception as e:

                log.info(e)

                self.db.rollback()

            else:

                return cursor.fetchone()


def data_gen():

    minute = 6000

    code = ['123011.SS','110010.SS','112111.SS']

    for i in range(minute):

        current = (datetime.datetime.now()+datetime.timedelta(minutes=i)).strftime('%H:%M:%D')

        data_list =

        for c in code:

            price = 5+random.random()+120

            data = (c,price,current)

            data_list.append(data)

        yield data_list

        # time.sleep(0.5)


app = SQLiteDBCls(cache=True)

app.create_table()

app.create_index()


def data_validation():

    print(app.result())

    app.sync_up()


def multithread_mode():

    total_count = 0

    thread_list =

    for d in data_gen():

        print(d)

        total_count+=len(d)

        # app.batch_add(d)

        t=threading.Thread(target=app.batch_add,args=(d,))

        thread_list.append(t)

    for t in thread_list:

        t.start()


    for t in thread_list:

        t.join()


    print(total_count)


if __name__=='__main__':

    multithread_mode()

    data_validation()
假如不加锁会出错:
File "/home/xda/miniconda3/envs/cpy/lib/python3.9/threading.py", line 910, in run

    self._target(*self._args, **self._kwargs)

  File "/home/xda/github/stock_strategy/sqlite_issue_debug.py", line 77, in batch_add

    self.db.commit()

Exception in thread Thread-3824:

Exception in thread Thread-3826:

Traceback (most recent call last):

  File "/home/xda/miniconda3/envs/cpy/lib/python3.9/threading.py", line 973, in _bootstrap_inner

sqlite3.OperationalError: cannot commit - no transaction is activeTraceback (most recent call last):

  File "/home/xda/github/stock_strategy/sqlite_issue_debug.py", line 72, in batch_add


    cursor.executemany(cmd, data)

sqlite3.InterfaceError: Error binding parameter 0 - probably unsupported type.
收起阅读 »
python安装demjson报错:error in setup command: use_2to3 is invalid.
原因:在setuptools 58之后的版本已经废弃了use_2to3所以安装一个旧版本的setuptools就可以了
随便整一个
pip install setuptools==57.5.0
python seo 小工具 查询百度权重,备案信息
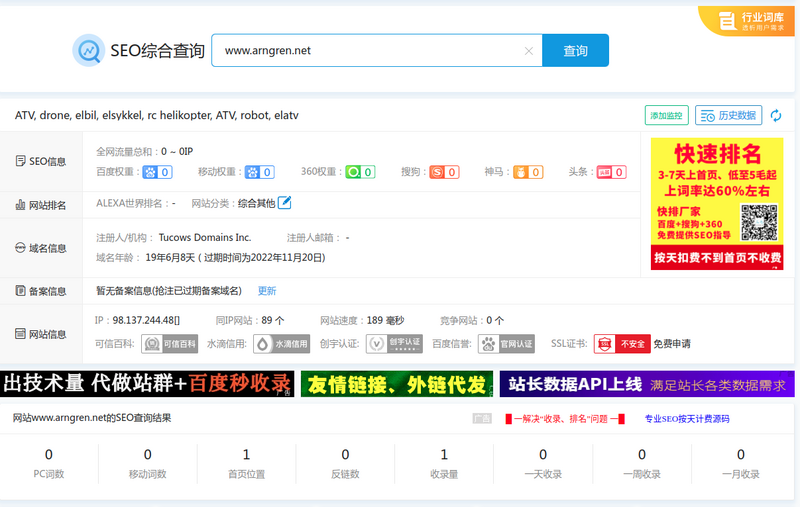
平时主要比较频繁查询 站长之家这个网站:
还有百度的收录情况:
对于经常操作的朋友,需要使用程序查询,还可以批量查询,并保存到excel或者数据库。
上图为入库到mongodb的数据
源码实现:
main.py 入口函数:
其他具体实现的文件:
baidu_collection.py
seo_info.py
运行效果:
需要完整代码,可关注公众号联系:
 收起阅读 »
还有百度的收录情况:
对于经常操作的朋友,需要使用程序查询,还可以批量查询,并保存到excel或者数据库。
上图为入库到mongodb的数据
源码实现:
main.py 入口函数:
from baidu_collection import baidu_site_collect

from seo_info import crawl_info

from configure.settings import DBSelector

import datetime

import argparse


client = DBSelector().mongo('qq')

doc = client['db_parker']['seo']


def main():


    parser = argparse.ArgumentParser()

    '''

    Command line options

    '''

    parser.add_argument(

        '-n',

        '--name', type=str,

        help='input web domain'

    )


    parser.add_argument(

        '-f',

        '--file', type=str,

        help='input web site domain file name'

    )


    FLAGS = parser.parse_args()

    site_list=

    if FLAGS.name:

        print(FLAGS.name)

        if '.' in FLAGS.name:

            site_list.append(FLAGS.name)


    elif FLAGS.file:

        print(FLAGS.file)

        with open(FLAGS.file,'r') as fp:

            webs=fp.readlines()


        site_list.extend(list(map(lambda x:x.strip(),webs)))


    if site_list:


        run(site_list=site_list)

    else:

        print("please input correct web domain")


def run(site_list):


    # TODO: 改为命令行形式


    for site in site_list:

        count = baidu_site_collect(site)

        info = crawl_info(site)

        print(info)

        print(count)

        info['site'] = site

        info['baidu_count'] = count

        info['update_time'] = datetime.datetime.now()

        doc.insert_one(info)


if __name__ == '__main__':

    main()
其他具体实现的文件:
baidu_collection.py
from parsel import Selector

import requests


def baidu_site_collect(site):

    # 百度收录

    headers = {'User-Agent': 'Chrome Google FireFox IE'}

    url = 'https://www.baidu.com/s?wd=site:{}&rsv_spt=1&rsv_iqid=0xf8b7b7e50006c034&issp=1&f=8&rsv_bp=1&rsv_idx=2&ie=utf-8&tn=baiduhome_pg&rsv_enter=0&rsv_dl=ib&rsv_sug3=14&rsv_sug1=7&rsv_sug7=100&rsv_n=2&rsv_btype=i&inputT=8238&rsv_sug4=8238'.format(site)

    resp = requests.get(

        url=url,

        headers=headers

    )


    resp.encoding='utf8'

    html = resp.text

    selector = Selector(text=html)


    count = selector.xpath('//div[@class="op_site_domain c-row"]/div/p/span/b/text()').extract_first()

    if count:

        count=int(count.replace(',',''))

    return count


if __name__=='__main__':

    site='30daydo.com'

    print(baidu_site_collect(site))
seo_info.py
import argparse

from atexit import register

import sys

import requests

import re

from parsel import Selector


#参数自定义


# parser = argparse.ArgumentParser()

# parser.add_argument('-r', dest='read', help='path file')

# parser.add_argument('-u',dest='read',help='targetdomain')

# parser_args = parser.parse_args()

#爬虫模块查询


VERBOSE = True


def askurl(target_url):

    headers = {

        'User-Agent': 'Mozilla/5.0 (Macintosh; Intel Mac OS X 10_15_7) AppleWebKit/537.36 (KHTML, like Gecko) Chrome/91.0.4472.106 Safari/537.36'

    }


    #baidu权重

    baidu_url=f"https://rank.chinaz.com/{target_url}"

    baidu_txt=requests.get(url=baidu_url,headers=headers)

    baidu_html=baidu_txt.content.decode('utf-8')

    baidu_PC=re.findall('PC端</i><img src="//csstools.chinaz.com/tools/images/rankicons/baidu(.*?).png"></a></li>',baidu_html,re.S)

    baidu_moblie=re.findall('移动端</i><img src="//csstools.chinaz.com/tools/images/rankicons/bd(.*?).png"></a></li>',baidu_html,re.S)

    #分割线

    print("*"*60)


    #如果查询html中有正则出来到权重关键字就输出,否则将不输出

    result={}


    baidu_pc_weight = None

    baidu_mobile_weight = None


    if len(baidu_PC) > 0:

        print('百度_PC:', baidu_PC[0])

        baidu_pc_weight=baidu_PC[0]

    if len(baidu_moblie) > 0:

        print('百度_moblie:', baidu_moblie[0])

        baidu_mobile_weight = baidu_moblie[0]

    else:

        print("百度无权重")


    result['baidu_pc_weight']=baidu_pc_weight

    result['baidu_mobile_weight']=baidu_mobile_weight


    #360权重

    url=f"https://rank.chinaz.com/sorank/{target_url}/"

    text = requests.get(url=url,headers=headers)

    html=text.content.decode('utf-8')

    sorank360_PC=re.findall('PC端</i><img src="//csstools.chinaz.com/tools/images/rankicons/360(.*?).png"></a><',html,re.S)

    sorank360_Mobile=re.findall('移动端</i><img src="//csstools.chinaz.com/tools/images/rankicons/360(.*?).png"',html,re.S)


    _360_pc_weight=None

    _360_mobile_weight=None


    # 如果查询html中有正则出来到权重关键字就输出,否则将不输出

    if len(sorank360_PC) > 0:

        _360_pc_weight=sorank360_PC[0]

        print("360_PC:", sorank360_PC[0])

    if len(sorank360_Mobile) > 0:

        _360_mobile_weight=sorank360_Mobile[0]

        print("360_moblie:", sorank360_Mobile[0])

    else:

        print("360无权重")


    result['360_pc_weight']=_360_pc_weight

    result['360_mobile_weight']=_360_mobile_weight


    #搜狗权重


    sogou_pc_weight=None

    sogou_mobile_weight=None


    sogou_url = f"https://rank.chinaz.com/sogoupc/{target_url}"

    sougou_txt = requests.get(url=sogou_url, headers=headers)

    sougou_html = sougou_txt.content.decode('utf-8')

    sougou_PC = re.findall('PC端</i><img src="//csstools.chinaz.com/tools/images/rankicons/sogou(.*?).png"></a></li>',sougou_html, re.S)

    sougou_mobile = re.findall('移动端</i><img src="//csstools.chinaz.com/tools/images/rankicons/sogou(.*?).png"></a></li>',sougou_html, re.S)


    # 如果查询html中有正则出来到权重关键字就输出,否则将不输出

    if len(sougou_PC) > 0:

        print('搜狗_PC:', sougou_PC[1])

        sogou_pc_weight=sougou_PC[1]


    if len(sougou_mobile) > 0 :

        print('搜狗_moblie:', sougou_mobile[1])

        sogou_mobile_weight=sougou_mobile[1]


    else:

        print('搜狗无权重')


    result['sogou_pc_weight']=sogou_pc_weight

    result['sogou_mobile_weight']=sogou_mobile_weight


    #神马权重

    shenma_pc_weight =None

    shenma_url=f'https://rank.chinaz.com/smrank/{target_url}'

    shenma_txt=requests.get(url=shenma_url,headers=headers)

    shenma_html=shenma_txt.content.decode('utf-8')

    shenma_PC=re.findall('class="tc mt5"><img src="//csstools.chinaz.com/tools/images/rankicons/shenma(.*?).png"></a></li>',shenma_html,re.S)


    # 如果查询html中有正则出来到权重关键字就输出,否则将不输出

    if len(shenma_PC) > 0:

        print('神马权重为:', shenma_PC[1])

        shenma_pc_weight=shenma_PC[1]

    else:

        print("神马无权重")


    result['shenma_pc_weight']=shenma_pc_weight

    # result['shenma_mobile_weight']=None


    #头条权重


    toutiao_pc_weight=None

    toutiao_url=f'https://rank.chinaz.com/toutiao/{target_url}'

    toutiao_txt=requests.get(url=toutiao_url,headers=headers)

    toutiao_html=toutiao_txt.content.decode('utf-8')

    toutiao_PC=re.findall('class="tc mt5"><img src="//csstools.chinaz.com/tools/images/rankicons/toutiao(.*?).png"></a></li>',toutiao_html,re.S)


    # 如果查询html中有正则出来到权重关键字就输出,否则将不输出

    if len(toutiao_PC) > 0:

        print('头条权重为:', toutiao_PC[1])

        toutiao_pc_weight=toutiao_PC[1]

    else:

        print("头条无权重")


    result['toutiao_pc_weight']=toutiao_pc_weight

    # result['toutiao_mobile_weight']=None


    #备案信息、title、企业性质

    beian_url=f"https://seo.chinaz.com/{target_url}"

    beian_txt=requests.get(url=beian_url,headers=headers)

    beian_html=beian_txt.content.decode('utf-8')


    with open('beian_html.html','w') as fp:

        fp.write(beian_html)


    title,beian_no,name,ip,nature,register,years=parse_info(beian_html)


    result['name']=name

    result['title']=title

    result['beian_no']=beian_no

    result['ip']=ip

    result['nature']=nature

    result['register']=register

    result['years']=years


    try:

        print("备案信息:",beian_no,"名称:",name,"网站首页Title:",title,"企业性质:",nature,"IP地址为:",ip)

        print("*"*60)

    except:

        print("没有查询到有效信息!")


    return result


strip_fun = lambda x:x.strip() if x is not None else ""


def parse_info(html):


    resp = Selector(text=html)

    title = strip_fun(resp.xpath('//div[@class="_chinaz-seo-t2l ellipsis"]/text()').extract_first())

    table = resp.xpath('//table[@class="_chinaz-seo-newt"]/tbody')


    if table[0].xpath('.//tr[4]/td[2]/span[1]/i'):

        beian_num=strip_fun(table[0].xpath('.//tr[4]/td[2]/span[1]/i/a/text()').extract_first())

    else:

        beian_num=strip_fun(table[0].xpath('.//tr[4]/td[2]/span[1]/a/text()').extract_first())


    name=strip_fun(table[0].xpath('.//tr[4]/td[2]/span[2]/i/text()').extract_first())

    if not name:

        print('---->',name)

        name=strip_fun(table[0].xpath('.//tr[4]/td[2]/span[2]/i/a/text()').extract_first())


    nature=strip_fun(table[0].xpath('.//tr[4]/td[2]/span[3]/i/text()').extract_first())

    ip=strip_fun(table[0].xpath('.//tr[5]/td[2]/div/span[1]/i/a/text()').extract_first())

    register=strip_fun(table[0].xpath('.//tr[3]/td[2]/div[1]/span[1]/i/text()').extract_first())

    years=strip_fun(table[0].xpath('.//tr[3]/td[2]/div[2]/span[1]/i/text()').extract_first())


    return title,beian_num,name,ip,nature,register,years


def crawl_info(site):

    return askurl(site)


if __name__ == '__main__':

    main()
运行效果:
需要完整代码,可关注公众号联系:
 收起阅读 »
B站批量下载某个UP主的所有视频
B站上不少优秀的学习资源,下载到本地观看,便于快进,多倍速。 也可以放到平板,手机,在没有网络,或者网络条件不佳的环境下观看。

使用python实现
https://github.com/Rockyzsu/bilibili
主要代码:
收起阅读 »

使用python实现
https://github.com/Rockyzsu/bilibili
B站视频下载

自动批量下载B站一个系列的视频


下载某个UP主的所有视频


使用:


下载you-get库,git clone https://github.com/soimort/you-get.git 复制其本地路径,比如/root/you-get/you-get


初次运行,删除history.db 文件, 修改配置文件config.py


START=1 # 下载系列视频的 第一个

END=1 # 下载系列视频的最后一个 , 比如一个系列教程有30个视频, start=5 ,end = 20 下载从第5个到第20个

ID='BV1oK411L7au' # 视频的ID

YOU_GET_PATH='/home/xda/othergit/you-get/you-get' # 你的you-get路径

MINS=1 # 每次循环等待1分钟

user_id = '518973111' # UP主的ID

total_page = 3 # up主的视频的页数

执行 python downloader.py ,进行下载循环


python people.py ,把某个up主的视频链接加入到待下载队列


python add_data.py --id=BV1oK411L7au --start=4 --end=8 下载视频id为BV1oK411L7au的系列教程,从第4开始,到第8个结束,如果只有一个的话,start和end设为1即可。


可以不断地往队列里面添加下载链接。
主要代码:
# @Time : 2019/1/28 14:19

# @File : youtube_downloader.py


import logging

import os

import subprocess

import datetime

import sqlite3

import time

from config import YOU_GET_PATH,MINS

CMD = 'python {} {}'

filename = 'url.txt'


class SQLite():

    def __init__(self):

        self.conn = sqlite3.connect('history.db')

        self.cursor = self.conn.cursor()

        self.create_table()


    def create_table(self):

        create_sql = 'create table if not exists tb_download (url varchar(100),status tinyint,crawltime datetime)'

        create_record_tb = 'create table if not exists tb_record (idx varchar(100) PRIMARY KEY,start tinyint,end tinyint,status tinyint)'

        self.cursor.execute(create_record_tb)

        self.conn.commit()

        self.cursor.execute(create_sql)

        self.conn.commit()


    def exists(self,url):

        querySet = 'select * from tb_download where url = ? and status = 1'

        self.cursor.execute(querySet,(url,))

        ret = self.cursor.fetchone()

        return True if ret else False


    def insert_history(self,url,status):

        query = 'select * from tb_download where url=?'

        self.cursor.execute(query,(url,))

        ret = self.cursor.fetchone()

        current = datetime.datetime.now()


        if ret:

            insert_sql='update tb_download set status=?,crawltime=? where url = ?'

            args=(status,status,current,url)

        else:

            insert_sql = 'insert into tb_download values(?,?,?)'

            args=(url,status,current)


        try:

            self.cursor.execute(insert_sql,args)

        except:

            self.conn.rollback()

            return False

        else:

            self.conn.commit()

            return True


    def get(self):

        sql = 'select idx,start,end from tb_record where status=0'

        self.cursor.execute(sql)

        ret= self.cursor.fetchone()

        return ret


    def set(self,idx):

        print('set status =1')

        sql='update tb_record set status=1 where idx=?'

        self.cursor.execute(sql,(idx,))

        self.conn.commit()


def llogger(filename):

    logger = logging.getLogger(filename)  # 不加名称设置root logger


    logger.setLevel(logging.DEBUG)  # 设置输出级别


    formatter = logging.Formatter(

        '[%(asctime)s][%(filename)s][line: %(lineno)d]\[%(levelname)s] ## %(message)s)',

        datefmt='%Y-%m-%d %H:%M:%S')


    # 使用FileHandler输出到文件

    prefix = os.path.splitext(filename)[0]

    fh = logging.FileHandler(prefix + '.log')

    fh.setLevel(logging.DEBUG)

    fh.setFormatter(formatter)


    # 使用StreamHandler输出到屏幕

    ch = logging.StreamHandler()

    ch.setLevel(logging.DEBUG)

    ch.setFormatter(formatter)


    # 添加两个Handler

    logger.addHandler(ch)

    logger.addHandler(fh)

    return logger


logger = llogger('download.log')

sql_obj = SQLite()


def run():

    while 1:

        result = sql_obj.get()

        print(result)

        if result:

            idx=result[0]

            start=result[1]

            end=result[2]

            try:

                download_bilibili(idx,start,end)

            except:

                pass

            else:

                sql_obj.set(idx)

        else:

            time.sleep(MINS*60)


def download_bilibili(id,start_page,total_page):

    global doc


    bilibili_url = 'https://www.bilibili.com/video/{}?p={}'

    for i in range(start_page, total_page+1):


        next_url = bilibili_url.format(id, i)

        if sql_obj.exists(next_url):

            print('have download')

            continue


        try:

            command = CMD.format(YOU_GET_PATH, next_url)

            p = subprocess.Popen(command, stdout=subprocess.PIPE, stderr=subprocess.PIPE,

                                 shell=True)


            output, error = p.communicate()


        except Exception as e:

            print('has execption')

            sql_obj.insert_history(next_url,status=0)

            logger.error(e)

            continue

        else:

            output_str = output.decode()

            if len(output_str) == 0:

                sql_obj.insert_history(next_url,status=0)

                logger.info('下载失败')

                continue


            logger.info('{} has been downloaded !'.format(next_url))

            sql_obj.insert_history(next_url,status=1)


run()
收起阅读 »
python3的map是迭代器,不用for循环或者next触发是不会执行的
最近刚好有位群友咨询,他写的代码如下:
作用很简单,就是拿到列表后用map放入到sqlite里面。
但是上面的代码并不起作用。
因为map只是定义了一个迭代器,并没有被触发。
可以加一个list(map(lambda x:update_data(x,1,1),bv_list))
这样就可以执行了。 收起阅读 »
def update_data(id,start,end):

    status=0

    conn = sqlite3.connect('history.db')

    cursor = conn.cursor()

    insert_sql ='insert into tb_record values(?,?,?,?)'


    try:

        cursor.execute(insert_sql,(id,start,end,status))

    except Exception as e:

        print(e)

        print('Error')

    else:

        conn.commit()

        print("successfully insert")
bv_list = []

for i in range(1, total_page + 1):

    bv_list.extend(visit(i))

    print(bv_list)

map(lambda x:update_data(x,1,1),bv_list)
作用很简单,就是拿到列表后用map放入到sqlite里面。
但是上面的代码并不起作用。
因为map只是定义了一个迭代器,并没有被触发。
可以加一个list(map(lambda x:update_data(x,1,1),bv_list))
这样就可以执行了。 收起阅读 »
dataframe如何 遍历所有的列?
如果遍历行,我们经常会使用df.iterrows(), 而列呢?
可以使用df.items()
可以使用df.items()
Python pandas.DataFrame.items用法及代码示例收起阅读 »
用法:
DataFrame.items()
迭代(列名,系列)对。
遍历 DataFrame 列,返回一个包含列名和内容的元组作为一个系列。
生成(Yield):
label:对象
被迭代的 DataFrame 的列名。
content:Series
属于每个标签的列条目,作为一个系列。
例子:
>>> df = pd.DataFrame({'species':['bear', 'bear', 'marsupial'],
... 'population':[1864, 22000, 80000]},
... index=['panda', 'polar', 'koala'])
>>> df
species population
panda bear 1864
polar bear 22000
koala marsupial 80000
>>> for label, content in df.items():
... print(f'label:{label}')
... print(f'content:{content}', sep='\n')
...
label:species
content:
panda bear
polar bear
koala marsupial
Name:species, dtype:object
label:population
content:
panda 1864
polar 22000
koala 80000
Name:population, dtype:int64
python对视频添加水印 调整帧率
Python调用ffmpeg开源视频处理库,来实现视频批量的处理:水印、背景音乐、剪辑、合并、帧率、速率、分辨率等操作
FFmpeg是一套可以用来记录、转换数字音频、视频,并能将其转化为流的开源计算机程序。采用LGPL或GPL许可证。 它提供了录制、转换以及流化音视频的完整解决方案。它包含了非常先进的音频/视频编解码库libavcodec,为了保证高可移植性和编解码质量,libavcodec里很多code都是从头开发的。 FFmpeg在Linux平台下开发,但它同样也可以在其它操作系统环境中编译运行,包括Windows、Mac OS X等。 这个项目最早由Fabrice Bellard发起,2004年至2015年间由Michael Niedermayer主要负责维护。 许多FFmpeg的开发人员都来自MPlayer项目,而且当前FFmpeg也是放在MPlayer项目组的服务器上。 项目的名称来自MPEG视频编码标准,前面的"FF"代表"Fast Forward"。
PS:需要电脑把ffmpeg的可执行文件放到环境变量中 收起阅读 »
FFmpeg是一套可以用来记录、转换数字音频、视频,并能将其转化为流的开源计算机程序。采用LGPL或GPL许可证。 它提供了录制、转换以及流化音视频的完整解决方案。它包含了非常先进的音频/视频编解码库libavcodec,为了保证高可移植性和编解码质量,libavcodec里很多code都是从头开发的。 FFmpeg在Linux平台下开发,但它同样也可以在其它操作系统环境中编译运行,包括Windows、Mac OS X等。 这个项目最早由Fabrice Bellard发起,2004年至2015年间由Michael Niedermayer主要负责维护。 许多FFmpeg的开发人员都来自MPlayer项目,而且当前FFmpeg也是放在MPlayer项目组的服务器上。 项目的名称来自MPEG视频编码标准,前面的"FF"代表"Fast Forward"。
# coding=utf-8

import os

import subprocess

import datetime

import json, pprint

import re, time

import threading

import random

import shutil


class FFmpeg:


    def __init__(self, editvdo, addlogo=None, addmusic=None,

                 addvdohead=None, addvdotail=None):

        self.editvdo = editvdo

        self.addlogo = addlogo

        self.addmusic = addmusic

        self.addvdohead = addvdohead

        self.addvdotail = addvdotail

        self.vdo_time, self.vdo_width, self.vdo_height, self.attr_dict = self.get_attr()

        self.editvdo_path = os.path.dirname(editvdo)

        self.editvdo_name = os.path.basename(editvdo)


    def get_attr(self):

        """

        获取视频属性参数

        :return:

        """

        strcmd = r'ffprobe -print_format json -show_streams -i "{}"'.format(self.editvdo)

        status, output = subprocess.getstatusoutput(strcmd)

        agrs = eval(re.search('{.*}', output, re.S).group().replace("\n", "").replace(" ", ''))

        streams = agrs.get('streams', )

        agrs_dict = dict()

        [agrs_dict.update(x) for x in streams]

        vdo_time = agrs_dict.get('duration')

        vdo_width = agrs_dict.get('width')

        vdo_height = agrs_dict.get('height')

        attr = (vdo_time, vdo_width, vdo_height, agrs_dict)

        return attr


    def edit_head(self, start_time, end_time, deposit=None):

        """

        截取指定长度视频

        :param second: 去除开始的多少秒

        :param deposit: 另存为文件

        :return: True/Flase

        """

        if None == deposit:

            deposit = self.editvdo_path+'/'+'edit_head'+self.editvdo_name

        start = time.strftime('%H:%M:%S', time.gmtime(start_time))

        end = time.strftime('%H:%M:%S', time.gmtime(end_time))

        strcmd = 'ffmpeg  -i "{}" -vcodec copy -acodec copy -ss {} -to {} "{}" -y'.format(

            self.editvdo, start, end, deposit)

        result = subprocess.run(args=strcmd, stdout=subprocess.PIPE, shell=True)

        if os.path.exists(deposit):

            os.remove(self.editvdo)

            os.rename(deposit, self.editvdo)

            return True

        else:

            return False


    def edit_logo(self, deposit=None):

        """

        添加水印

        :param deposit:添加水印后另存为路径,为空则覆盖

        :return: True/False

        """

        if None == deposit:

            deposit = self.editvdo_path+'/'+'edit_logo'+self.editvdo_name

        strcmd = r'ffmpeg -i "{}" -vf "movie=\'{}\' [watermark];[in] ' \

                 r'[watermark] overlay=main_w-overlay_w-10:10 [out]"  "{}"'.format(

                    self.editvdo, self.addlogo, deposit)

        result = subprocess.run(args=strcmd, stdout=subprocess.PIPE, shell=True)

        if os.path.exists(deposit):

            os.remove(self.editvdo)

            os.rename(deposit, self.editvdo)

            return True

        else:

            return False


    def edit_music(self, deposit=None):

        if None == deposit:

            deposit = self.editvdo_path+'/'+'edit_music'+self.editvdo_name

        strcmd = r'ffmpeg -y -i "{}" -i "{}" -filter_complex "[0:a] ' \

                 r'pan=stereo|c0=1*c0|c1=1*c1 [a1], [1:a] ' \

                 r'pan=stereo|c0=1*c0|c1=1*c1 [a2],[a1][a2]amix=duration=first,' \

                 r'pan=stereo|c0<c0+c1|c1<c2+c3,pan=mono|c0=c0+c1[a]" ' \

                 r'-map "[a]" -map 0:v -c:v libx264 -c:a aac ' \

                 r'-strict -2 -ac 2 "{}"'.format(self.editvdo, self.addmusic, deposit)

        result = subprocess.run(args=strcmd, stdout=subprocess.PIPE, shell=True)

        if os.path.exists(deposit):

            os.remove(self.editvdo)

            os.rename(deposit, self.editvdo)

            return True

        else:

            return False


    def edit_rate(self, rete=30, deposit=None):

        """

        改变帧率

        :param rete: 修改大小帧率

        :param deposit: 修改后保存路径

        :return:

        """

        if None == deposit:

            deposit = self.editvdo_path+'/'+'edit_music'+self.editvdo_name

        strcmd = r'ffmpeg -i "{}" -r {} "{}"' % (self.editvdo, rete, deposit)

        result = subprocess.run(args=strcmd, stdout=subprocess.PIPE, shell=True)

        if os.path.exists(deposit):

            os.remove(self.editvdo)

            os.rename(deposit, self.editvdo)

            return True

        else:

            return False


    def edit_power(self, power='1280x720', deposit=None):

        """

        修改分辨率

        :param power: 分辨率

        :param deposit: 修改后保存路径,为空则覆盖

        :return:

        """

        if None == deposit:

            deposit = self.editvdo_path+'/'+'edit_power'+self.editvdo_name

        strcmd = r'ffmpeg -i "{}" -s {} "{}"'.format(self.editvdo, power, deposit)

        result = subprocess.run(args=strcmd, stdout=subprocess.PIPE, shell=True)

        if os.path.exists(deposit):

            os.remove(self.editvdo)

            os.rename(deposit, self.editvdo)

            return True

        else:

            return False


    def rdit_marge(self, vdo_head, vdo_tail, deposit=None):

        if None == deposit:

            deposit = self.editvdo_path+'/'+'rdit_marge'+self.editvdo_name

        with open(self.editvdo_path+'/'+'rdit_marge.txt', 'w', encoding='utf-8') as f:

            f.write("file '{}' \nfile '{}' \nfile '{}'" .format(

                vdo_head, self.editvdo, vdo_tail))

        strcmd = r'ffmpeg -f concat -safe 0 -i "{}" -c copy "{}"'.format(

            self.editvdo_path + '/' + 'rdit_marge.txt', deposit)

        result = subprocess.run(args=strcmd, stdout=subprocess.PIPE, shell=True)

        if os.path.exists(deposit):

            os.remove(self.editvdo)

            os.rename(deposit, self.editvdo)

            return True

        else:

            return False


    # ffmpeg - i input.mkv - filter_complex "[0:v]setpts=0.5*PTS[v];[0:a]atempo=2.0[a]" - map"[v]" - map"[a]"  output.mkv


test = FFmpeg(r"D:\vdio\4.mp4")
PS:需要电脑把ffmpeg的可执行文件放到环境变量中 收起阅读 »
python3 安装demjson 报错 use_2to3 is invalid
ooking in indexes: https://pypi.douban.com/simple

Collecting demjson==2.2.4

  Downloading https://pypi.doubanio.com/pack ... ar.gz (131 kB)

     |████████████████████████████████| 131 kB 985 kB/s

    ERROR: Command errored out with exit status 1:

     command: /root/miniconda3/envs/py37/bin/python -c 'import io, os, sys, setuptools, tokenize; sys.argv[0] = '"'"'/tmp/pip-install-pj0ajcpl/demjson_86a1bab6643c4ed7a7b0c6bb6d3a43a2/setup.py'"'"'; __file__='"'"'/tmp/pip-install-pj0ajcpl/demjson_86a1bab6643c4ed7a7b0c6bb6d3a43a2/setup.py'"'"';f = getattr(tokenize, '"'"'open'"'"', open)(__file__) if os.path.exists(__file__) else io.StringIO('"'"'from setuptools import setup; setup()'"'"');code = f.read().replace('"'"'\r\n'"'"', '"'"'\n'"'"');f.close();exec(compile(code, __file__, '"'"'exec'"'"'))' egg_info --egg-base /tmp/pip-pip-egg-info-7ve4tu87

         cwd: /tmp/pip-install-pj0ajcpl/demjson_86a1bab6643c4ed7a7b0c6bb6d3a43a2/

    Complete output (3 lines):

    /root/miniconda3/envs/py37/lib/python3.7/site-packages/setuptools/dist.py:760: UserWarning: Usage of dash-separated 'index-url' will not be supported in future versions. Please use the underscore name 'index_url' instead

      % (opt, underscore_opt)

    error in demjson setup command: use_2to3 is invalid.
记录一下解决办法:
setuptools 降级:
pip install --upgrade setuptools==57.5.0
然后再pip install demjson 即可
如果担心setuptools 修改到系统的其他库,可以创建一个虚拟环境。
然后在虚拟环境里面对setuptools 降级,再安装demjson
来个养眼图:
 收起阅读 »
mongodb python同步两个数据库数据
有时候需要做一些迁移工作,需要对mongodb进行迁移。默认的工具貌似也十分好用的。缺少像Navicat 之于mysql的这样神级的软件。
所以自己动手写代码完成:
原理就是不断迭代,不同的数据库,里面的不同的collection。
对于同名collection,通过条数是否一致,来决定是否要把原数据复制过来。
保存上面文件为main.py
执行 python main.py
就可以进行数据同步工作啦。 收起阅读 »
所以自己动手写代码完成:
# -*- coding: utf-8 -*-

# @Time : 2022/4/6 4:41

# @File : database_migrate.py

# @Author : Rocky C@www.30daydo.com

import time

from loguru import logger

import pymongo


ignore_db = ['admin', 'config', 'local',

             ] # 忽略更新的库


ignore_col = [('db_stock','dfcf_list_full')]


logger.add('mongo.log')


#  数据库同步

def get_client(user, password, host, port):

    connect_uri = f'mongodb://{user}:{password}@{host}:{port}'

    client = pymongo.MongoClient(connect_uri)

    return client


def origin():

    return get_client('admin', 'password', '127.0.0.1', '27017')


def target():

    return get_client('root', 'password', '127.0.0.1', '27017')


def transfer():

    origin_client = origin()

    target_client = target()

    dbs = get_db_name(origin_client)

    for db in dbs:

        for col in get_collection_name(origin_client, db):


            if (db,col) in ignore_col:

                continue

            items = []

            logger.info(f'正在更新{db} {col}')

            for i in get_item(origin_client, db, col):

                items.append(i)


            insert_item(target_client, db, col, items)

            logger.info(f'更新数据库 {db} {col}')

            # time.sleep(0.5)


def get_item(client, db_name, col):

    return client[db_name][col].find()


def insert_item(client, db_name, col, data):

    batch = 1000

    count = len(data)//batch + 1

    for i in range(count):

        item = data[i*batch:(i+1)*batch]


        if len(item)==0:

            continue


        try:

            client[db_name][col].insert_many(item)

        except Exception as e:

            logger.error(e)

            logger.error(f'{db_name} {col} 插入出错')


def get_db_name(client):

    db_name = client.list_database_names()

    dbs = []

    for db in db_name:

        if db not in ignore_db:

            dbs.append(db)

    return dbs


def delete_col(client,db,col):

    try:

        client[db][col].delete_many({})

    except Exception as e:

        logger.error(e)

        logger.error(db)

        logger.error(col)

        return False

    else:

        return True


def server_compare():

    '''

    比较2个数据库是否相同,只是单纯比较条数

    '''

    origin_client = origin()

    target_client = target()

    dbs = get_db_name(origin_client)


    for db in dbs:

        for col in get_collection_name(origin_client, db):

            origin_count = origin_client[db][col].count_documents({})

            target_count = target_client[db][col].count_documents({})

            if origin_count!=target_count:

                logger.info(f'collection {db} {col}有区别')

                #

                if delete_col(target_client,db,col):

                    items = []

                    logger.info(f'正在更新{db} {col}')

                    for i in get_item(origin_client, db, col):

                        items.append(i)


                    insert_item(target_client, db, col, items)

                    logger.info(f'更新数据库 {db} {col}')

                    time.sleep(1)


def get_collection_name(client, db_name):

    collection_names = client[db_name].list_collection_names(session=None)

    return collection_names


def main():

    server_compare()


if __name__ == '__main__':

    main()
原理就是不断迭代,不同的数据库,里面的不同的collection。
对于同名collection,通过条数是否一致,来决定是否要把原数据复制过来。
保存上面文件为main.py
执行 python main.py
就可以进行数据同步工作啦。 收起阅读 »
python AES 加密 windows和linux平台的不同
同样一段AES加密的代码,放到了ubuntu可以正常使用,而在windows却报错。
实际两个平台使用pip install安装的aes库不一样。
windows报错
只需要把AES.new() 的参数里面的iv给去掉就可以了。

收起阅读 »
实际两个平台使用pip install安装的aes库不一样。
windows报错
  File "C:\anaconda\lib\site-packages\Crypto\Cipher\__init__.py", line 77, in _create_cipher

    raise TypeError("IV is not meaningful for the ECB mode")

TypeError: IV is not meaningful for the ECB mode
只需要把AES.new() 的参数里面的iv给去掉就可以了。

收起阅读 »
不是所有的bytes都可以转换为string
byte转为string
b.decode('utf8')
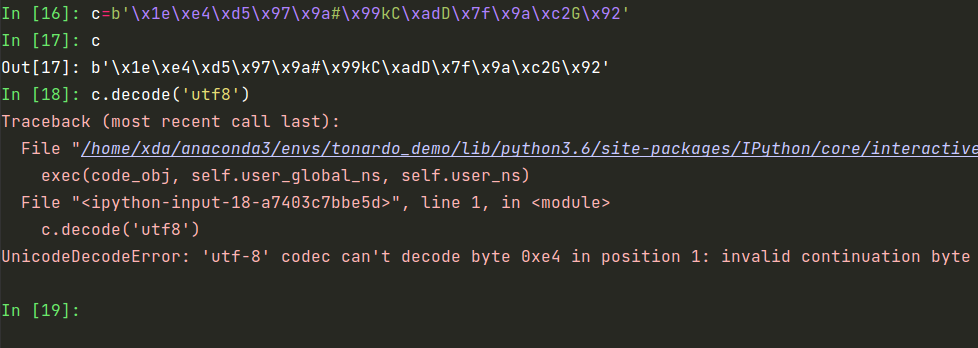
如果报错:
说明字节无法字节转为string,
上面的字节是可以正常decode为utf8
而改下字节数据
所以你试下decode下面的字节:
是无法解析的。
这个是没有办法的,如果要硬刚 。
可以加入参数errors = ‘replace’
这样就不会报错。但是这也只是输出的乱码。
正确的姿势是要看看你的字节的最原始编码格式。如果是gbk,那么就应该使用b.decode('gbk')
收起阅读 »
b.decode('utf8')
如果报错:
UnicodeDecodeError: 'utf-8' codec can't decode byte 0xe4 in position 1: invalid continuation byte
说明字节无法字节转为string,
上面的字节是可以正常decode为utf8
而改下字节数据
所以你试下decode下面的字节:
c=b'\x1e\xe4\xd5\x97\x9a#\x99kC\xadD\x7f\x9a\xc2G\x92'
是无法解析的。
这个是没有办法的,如果要硬刚 。
可以加入参数errors = ‘replace’
b.decode('utf8',errors='replace')这样就不会报错。但是这也只是输出的乱码。
正确的姿势是要看看你的字节的最原始编码格式。如果是gbk,那么就应该使用b.decode('gbk')
收起阅读 »
vs code 无法启动jupyter notebook 修复 亲测
错误信息:
之前一直运行得好好的。不知道安装了什么依赖库后就这样了。。
在国外网站找了一通后,找到了解决办法:
不得不感慨,国外大神多,国内csdn乱ctrl cv.
收起阅读 »
failed to start INotebook in kernel, UI Disabled = false s [Error]: Unable to start Kernel 'base (Python 3.8.3)' due to connection timeout. View Jupyter [log](command:jupyter.viewOutput) for further detail
之前一直运行得好好的。不知道安装了什么依赖库后就这样了。。
在国外网站找了一通后,找到了解决办法:
pip install traitlets==4.3.3
不得不感慨,国外大神多,国内csdn乱ctrl cv.
收起阅读 »
python 上传文件夹内图片到七牛,同时加入批量删除,单个删除
先注册好七牛的账户,那都AK和SK两个key
然后把key写入到环境变量或者写到下面的python文件里面
然后运行:
python main.py --path='C:\Photo' --category='person'
运行后会上传到七牛的虚拟目录 person目录下
如果要删除,bulk_delete批量删除某个前缀或者文件夹的 收起阅读 »
然后把key写入到环境变量或者写到下面的python文件里面
from qiniu import Auth, put_file,BucketManager,build_batch_delete
import os
import fire
access_key = os.getenv('qiniu_access_key')
secret_key = os.getenv('qiniu_secret_key')
bucket_name = '' # 你的空间名称
HOST ='[url]http://xximg.xxx.com/{}'[/url] # 可以不用填
TEMPLATE = '\n\n\n\n'
def upload(file,category=''):
#构建鉴权对象
q = Auth(access_key, secret_key)
#要上传的空间
#上传后保存的文件名
key = category +'/' + os.path.split(file)[1]
#生成上传 Token,可以指定过期时间等
token = q.upload_token(bucket_name, key) # 永不过期
#要上传文件的本地路径
ret, info = put_file(token, key, file, version='v1')
print(ret)
print(info)
return HOST.format(ret['key'])
def bulk_upload(path,category=''):
with open('qiniu_image.md','a+') as fp:
for file in os.listdir(path):
full_path = os.path.join(path,file)
if os.path.isfile(full_path):
host_url = upload(full_path,category)
fp.write(TEMPLATE.format(host_url,host_url))
def get_file_info(prefix,limit = 10):
q = Auth(access_key, secret_key)
bucket = BucketManager(q)
delimiter = None
marker = None
ret, eof, info = bucket.list(bucket_name, prefix, marker, limit, delimiter)
# assert len(ret.get('items')) is not None
url_list=[]
for item in ret.get('items',):
url_list.append(item['key'])
# print(url_list)
# print(len(url_list))
return url_list,len(url_list)
def bulk_delete(prefix,limit=None):
url_list,lens = get_file_info(prefix,limit=limit)
q = Auth(access_key, secret_key)
bucket = BucketManager(q)
ops = build_batch_delete(bucket_name, url_list)
ret, info = bucket.batch(ops)
print(info)
print(ret)
def delete_one(key):
q = Auth(access_key, secret_key)
#初始化BucketManager
bucket = BucketManager(q)
#你要测试的空间, 并且这个key在你空间中存在
# key = 'python-logo.png'
#删除bucket_name 中的文件 key
ret, info = bucket.delete(bucket_name, key)
print(info)
print(ret)
# assert ret == {}
def bulk_delete_ones(prefix):
url_list,lens = get_file_info(prefix,limit=10)
for url in url_list:
delete_one(url)
# print(url)
def main(path,category):
if os.path.isdir(path):
bulk_upload(path,category)
elif os.path.isfile(path):
upload(path,category)
else:
raise ValueError('文件不存在')
get_file_info()
bulk_delete('resource')
bulk_delete_ones('resource')
delete_one('resource/data_beauty.png')
if __name__ == '__main__':
fire.Fire(main)
然后运行:
python main.py --path='C:\Photo' --category='person'
运行后会上传到七牛的虚拟目录 person目录下
如果要删除,bulk_delete批量删除某个前缀或者文件夹的 收起阅读 »
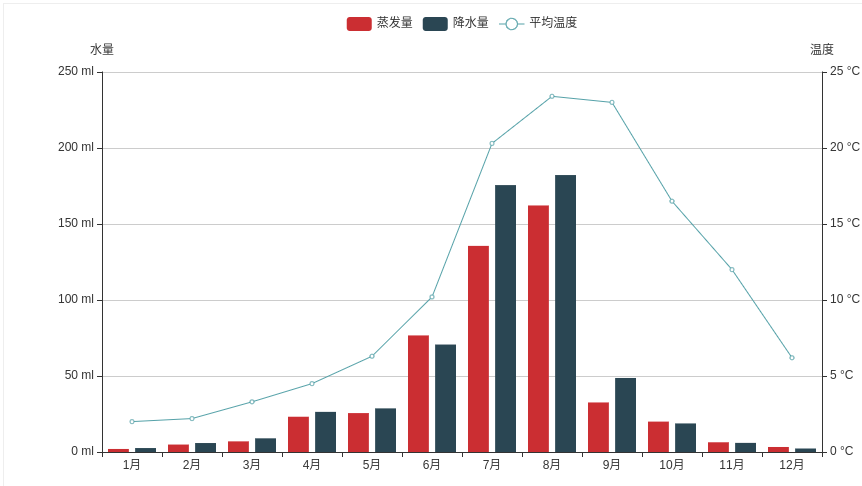
python pyecharts 多图叠加 bar和line叠加在一张图上
先准备一个bar图
import pyecharts.options as opts

from pyecharts.charts import Bar, Line


x_data = ["1月", "2月", "3月", "4月", "5月", "6月", "7月", "8月", "9月", "10月", "11月", "12月"]


bar = (

    Bar(init_opts=opts.InitOpts(width="1600px", height="800px"))

    .add_xaxis(xaxis_data=x_data)

    .add_yaxis(

        series_name="蒸发量",

        y_axis=[

            2.0,

            4.9,

            7.0,

            23.2,

            25.6,

            76.7,

            135.6,

            162.2,

            32.6,

            20.0,

            6.4,

            3.3,

        ],

        label_opts=opts.LabelOpts(is_show=False),

    )

    .add_yaxis(

        series_name="降水量",

        y_axis=[

            2.6,

            5.9,

            9.0,

            26.4,

            28.7,

            70.7,

            175.6,

            182.2,

            48.7,

            18.8,

            6.0,

            2.3,

        ],

        label_opts=opts.LabelOpts(is_show=False),

    )

    .extend_axis(

        yaxis=opts.AxisOpts(

            name="温度",

            type_="value",

            min_=0,

            max_=25,

            interval=5,

            axislabel_opts=opts.LabelOpts(formatter="{value} °C"),

        )

    )

    .set_global_opts(

        tooltip_opts=opts.TooltipOpts(

            is_show=True, trigger="axis", axis_pointer_type="cross"

        ),

        xaxis_opts=opts.AxisOpts(

            type_="category",

            axispointer_opts=opts.AxisPointerOpts(is_show=True, type_="shadow"),

        ),

        yaxis_opts=opts.AxisOpts(

            name="水量",

            type_="value",

            min_=0,

            max_=250,

            interval=50,

            axislabel_opts=opts.LabelOpts(formatter="{value} ml"),

            axistick_opts=opts.AxisTickOpts(is_show=True),

            splitline_opts=opts.SplitLineOpts(is_show=True),

        ),

    )

)
再加一个折线图
line = (

    Line()

    .add_xaxis(xaxis_data=x_data)

    .add_yaxis(

        series_name="平均温度",

        yaxis_index=1,

        y_axis=[2.0, 2.2, 3.3, 4.5, 6.3, 10.2, 20.3, 23.4, 23.0, 16.5, 12.0, 6.2],

        label_opts=opts.LabelOpts(is_show=False),

    )

)
然后使用overlap 函数叠加在一起
bar.overlap(line).render_notebook()
收起阅读 »
python rabbitmq 连接时无法正常发送和接受消息
用的是有密码的连接:
而在页面中其实是可以看到有对应的消息的。
后面发行上面的连接方式是由问题的,在于'/' 参数问题,因为默认参数的位置关系,‘/’ 并不是赋值给了virtual_host , 而是另外的参数。 所以解决问题的方法就是把每个参数的形参也写上去:
PS: 后面经过实际调试,原理是git的自带终端窗口的问题,用cmd命令行下面就没有这个问题。 收起阅读 »
auth = pika.PlainCredentials(user,password)使用上面的这个连接方式,消费者一只等待生产者生产数据,而生产数据者发出消息后,也无法正常发给消费者。
connection = pika.BlockingConnection(pika.ConnectionParameters(host,port,'/',auth))
而在页面中其实是可以看到有对应的消息的。
后面发行上面的连接方式是由问题的,在于'/' 参数问题,因为默认参数的位置关系,‘/’ 并不是赋值给了virtual_host , 而是另外的参数。 所以解决问题的方法就是把每个参数的形参也写上去:
auth = pika.PlainCredentials(user,password)

connection = pika.BlockingConnection(pika.ConnectionParameters(host=host,port=port,virtual_host='/',credentials=auth))
PS: 后面经过实际调试,原理是git的自带终端窗口的问题,用cmd命令行下面就没有这个问题。 收起阅读 »
flask自定义所有错误返回json格式
使用app.register_error_andler绑定时,把debug=True去掉才可以。
pandas 合并两个表,如何保留第一个表的索引?
df1 数据
df2 数据
如果按照 pd.merge(df1,df2,on='tickerEqu') ,按照列 tickerEqu 进行合并,这样会导致最后合成的新的列的索性重构,变成 0,1,2,3 这种的。
有什么办法可以保留 df1 的索引? 用 join 的话会报错,因为 df2 的索引和 df1 匹配不上。
 tickerBond  closePriceBond  bondPremRatio secShortNameBond tickerEqu  \

secID

110066     110066          199.94        -1.2442             盛屯转债    600711

110067     110067          119.53        25.9204             华安转债    600909

113021     113021          105.81        45.0989             中信转债    601998

113024     113024          101.94        36.6668             核建转债    601611

113025     113025          129.16         0.0409             明泰转债    601677
df2 数据
        ROE tickerEqu

0  2.642931    600711

1  4.425438    600909

2  6.259092    601998

3  4.432315    601611

4  6.454054    601677
如果按照 pd.merge(df1,df2,on='tickerEqu') ,按照列 tickerEqu 进行合并,这样会导致最后合成的新的列的索性重构,变成 0,1,2,3 这种的。
有什么办法可以保留 df1 的索引? 用 join 的话会报错,因为 df2 的索引和 df1 匹配不上。
先 df1 = df1.reset_index(),合并之后再把 secID 那一列设为 index 。收起阅读 »
