Started update UTMP about system Runlevel during booting ubuntu/armlinux
I hit this issue on my ARMLinux (Same arch as Ubuntu), i can't login system with graphic. It always stuck on the line
Started update UTMP about system Runlevel
Finally, i try to enter into secure mode and check logs.
it was caused by system disk is out of space.
So i try to delete some unless file to release some space, then reboot system, then everything is ok now.
http://30daydo.com/article/617
收起阅读 »
Started update UTMP about system Runlevel
Finally, i try to enter into secure mode and check logs.
it was caused by system disk is out of space.
So i try to delete some unless file to release some space, then reboot system, then everything is ok now.
http://30daydo.com/article/617
收起阅读 »
pycharm实用插件
1. rainbow bracket
括号对变成彩色的
2. kite
人工智能预测输入提示: 根据机器学习,预测你下一个输入函数的名
括号对变成彩色的
2. kite
人工智能预测输入提示: 根据机器学习,预测你下一个输入函数的名
为什么美股打新只能打部分公司,而且大部分都是中国境内运营的公司?
之前一个比较疑惑的问题,在一些可以打美股新股的券商软件上,明明看到不少美股新股上市,排队也爬的慢慢的,为什么我们只能打一些中国境内运营的公司?
原因是:
作为全球第一大市场,美股每年IPO融资规模和上市宗数基本稳定在全球前3。
从之前笔者汇总的数据来看:美股IPO首日破发率比港股还要低一点,打新确实有利可图。可为什么一直火不起来呢?
应粉丝要求,今天简单讲一讲。可能有的地方会说错,欢迎指正。美股打新只有美国人可以参与,其他人只能参与国际配售。其实港股也是这样的,不允许非香港居民参与公开申购,很多银行都严格执行这个规定,但是对参与国际配售就没有限制。
然而港交所并不认真查这个,原因有2点:香港本地居民很少参与IPO认购,2018年之前新股平均认购人数不足3000。大概是因为本地券商手续费太高,申购新股根本赚不到钱。如果再不让大陆人来参与的话,很多公司都发不出去。
同时,投资者通过券商认购新股,港交所会收取5元/笔的EIPO费用。如果单个新股有20万人申购,就可以一次收100万元,谁会跟钱过不去?
港股很多规则是跟美股学的,还是说回美股。
具体申购美股要不要钱(指费用)我不知道,反正国际配售不要钱。连1.0077%中签费好像都没有,参与成本低于港股IPO。
美国居民人数是香港的几十倍,不用担心人数不足;
美国法律那是杠杠的,应该没有券商敢去以身试法。
所以大陆人只能参与国际配售,就会面临一个很麻烦的问题:我们能接触到的开户券商根本就拿不到货,除了少数几个中概股之外。
那么,我们能参与的标的就非常少,通常一年也就那么几次。然而问题并不是到此为止。
还有几个很现实的问题:
首先是新股上市首日,时间很不确定。据说在美股开盘后,新股有很长一段时间是集合竞价时间,将会在这半小时至2小时内随机开盘。你以为可以提前挂个竞价单去睡觉?很不幸,这是不可能的,因为你股票大概率还没到账!
券商拿到股票之后,在通过各种后台分发到投资者账户,根据上手(可以认为是保荐人或者承销商)的不同,时长也不同。反正基本不要指望开盘前能到。
亏钱就算了,还TM不知道要熬夜到几点!
还有一点,同样让人很纠结:券商在派货上有相当大的自主权。
如果股票热门,不分给你,你又能怎么样?跟你很熟吗?
有券商经常这样玩:
认购100股,分50股;
认购300股,还是分50股!
认购1000股,也只分了50股...
为了做到人人有份,简直是侮辱智商!那以后SB才去认购那么多!
烂票都是你的,这个你肯定也不介意吧
申购100股,能分你130股,因为你交的1000美元,下限定价后可以买130股啦!加量不加价哟...
基本就讲完了吧,我只玩过一次就果断拉黑了。集团上市不让我们参与,也没搞成。如果后面有非常好的标的去美国上市,我可能会再参与下。
出了瑞幸这档子事之后,中概股去美国上市,估计要被砍估值。
如果读者有需要开港美股,可以关注公众号:
后台留言: 港美股开户
优惠多多哦。 收起阅读 »
asyncio中get_running_loop和get_event_loop的区别
asyncio.get_running_loop()
asyncio.get_event_loop()
官方地址
https://docs.python.org/3/library/asyncio-eventloop.html?highlight=get_running_loop#asyncio.get_running_loop
get_running_loop() 是python3.7之后新增的函数,用于获取当前正在运行的loop,如果当前主线程中没有正在运行的loop,如果没有就会报RuntimeError 错误。
并且get_running_loop 要在协程里面用,用来捕获当前的loop。
示例用法:
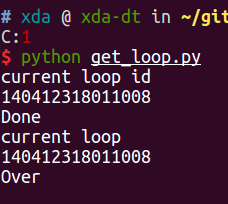
运行结果:
可以看到两个loop的id是一样的,是同一个对象。
如果第十二行直接调用的话会报错。
asyncio.get_event_loop() 如果在主线程中,如果没有被设置过任何event loop (时间循环),那么会创建一个时间循环,并返回。
收起阅读 »
asyncio.get_event_loop()
官方地址
https://docs.python.org/3/library/asyncio-eventloop.html?highlight=get_running_loop#asyncio.get_running_loop
get_running_loop() 是python3.7之后新增的函数,用于获取当前正在运行的loop,如果当前主线程中没有正在运行的loop,如果没有就会报RuntimeError 错误。
并且get_running_loop 要在协程里面用,用来捕获当前的loop。
示例用法:
  1 # -*- coding: utf-8 -*-

  2

  3 import asyncio

  4

  5 async def main():

  6     await asyncio.sleep(10)

  7     print('Done')

  8     myloop = asyncio.get_running_loop()

  9     print('current loop ')

 10     print(id(myloop))

 11

 12 # loop = asyncio.get_running_loop()

 13 loop = asyncio.get_event_loop()

 14 print('current loop id')

 15 print(id(loop))

 16

 17 # print(id(myloop))

 18 try:

 19     loop.run_until_complete(main())

 20 except KeyboardInterrupt:

 21     print('key board inpterrupt!')
运行结果:
可以看到两个loop的id是一样的,是同一个对象。
如果第十二行直接调用的话会报错。
asyncio.get_event_loop() 如果在主线程中,如果没有被设置过任何event loop (时间循环),那么会创建一个时间循环,并返回。
收起阅读 »
zsh历史记录文件损坏: zsh: corrupt history file /home/admin/.zsh_history
由于不正确关机,或者突然重启造成的文件属性损坏。可以使用以下方式修复。
如果最后一步提示出错 fc的参数不对,可以进入zsh,然后再执行 fc -R .zsh_histroy
原创文章,转载请注明出处:
http://30daydo.com/article/612
收起阅读 »
cd ~

mv .zsh_history .zsh_history_bad

strings .zsh_history_bad > .zsh_history

fc -R .zsh_history
如果最后一步提示出错 fc的参数不对,可以进入zsh,然后再执行 fc -R .zsh_histroy
原创文章,转载请注明出处:
http://30daydo.com/article/612
收起阅读 »
DBUtils 包名更新为dbutils,居然大部分包名都由驼峰命名改为下划线了
原来的调用是这样子的:
现在是这样的了:
原创文章,转载请注明出处
http://30daydo.com/article/611
收起阅读 »
from DBUtils.PooledDB import PooledDB, SharedDBConnection

POOL = PooledDB
现在是这样的了:
from dbutils.persistent_db import PersistentDB至于使用方法还是和原来的差不多。
原创文章,转载请注明出处
http://30daydo.com/article/611
收起阅读 »
机器学习:港股首日上市价格预测
上一篇《python程序分析港股打新到底赚不赚钱》一文简单的分析了港股打新的盈利预期。
因为我们花了不少时间爬取了港股新股的数据,可以对这些数据加以利用,利用机器学习的模型,预测港股上市价格以及影响因素的权重。
香港股市常年位于全球新股集资三甲之列,每年都有上百只新股上市。与已上市的正股相比,新股的特点是没有任何历史交易数据,这使新股的feature比较朴素,使其可以变成一个较为简单的机器学习问题。
我们在这里,以练手为目的,用新股首日涨跌幅的预测作为例子,介绍一个比较完整的机器学习流程。
数据获取
一个机器学习的项目,最重要的是数据。没有数据,一切再高级的算法都只是纸上谈兵。上一篇文中,已经获取了最近发行的新股的一些基本数据,还有一些详情数据在详细页里面,需要访问详情页获取。
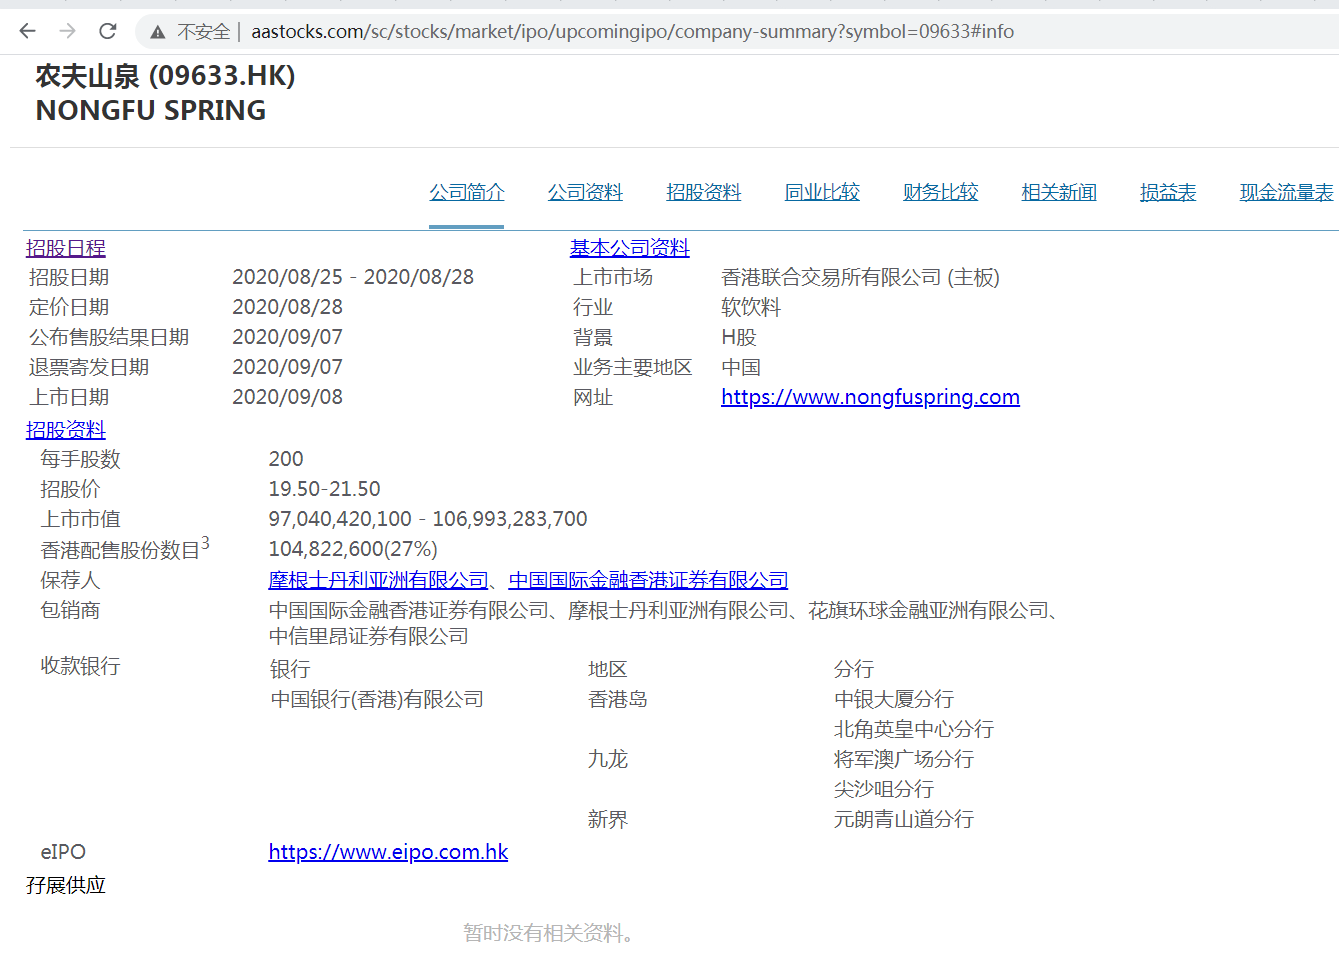
比如农夫山泉,除了之前爬取的基本数据,如上市市值,招股价,中签率,超额倍数,现价等,还有一些保荐人,包销商等有价值数据,所以我们也需要顺带把这些数据获取过来。这时需要在上一篇文章的基础上,获取每一个新股的详情页地址,然后如法炮制,用xpath把数据提取出来。
基本数据页和详情页保存为2个csv文件:data/ipo_list.csv和data/ipo_details.csv
数据清理和特征提取
接下来要做的是对数据进行清理,扔掉无关的项目,然后做一些特征提取和特征处理。
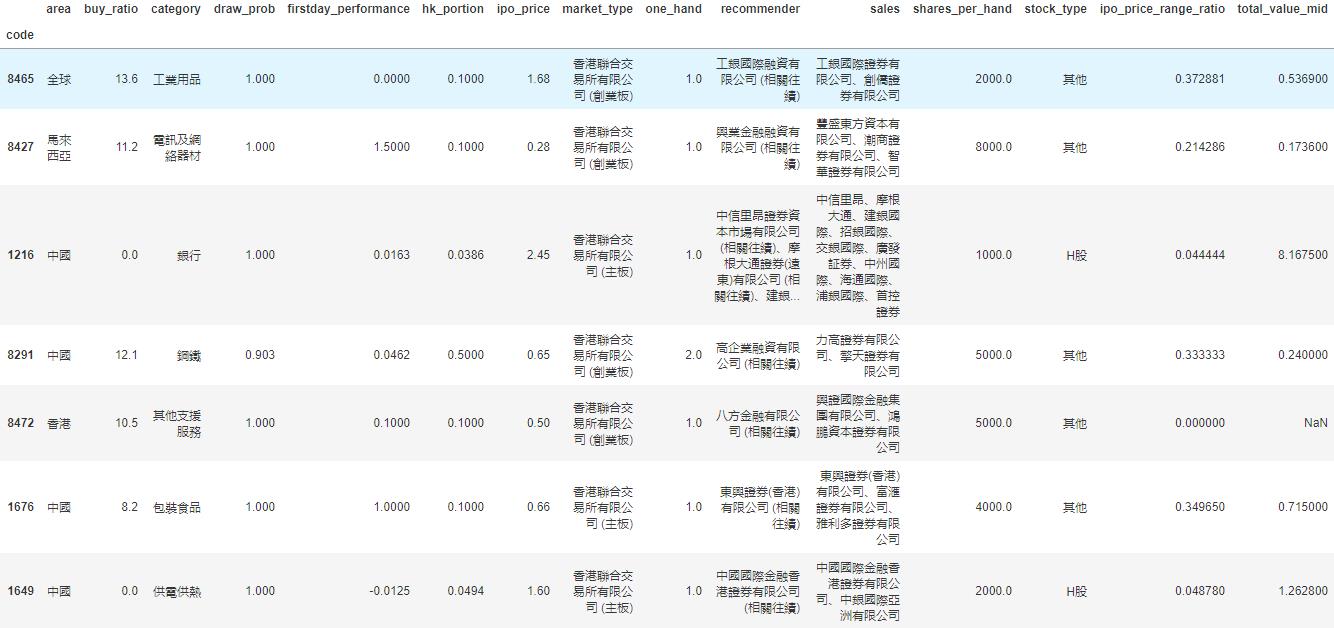
爬取的两个数据,我们先用pandas读取进来,用股票代码code做index,然后合并成为一个大的dataframe.
我们看看我们的dataframe有哪些column先:
我们的目标,也就是我们要预测的值,是首日涨跌幅,即firstday_performance. 我们需要扔掉一些无关的项目,比如日期、收票银行、网址、当前的股价等等。还要扔掉那些没有公开发售的全配售的股票,因为这些股票没有任何散户参与,跟我们目标无关。
对于百分比的数据,我们要换成float的形式:
对于”认购不足”的情况,我们要把超购数替换成为0:
新股招股的IPO价格是一个区间。有一些新股,招股价上下界拉得很开。因为我们已经有了股价作为另一个,所以我们这里希望能拿到IPO招股价格的上下界范围与招股价相比的一个比例,作为一个新的特征:
我们取新股招股价对应总市值的中位数作为另一个特征。因为总市值的绝对值是一个非常大的数字,我们把它按比例缩小,使它的取值和其它特征在一个差不多的范围里。
于是我们的数据变成了这样一个278 rows × 15 columns的dataframe,即我们有278个数据点和15个特征:
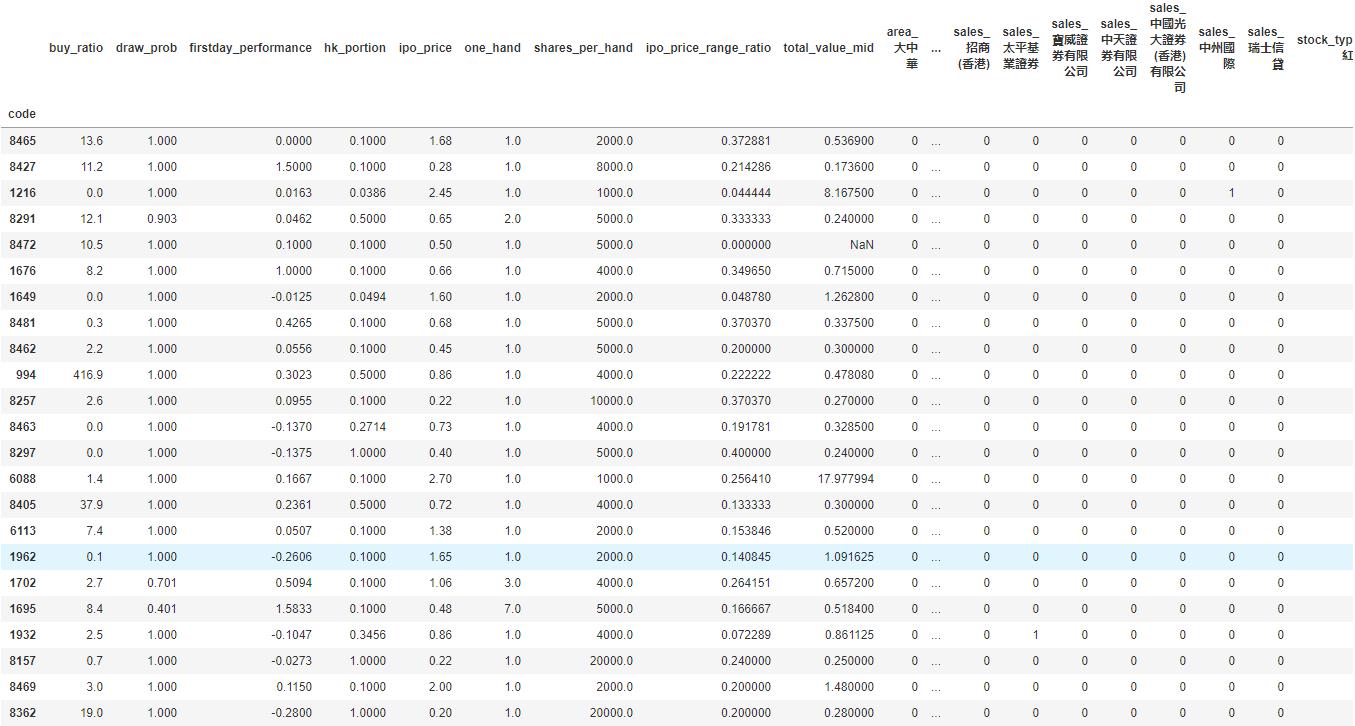
我们看到诸如地区、业务种类等这些特征是categorical的。同时,保荐人和包销商又有多个item的情况。对于这种特征的处理,我们使用one-hot encoding,对每一个种类创建一个新的category,然后用0-1来表示instance是否属于这个category。
训练模型
有了已经整理好特征的数据,我们可以开始建立机器学习模型了。
这里我们用xgboost为例子建立一个非常简单的模型。xgboost是一个基于boosted tree的模型。大家也可以尝试其它更多的算法模型。
我们把数据读入,然后随机把1/3的股票数据分出来做testing data. 我们这里只是一个示例,更高级的方法可以做诸如n-fold validation,以及grid search寻找最优参数等。
因为新股首日涨跌幅是一个float,所以这是一个regression的问题。我们跑xgboost模型,输出mean squared error (越接近0表明准确率越高):
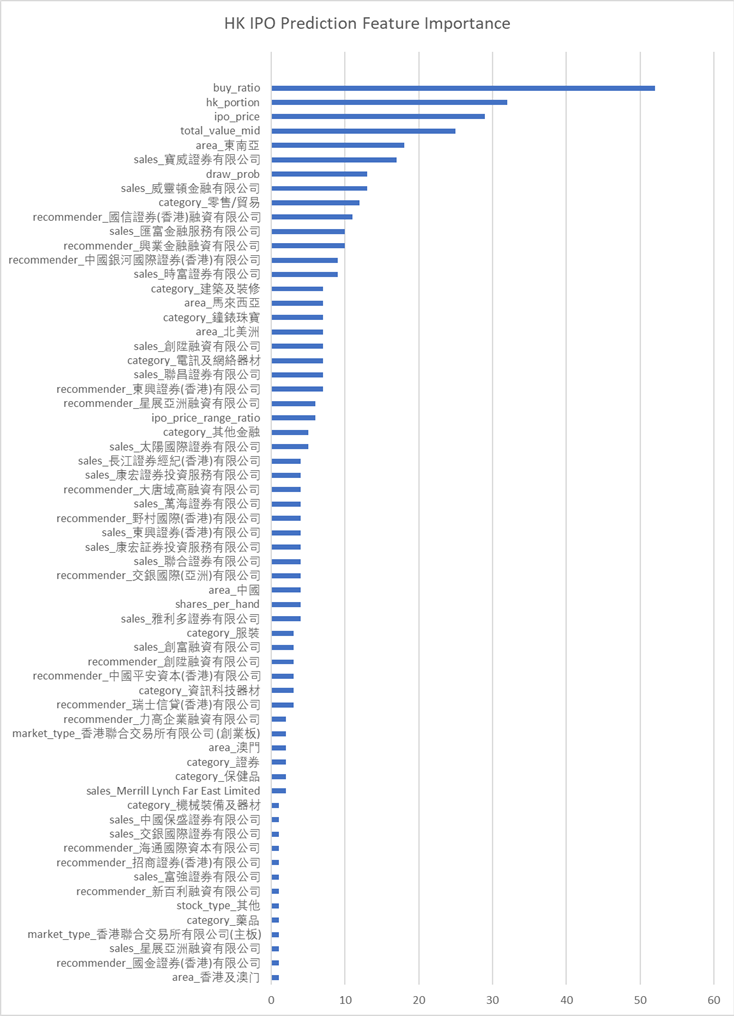
我们看到几个最强的特征,比如超额倍数、在香港发售的比例、ipo的价格和总市值(细价股更容易涨很多)等。
同时我们还发现了几个比较有意思的特征,比如东南亚地区的股票,和某些包销商与保荐人。
模型预测
这里就略过了。大家大可以自己将即将上市的港股新股做和上面一样的特征处理,然后预测出一个首日涨跌幅,待股票上市后做个对比了!
总结
我们用预测港股新股首日涨跌幅的例子,介绍了一个比较简单的机器学习的流程,包括了数据获取、数据清理、特征处理、模型训练和模型预测等。这其中每一个步骤都可以钻研得非常深;这篇文章只是蜻蜓点水,隔靴搔痒。
最重要的是,掌握了机器学习的知识,也许真的能帮助我们解决很多生活中实际的问题。比如,赚点小钱?
由于微信改版后不再是按时间顺序推送文章,如果后续想持续关注笔者的最新观点,请务必将公众号设为星标,并点击右下角的“赞”和“在看”,不然我又懒得更新了哈,还有更多很好玩的数据等着你哦。
原创文章,转载请注明牛出处
http://30daydo.com/article/608
收起阅读 »
因为我们花了不少时间爬取了港股新股的数据,可以对这些数据加以利用,利用机器学习的模型,预测港股上市价格以及影响因素的权重。
香港股市常年位于全球新股集资三甲之列,每年都有上百只新股上市。与已上市的正股相比,新股的特点是没有任何历史交易数据,这使新股的feature比较朴素,使其可以变成一个较为简单的机器学习问题。
我们在这里,以练手为目的,用新股首日涨跌幅的预测作为例子,介绍一个比较完整的机器学习流程。
数据获取
一个机器学习的项目,最重要的是数据。没有数据,一切再高级的算法都只是纸上谈兵。上一篇文中,已经获取了最近发行的新股的一些基本数据,还有一些详情数据在详细页里面,需要访问详情页获取。
比如农夫山泉,除了之前爬取的基本数据,如上市市值,招股价,中签率,超额倍数,现价等,还有一些保荐人,包销商等有价值数据,所以我们也需要顺带把这些数据获取过来。这时需要在上一篇文章的基础上,获取每一个新股的详情页地址,然后如法炮制,用xpath把数据提取出来。
基本数据页和详情页保存为2个csv文件:data/ipo_list.csv和data/ipo_details.csv
数据清理和特征提取
接下来要做的是对数据进行清理,扔掉无关的项目,然后做一些特征提取和特征处理。
爬取的两个数据,我们先用pandas读取进来,用股票代码code做index,然后合并成为一个大的dataframe.
#Read two files and merge

df1 = pd.read_csv('../data/ipo_list', sep='\t', index_col='code')

df2 = pd.read_csv('../data/ipo_details', sep= '\t', index_col = 0)

#Use combine_first to avoid duplicate columns

df = df1.combine_first(df2)
我们看看我们的dataframe有哪些column先:
df.columns.values


array(['area', 'banks', 'buy_ratio', 'category', 'date', 'draw_prob',

       'eipo', 'firstday_performance', 'hk_portion', 'ipo_price',

       'ipo_price_range', 'market_type', 'name', 'now_price', 'one_hand',

       'predict_profile_market_ratio', 'predict_profit_ratio',

       'profit_ratio', 'recommender', 'sales', 'shares_per_hand',

       'stock_type', 'total_performance', 'total_value', 'website'], dtype=object)
我们的目标,也就是我们要预测的值,是首日涨跌幅,即firstday_performance. 我们需要扔掉一些无关的项目,比如日期、收票银行、网址、当前的股价等等。还要扔掉那些没有公开发售的全配售的股票,因为这些股票没有任何散户参与,跟我们目标无关。
# Drop unrelated columns

to_del = ['date', 'banks', 'eipo', 'name', 'now_price', 'website', 'total_performance','predict_profile_market_ratio', 'predict_profit_ratio', 'profit_ratio']

for item in to_del:

    del df[item]


#Drop non_public ipo stocks

df = df[df.draw_prob.notnull()]
对于百分比的数据,我们要换成float的形式:
def per2float(x):

    if not pd.isnull(x):

        x = x.strip('%')

        return float(x)/100.

    else:

        return x


#Format percentage

df['draw_prob'] = df['draw_prob'].apply(per2float)

df['firstday_performance'] = df['firstday_performance'].apply(per2float)

df['hk_portion'] = df['hk_portion'].apply(per2float)
对于”认购不足”的情况,我们要把超购数替换成为0:
def buy_ratio_process(x):

    if x == '认购不足':

        return 0.0

    else:

        return float(x)


#Format buy_ratio

df['buy_ratio'] = df['buy_ratio'].apply(buy_ratio_process)
新股招股的IPO价格是一个区间。有一些新股,招股价上下界拉得很开。因为我们已经有了股价作为另一个,所以我们这里希望能拿到IPO招股价格的上下界范围与招股价相比的一个比例,作为一个新的特征:
def get_low_bound(x):

    if ',' in str(x):

        x = x.replace(',', '')

    try:

        if pd.isnull(x) or '-' not in x:

            return float(x)

        else:

            x = x.split('-')

            return float(x[0])

    except Exception as e:

        print(e)

        print(x)


def get_up_bound(x):

    if ',' in str(x):

        x = x.replace(',', '')

    try:

        if pd.isnull(x) or '-' not in x:

            return float(x)

        else:

            x = x.split('-')

            return float(x[1])

    except Exception as e:

        print(e)

        print(x)


def get_ipo_range_prop(x):

    if pd.isnull(x):

        return x

    low_bound = get_low_bound(x)

    up_bound = get_up_bound(x)

    return (up_bound-low_bound)*2/(up_bound+low_bound)


#Merge ipo_price_range to proportion of middle

df['ipo_price_range_ratio'] = df['ipo_price_range'].apply(get_ipo_range_prop)

del df['ipo_price_range']
我们取新股招股价对应总市值的中位数作为另一个特征。因为总市值的绝对值是一个非常大的数字,我们把它按比例缩小,使它的取值和其它特征在一个差不多的范围里。
def get_total_value_mid(x):

    if pd.isnull(x):

        return x

    low_bound = get_low_bound(x)

    up_bound = get_up_bound(x)

    return (up_bound+low_bound)/2


df['total_value_mid'] = df['total_value'].apply(get_total_value_mid)/1000000000.

del df['total_value']
于是我们的数据变成了这样一个278 rows × 15 columns的dataframe,即我们有278个数据点和15个特征:
我们看到诸如地区、业务种类等这些特征是categorical的。同时,保荐人和包销商又有多个item的情况。对于这种特征的处理,我们使用one-hot encoding,对每一个种类创建一个新的category,然后用0-1来表示instance是否属于这个category。
#Now do one-hot encoding for all categorical columns这下我们的数据变成了一个278 rows × 535 columns的dataframe,即我们之前的15个特征因为one-hot encoding,一下子变成了535个特征。这其实是机器学习很常见的一个情况,即我们的数据是一个sparce matrix。
#One problem is that we have to split('、') first for contents with multiple companies
dftest = df.copy()
def one_hot_encoding(df, column_name):
#Reads a df and target column, does tailored one-hot encoding, and return new df for merge
cat_list = df[column_name].unique().tolist()
cat_set = set()
for items in cat_list:
if pd.isnull(items):
continue
items = items.split('、')
for item in items:
item = item.strip()
cat_set.add(item)
for item in cat_set:
item = column_name + '_' + item
df[item] = 0
def check_onehot(x, cat):
if pd.isnull(x):
return 0
x = x.split('、')
for item in x:
if cat == item.strip():
return 1
return 0
for item in cat_set:
df[column_name + '_' + item] = df[column_name].apply(check_onehot, args=(item, ))
del df[column_name]
return df
dftest = one_hot_encoding(dftest, 'area')
dftest = one_hot_encoding(dftest, 'category')
dftest = one_hot_encoding(dftest, 'market_type')
dftest = one_hot_encoding(dftest, 'recommender')
dftest = one_hot_encoding(dftest, 'sales')
dftest = one_hot_encoding(dftest, 'stock_type')
训练模型
有了已经整理好特征的数据,我们可以开始建立机器学习模型了。
这里我们用xgboost为例子建立一个非常简单的模型。xgboost是一个基于boosted tree的模型。大家也可以尝试其它更多的算法模型。
我们把数据读入,然后随机把1/3的股票数据分出来做testing data. 我们这里只是一个示例,更高级的方法可以做诸如n-fold validation,以及grid search寻找最优参数等。
# load data and split feature and label

df = pd.read_csv('../data/hk_ipo_feature_engineered', sep='\t', index_col='code', encoding='utf-8')

Y = df['firstday_performance']

X = df.drop('firstday_performance', axis = 1)

# split data into train and test sets

seed = 7

test_size = 0.33

X_train, X_test, y_train, y_test = train_test_split(X, Y, test_size=test_size, random_state=seed)

# fit model no training data

eval_set = [(X_test, y_test)]
因为新股首日涨跌幅是一个float,所以这是一个regression的问题。我们跑xgboost模型,输出mean squared error (越接近0表明准确率越高):
# fit model no training data可见准确率还是蛮高的。 xgboost自带了画出特征重要性的方法xgb.plot_importance。 用来描述每个特征对结果的重要程度。
xgb_model = xgb.XGBRegressor().fit(X_train,y_train)
predictions = xgb_model.predict(X_test)
actuals = y_test
print mean_squared_error(actuals, predictions)
0.0643324471123
importance = xgb_model.booster().get_score(importance_type='weight')然后利用matplotlib绘制图形。
tuples = [(k, importance[k]) for k in importance]
我们看到几个最强的特征,比如超额倍数、在香港发售的比例、ipo的价格和总市值(细价股更容易涨很多)等。
同时我们还发现了几个比较有意思的特征,比如东南亚地区的股票,和某些包销商与保荐人。
模型预测
这里就略过了。大家大可以自己将即将上市的港股新股做和上面一样的特征处理,然后预测出一个首日涨跌幅,待股票上市后做个对比了!
总结
我们用预测港股新股首日涨跌幅的例子,介绍了一个比较简单的机器学习的流程,包括了数据获取、数据清理、特征处理、模型训练和模型预测等。这其中每一个步骤都可以钻研得非常深;这篇文章只是蜻蜓点水,隔靴搔痒。
最重要的是,掌握了机器学习的知识,也许真的能帮助我们解决很多生活中实际的问题。比如,赚点小钱?
由于微信改版后不再是按时间顺序推送文章,如果后续想持续关注笔者的最新观点,请务必将公众号设为星标,并点击右下角的“赞”和“在看”,不然我又懒得更新了哈,还有更多很好玩的数据等着你哦。
原创文章,转载请注明牛出处
http://30daydo.com/article/608
收起阅读 »
华宝油气自动化申购脚本 AutoJS
运行效果图:https://v.qq.com/x/page/u3155gvuxvt.html
因为最近两周的华宝油气都呈现很大的折价,但是限购,所以拖拉机申购非常的麻烦,需要一路点击,非常的耗时间,而且容易出错,容易点重复了,导致另外一个股东号没有申购。
所以自己用appium写了个手机自动化申购的脚本,只是它的部署相当不方便,对于一般小白几乎很难独立实现。在上一篇文章中埋了个伏笔 转债水位在降低 当时还准备基于appium写个教程来着。
最近发现有一个叫auto.js的app,基于JS代码的自动化工具,可以很方便的操控手机,只需要在手机上安装一个app,然后写一段JS脚本,然后运行就可以了,部署简化了不少。
后台回复:autojs 会提供相应的app下载与源码打包。
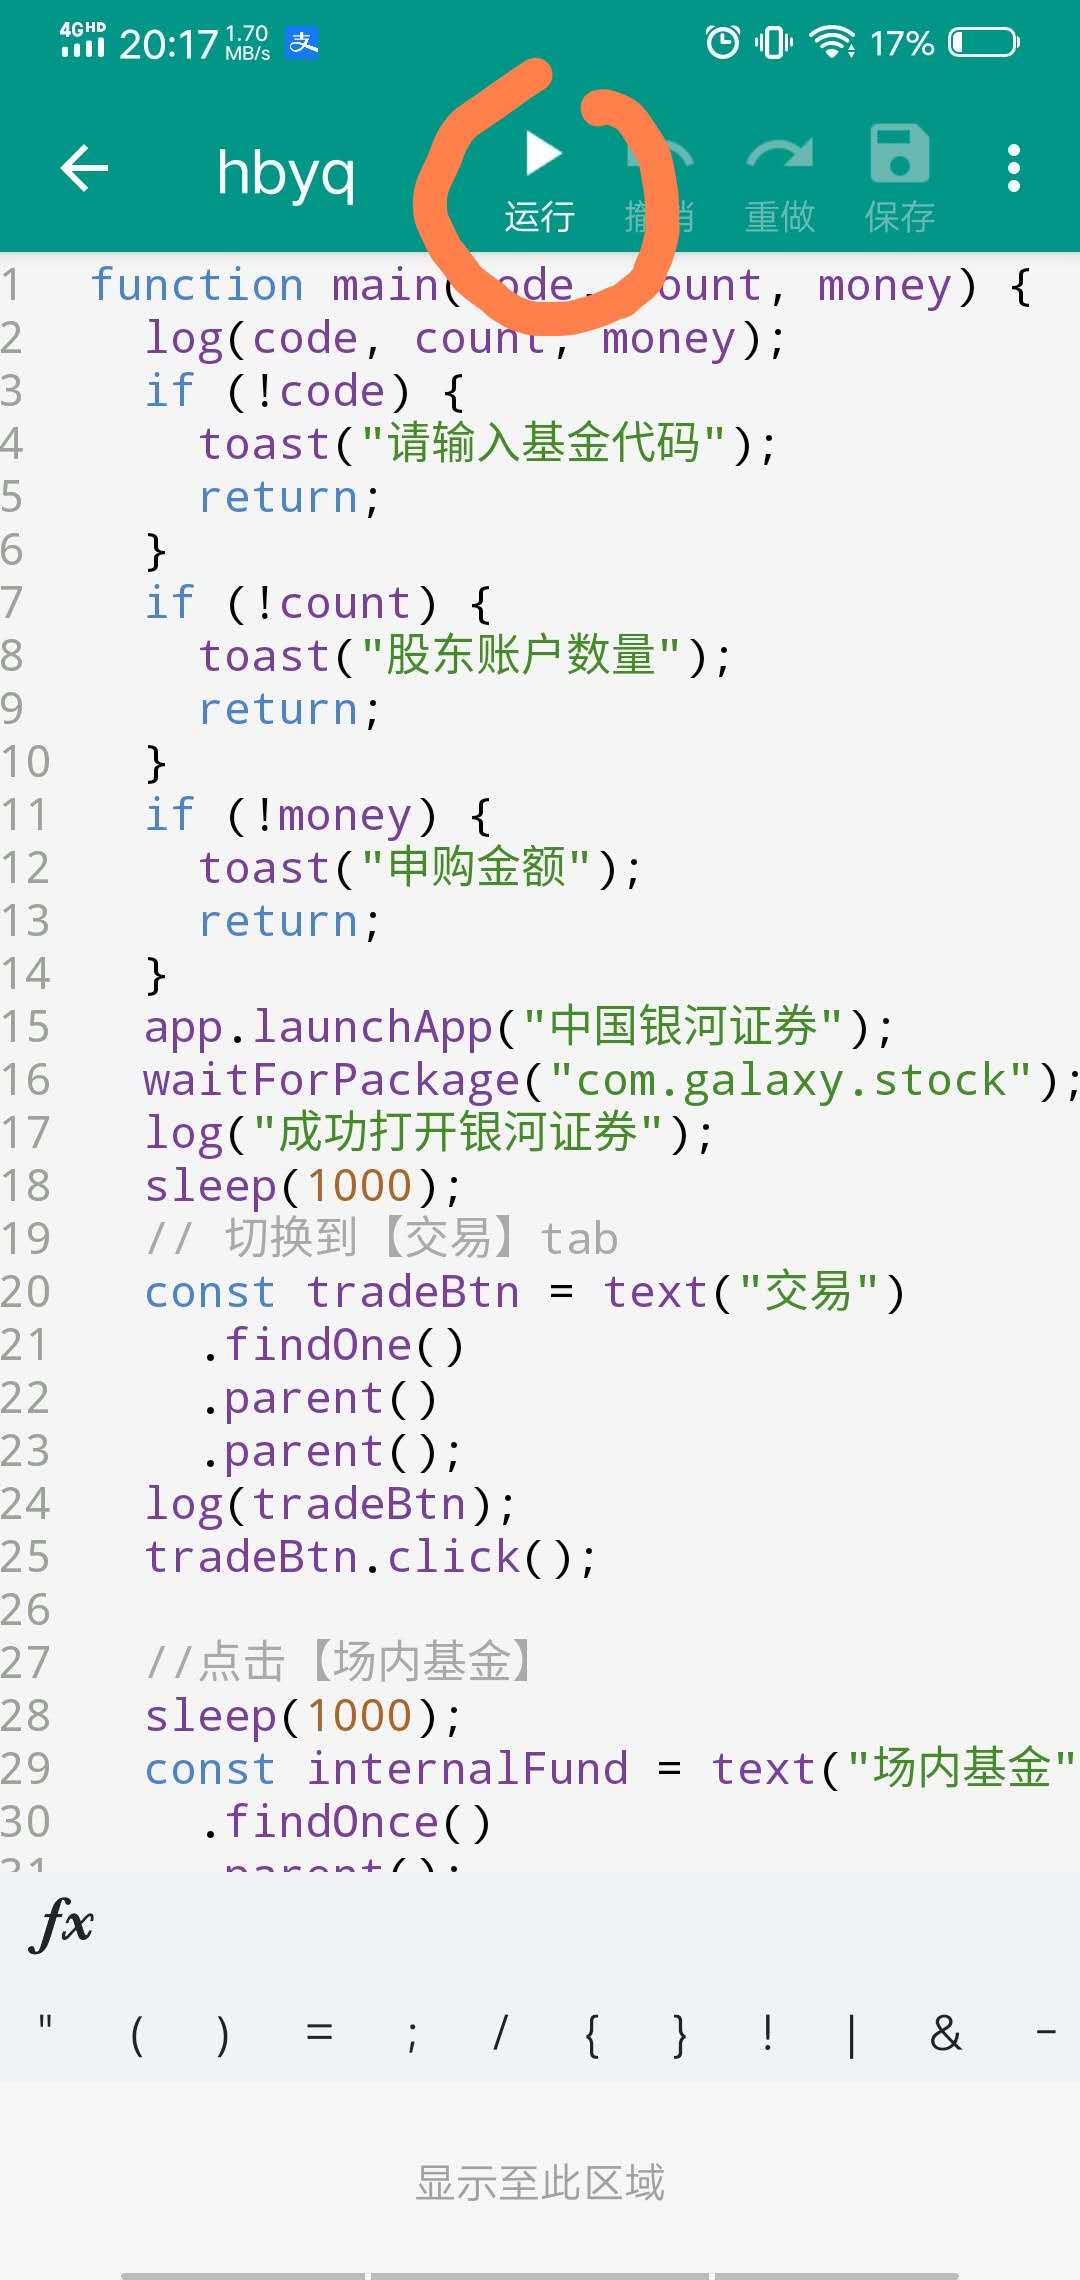
先看运行效果图:
运行的视频文件下面:
https://v.qq.com/x/page/u3155gvuxvt.html
脚本代码入口函数:
完整代码:
[i]安装使用步骤:
安装autojs app
[/i]
[/*]
[/list]
[/*]
[/list]
[/*]
[/list]
[i]
然后就静静的等待脚本执行完成,你的6个股东号就全部打完啦。如果你有多个证券账户,需要你退出当前的账户,然后登陆下一个账号,然后继续运行这个脚本即可。
后台回复:autojs 就可以获取autojs的app与上面的源码打包。
PS:如果你有有趣的想法要验证或者苦于没有数据无从下手,可以后台留言,一起交流,笔者会尝试帮你们验证分析。
关注公众号:
[/i] 收起阅读 »
因为最近两周的华宝油气都呈现很大的折价,但是限购,所以拖拉机申购非常的麻烦,需要一路点击,非常的耗时间,而且容易出错,容易点重复了,导致另外一个股东号没有申购。
所以自己用appium写了个手机自动化申购的脚本,只是它的部署相当不方便,对于一般小白几乎很难独立实现。在上一篇文章中埋了个伏笔 转债水位在降低 当时还准备基于appium写个教程来着。
最近发现有一个叫auto.js的app,基于JS代码的自动化工具,可以很方便的操控手机,只需要在手机上安装一个app,然后写一段JS脚本,然后运行就可以了,部署简化了不少。
后台回复:autojs 会提供相应的app下载与源码打包。
先看运行效果图:
运行的视频文件下面:
https://v.qq.com/x/page/u3155gvuxvt.html
脚本代码入口函数:
main("162411", "6", "100");其中第二个参数是申购的次数,场内的最多6个股东号,所以设置为6。完整代码:
//可转债量化分析

function main(code, count, money) {

    log(code, count, money);

    if (!code) {

        toast("请输入基金代码");

        return;

    }

    if (!count) {

        toast("股东账户数量");

        return;

    }

    if (!money) {

        toast("申购金额");

        return;

    }

    app.launchApp("中国银河证券");

    waitForPackage("com.galaxy.stock");

    log("成功打开银河证券");

    sleep(1000);

    // 切换到【交易】tab

    const tradeBtn = text("交易")

        .findOne()

        .parent()

        .parent();

    log(tradeBtn);

    tradeBtn.click();


    //点击【场内基金】

    sleep(1000);

    const internalFund = text("场内基金")

        .findOnce()

        .parent();

    internalFund.click();


    //点击【基金申购】

    waitForActivity("cn.com.chinastock.trade.activity.LofActivity");

    const fundPurchase = text("基金申购")

        .findOnce()

        .parent();

    fundPurchase.click();


    // 自动填信息

    sleep(1000);


    purchaseFund(code, count, money);

}


function purchaseFund(code, count, money) {

    for (let i = 0; i < count; i++) {

        log(code, count, money);

        const codeInput = id("stockCode").findOne();

        codeInput.click();

        codeInput.setText(code);

        sleep(1000);

        const accountSelect = id("secuidList").findOne();

        accountSelect.click();

        sleep(1000);

        const options = className("CheckedTextView").find();

        click(options[i].bounds().left + 2, options[i].bounds().top + 2);

        sleep(300);

        const orderAmount = id("orderAmount")

            .findOnce()

            .children()[0];

        log(orderAmount);

        orderAmount.setText(money);

        sleep(300);

        id("order")

            .findOnce()

            .click();

        sleep(6000);

        id("acceptedCb")

            .findOnce()

            .click();

        id("okBtn")

            .findOnce()

            .click();

        sleep(6000);

        click("本人已认真阅读并理解上述内容");

        sleep(200);

        click("我接受");

        sleep(200);

        click("本人已认真阅读并理解上述内容");

        sleep(200)

        click("我接受");

        sleep(7000);

        click("本人已认真阅读并理解上述内容");

        sleep(200);

        click("我接受");

        sleep(500);

        text('确认申购').findOnce().click();

        sleep(1000);

        text("确定")

            .findOnce()

            .click();


        sleep(1000);

    }

}


main("162411", "6", "100");[/i][/i]
[i]安装使用步骤:
安装autojs app
[/i]
- [i]手机设置无障碍模式,把autojs添加进去,一般按住app的时候会提示引导你这么操作[/i][list][*][i]打开autojs app,把上面的JS代码复制进去[/i][list][*][i]登录你的X河牌拖拉机[/i][list][*][i]在autojs app里面点击执行[/i]
[/*]
[/list]
[/*]
[/list]
[/*]
[/list]
[i]
然后就静静的等待脚本执行完成,你的6个股东号就全部打完啦。如果你有多个证券账户,需要你退出当前的账户,然后登陆下一个账号,然后继续运行这个脚本即可。
后台回复:autojs 就可以获取autojs的app与上面的源码打包。
PS:如果你有有趣的想法要验证或者苦于没有数据无从下手,可以后台留言,一起交流,笔者会尝试帮你们验证分析。
关注公众号:
[/i] 收起阅读 »
python asyncio aiohttp motor异步爬虫例子 定时抓取bilibili首页热度网红
使用的异步库: aiohttp【http异步库】,motor【mongo异步库】
AsyncIOMotorClient(connect_uri)
motor连接带用户名和密码的方法和pymongo一致。
connect_uri = f'mongodb://{user}:{password}@{host}:{port}'
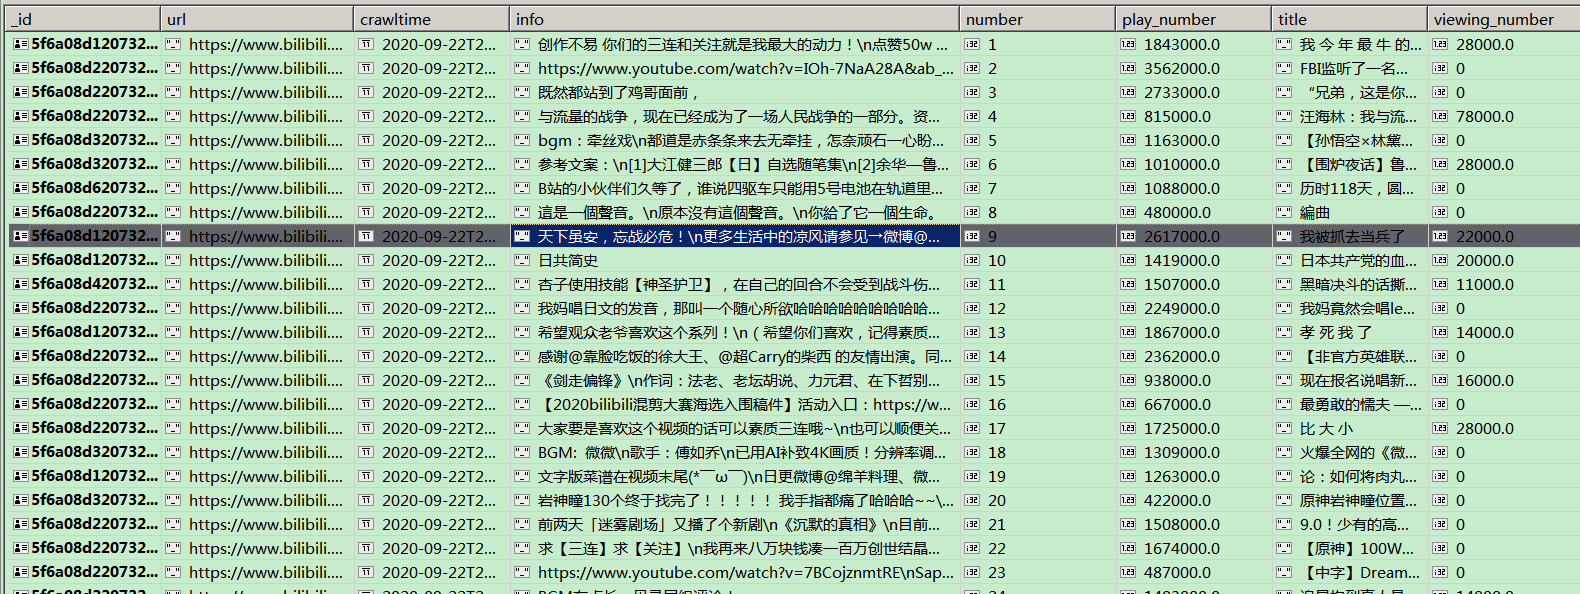
爬取的数据图:
原创文章,转载请注明:http://30daydo.com/article/605
需要源码,可私信。
收起阅读 »
AsyncIOMotorClient(connect_uri)
motor连接带用户名和密码的方法和pymongo一致。
connect_uri = f'mongodb://{user}:{password}@{host}:{port}'
# -*- coding: utf-8 -*-

# website: http://30daydo.com

# @Time : 2020/9/22 10:07

# @File : bilibili_hot_anchor.py


# 异步爬取首页与列表


import asyncio

import datetime

import aiohttp

import re

import time

from motor.motor_asyncio import AsyncIOMotorClient

from parsel import Selector

from settings import _json_data


SLEEP = 60 * 10

INFO = _json_data['mongo']['arm']

host = INFO['host']

port = INFO['port']

user = INFO['user']

password = INFO['password']

connect_uri = f'mongodb://{user}:{password}@{host}:{port}'


client = AsyncIOMotorClient(connect_uri)


db = client['db_parker']


home_url = 'https://www.bilibili.com/ranking'

headers = {'User-Agent': 'Mozilla/5.0 (Windows NT 10.0; Win64; x64; rv:57.0) Gecko/20100101 Firefox/57.0',

           'Accept-Language': 'zh-CN,zh;q=0.8,zh-TW;q=0.7,zh-HK;q=0.5,en-US;q=0.3,en;q=0.2'}


def convertor(number_str):

    '''

    将小数点的万变为整数

    :param number_str:

    :return:

    '''

    number = re.search('(\d+\.+\d+)', number_str)

    if number:

        number = float(number.group(1))

        if re.search('万', number_str):

            number = int(number * 10000)

    else:

        number = 0


    return number


async def home_page():

    async with aiohttp.ClientSession() as session:

        while True:

            start = time.time()

            async with session.get(url=home_url, headers=headers) as response:

                html = await response.text()

                resp = Selector(text=html)

                items = resp.xpath('//ul[@class="rank-list"]/li')

                for item in items:

                    json_data = {}

                    number = item.xpath('.//div[@class="num"]/text()').extract_first()

                    info = item.xpath('.//div[@class="info"][1]')

                    title = info.xpath('.//a/text()').extract_first()


                    detail_url = info.xpath('.//a/@href').extract_first()

                    play_number = info.xpath('.//div[@class="detail"]/span[1]/text()').extract_first()

                    viewing_number = info.xpath('.//div[@class="detail"]/span[2]/text()').extract_first()


                    json_data['number'] = int(number)

                    json_data['title'] = title

                    json_data['play_number'] = convertor(play_number)

                    json_data['viewing_number'] = convertor(viewing_number)


                    json_data['url'] = detail_url


                    task = asyncio.create_task(detail_list(session, detail_url, json_data))

                    # await detail_url()

                end = time.time()

                print(f'time used {end-start}')

                await asyncio.sleep(SLEEP)  # 暂停10分钟

                print(f'sleep for {SLEEP}')


async def detail_list(session, url, json_data):

    async with session.get(url, headers=headers) as response:

        response = await response.text()

        await parse_detail(response, json_data)


async def parse_detail(html, json_data=None):

    resp = Selector(text=html)

    info = resp.xpath('//div[@id="v_desc"]/div[@class="info open"]/text()').extract_first()


    if not info:

        info = '这个家伙很懒'


    json_data['info'] = info.strip()

    current = datetime.datetime.now()

    json_data['crawltime'] = current

    await db['bilibili'].update_one({'url': json_data['url']}, {'$set': json_data}, True, True)


loop = asyncio.get_event_loop()

loop.run_until_complete(home_page())
爬取的数据图:
原创文章,转载请注明:http://30daydo.com/article/605
需要源码,可私信。
收起阅读 »
Elastic Search报错:Fielddata is disabled on text fields by default
在使用 ElasticSearch 的时候,如果索引中的字段是 text 类型,针对该字段聚合、排序和查询的时候常会出现 Fielddata is disabled on text fields by default. Set fielddata=true 的错误。本文总结这个错误出现的原因,可能的修复方法等。
常见原因
在 ElasticSearch 中,Fielddata 默认在 text 类型的字段时是不启用的。设想,如果默认打开,那么你的数据中,每个字符串大概率不一样的话,那么这个字段需要的集合大小(Cardinality)会非常大。
而这个字段是需要存在内存中的 (heap),因此不可能默认打开。所以如果你从一个 script 来对一个 text 字段进行排序、聚合或者查询的话,就会出现这个错误。Fielddata is disabled on text fields by default. Set `fielddata=true` on [`你的字段名字`] in order to load fielddata in memory by uninverting the inverted index. Note that this can however use significant memory.
Fielddata is disabled on text fields by default 解答方法看这篇:
ES 如何解决 Fielddata is disabled on text fields by default 错误
收起阅读 »
开源网盘系统推荐 sharelist
不错的一个网盘系统https://github.com/reruin/sharelist
支持以下功能:
挂载GoogleDrive
挂载OneDrive(含世纪互联)
挂载天翼云盘(支持账号密码挂载)
挂载和彩云
挂载本地文件
挂载GitHub
挂载蓝奏云
挂载h5ai
挂载WebDAV
挂载SFTP
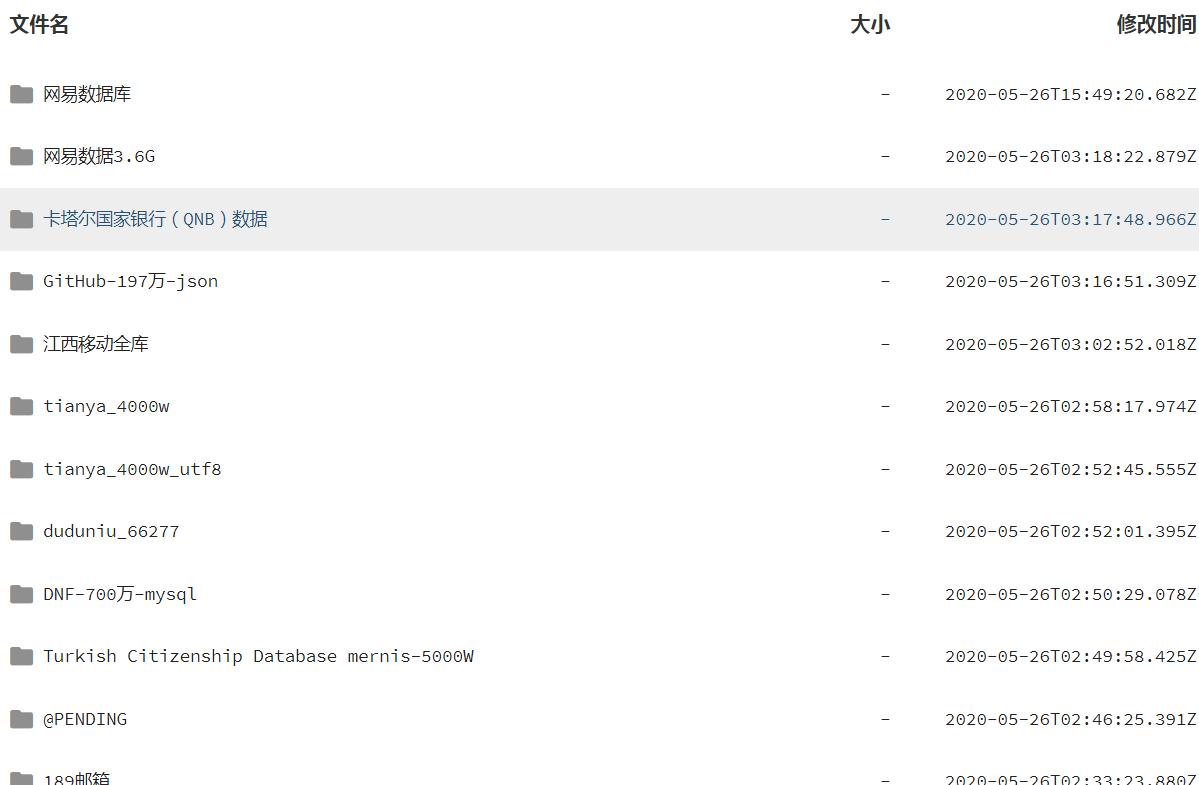
【别问我是怎么知道的】当时在网络上搜刮到一个别人的共享盘,里面居然一堆的QQ密码数据库,网易邮箱密码库,上百G的数据库,哎,网名的隐私在中国互联网连P都不是哈。
收起阅读 »
支持以下功能:
挂载GoogleDrive
挂载OneDrive(含世纪互联)
挂载天翼云盘(支持账号密码挂载)
挂载和彩云
挂载本地文件
挂载GitHub
挂载蓝奏云
挂载h5ai
挂载WebDAV
挂载SFTP
【别问我是怎么知道的】当时在网络上搜刮到一个别人的共享盘,里面居然一堆的QQ密码数据库,网易邮箱密码库,上百G的数据库,哎,网名的隐私在中国互联网连P都不是哈。
收起阅读 »
python3.8海象运算符
海象运算符( := )
这个「:=」横过来看是不是有点像海象的脸?这是一个新的 Python 语法,可以在进行条件判断时直接为变量赋值。
过去我们需要首先对某个变量进行赋值,然后进行条件判断。
而使用海象运算符后,我们可以直接为变量赋值:
PS:
python的版本更新最喜欢搞这一类的小动作,仅仅为了节省那么一两行代码弄得代码无法向下兼容。
收起阅读 »
这个「:=」横过来看是不是有点像海象的脸?这是一个新的 Python 语法,可以在进行条件判断时直接为变量赋值。
过去我们需要首先对某个变量进行赋值,然后进行条件判断。
m = re.match(p1, line)

if m:

return m.group(1)

else:

m = re.match(p2, line)

if m:

return m.group(2)

else:

m = re.match(p3, line)

    ...
而使用海象运算符后,我们可以直接为变量赋值:
if m := re.match(p1, line):

return m.group(1)

elif m := re.match(p2, line):

return m.group(2)

elif m := re.match(p3, line):
PS:
python的版本更新最喜欢搞这一类的小动作,仅仅为了节省那么一两行代码弄得代码无法向下兼容。
收起阅读 »
港股打新的基础知识
……港股打新的基础知识……
其实我们不提倡长期炒港股,我们打新即可。今天就介绍些港股打新的基础知识给大家参考。
1、招股书:这个和我们大A是一样的,上市公司发行股票前要发布招股说明书,把公司的基本情况、近三年业绩情况、财务指标数据、行业前景等等都写在这里,基本上得有三四百页。
2、招股价:通常港股上市前会让公众认购的股价,会给一个范围,比如招股价1-3港元,那么地区定价就在1港元,中位数2港元,高区定价就是3港元,公司会结合公众认购的情况定价。
3、超额认购倍数:认购金额/募资额的倍数。通常公开发售超够倍数动态监测才有,具体数据只能在中签公开日才能知道。倍数越高,说明这个股票受到市场追捧,大家都希望认购,后期股票上市时上涨、大涨的概率就越高。
4、回拨机制:港股发行股票是有回拨机制的,比如公开发售占总募资股份的10%,国际配售占90%,如果认购太火爆,上市公司和承销商就可以根据认购倍数来进行调整,这个调整就叫回拨机制。超额认购倍数如果在15>50>100倍,则对应回拨比例30%、40%、50%最常见。回拨越多,说明市场需求越强,上涨概率越大。
5、绿鞋机制:港股中比较常见,因为港股打新并非必赚钱,新港股有一半上市就破发。绿鞋机制其实就是护盘机制,承销商就有维护上市股价稳定的责任,防止大起大落。
6、保荐人:保荐人一般是证券公司,就是辅导上市公司上市和信息披露的券商,并且承担担保责任。如果保荐人是国际知名企业,并且有很多辅导上市公司的案例,形成了自身的品牌,那么新股上市上涨的概率较大。
7、基石投资者:港股是有基石投资者的,主要是看好上市公司的机构、企业集团或上市公司的亲朋好友提前持有一些原始股,表示对上市公司未来前景的肯定,能给市场增强信心,因为基石投资者持有的股票需要锁定半年才能抛售。
8、新股认购:港股认购新股不需要市值,可用现金认购,也可融资认购。现金认购就是你账户有多少钱就认购多少,大部分券商现金认购免费。融资认购就是上杠杆,大部分券商支持10-20倍融资认购,少部分支持50倍认购,大部分券商融资认购既收手续费,又收融资利息。
9、甲组和乙组:港股打新根据申购金额不同分组,500万以下为甲组(小散户),500万以上为乙组(大户),公开发售甲乙组各50%,通常乙组人少,所以中签数量会多,收益与亏损都将同步放大。有时候融资多了就会冲到乙组。
10、孖展:其实是英文Margin,即保证金,可以认为是融资认购打新加杠杆。孖展越多超够倍数就越多,孖展倍数越高说明大家愿意上杠杆参与,新股上涨的概率就越大。
11、入门资金:港股的1手每个股票都不同,有些1手是100股,有些是1000股,甚至有些是2000股,每个股票都不一样,在招股说明书中一定要看好。同时这也决定了打1手需要的最低金额,即入门资金。比如招股价范围是1-3港元,1手是2000股,那么最低申购1手冻结的资金范围就是2000港元-6000港元之间。
12、一手中签率:港股打新就这点好,为了保证大家参与都有钱挣,港交所规定每个账户认购1手新股的中签率必须是最高的。比如你1个账户认购了1手新股,中1签的概率可能为80%;但如果你1个账户认购10手新股,你中1签的概率可能是10%。具体怎么操作的我也还不清楚,只知道这就是港股的规则。
正是一手中签率最高的原则,决定了港股打新的玩法:同一身份证开多账户,每账户配置1-2万港元,一手申购,提高中签率!
收起阅读 »
python pyexecjs执行含有中文字符的js脚本报错
报错信息如下:
使用nodejs直接执行js是没有问题,同样代码在linux上执行也没有问题。
原因是windows的默认编码为cp396,修改subprocess.py文件的默认编码就可以解决。
把上面的encoding=None改为 encoding="utf-8",就可以了。 收起阅读 »
  File "C:\ProgramData\Anaconda3\lib\threading.py", line 926, in _bootstrap_inner

    self.run()

  File "C:\ProgramData\Anaconda3\lib\threading.py", line 870, in run

    self._target(*self._args, **self._kwargs)

  File "C:\ProgramData\Anaconda3\lib\subprocess.py", line 1238, in _readerthread

    buffer.append(fh.read())

UnicodeDecodeError: 'gbk' codec can't decode byte 0xbd in position 52: illegal multibyte sequence
  File "C:\ProgramData\Anaconda3\lib\site-packages\execjs\_external_runtime.py", line 103, in _exec_with_pipe

    stdoutdata, stderrdata = p.communicate(input=input)

  File "C:\ProgramData\Anaconda3\lib\subprocess.py", line 939, in communicate

    stdout, stderr = self._communicate(input, endtime, timeout)

  File "C:\ProgramData\Anaconda3\lib\subprocess.py", line 1288, in _communicate

    stdout = stdout[0]

IndexError: list index out of range
使用nodejs直接执行js是没有问题,同样代码在linux上执行也没有问题。
原因是windows的默认编码为cp396,修改subprocess.py文件的默认编码就可以解决。
    def __init__(self, args, bufsize=-1, executable=None,

                 stdin=None, stdout=None, stderr=None,

                 preexec_fn=None, close_fds=True,

                 shell=False, cwd=None, env=None, universal_newlines=None,

                 startupinfo=None, creationflags=0,

                 restore_signals=True, start_new_session=False,

                 pass_fds=(), *, encoding="None", errors=None, text=None):
把上面的encoding=None改为 encoding="utf-8",就可以了。 收起阅读 »
2020-08-19招商证券app和电脑客户端都无法登录 一整天无法登录
不知道是咋回事。 IP地址被封了?
一整天无法登录,这个故障也太大了吧。
一整天无法登录,这个故障也太大了吧。
爬虫nike登录流程抓包分析
<占坑> 敬请期待。
在Docker中配置Kibana连接ElasticSearch的一些小坑
之前编译部署的时候只需要在config/kibana.yaml 中修改host ,把默认的 http://elasticsearch:9200 改为 http://127.0.0.1:9200 , 如果你的ElasticSearch带密码访问,只需在下面加多2行
elasticseacrh.user='elastic'
elasticsearch.password='xxxxxx' # 你之前配置ES时设置的密码
BUT, 上面的配置在docker环境下无法正常启动使用kibana, 通过docker logs 容器ID, 查看的日志信息:
elasticseacrh.user='elastic'
elasticsearch.password='xxxxxx' # 你之前配置ES时设置的密码
BUT, 上面的配置在docker环境下无法正常启动使用kibana, 通过docker logs 容器ID, 查看的日志信息:
log [17:39:09.057] [warning][data][elasticsearch] No living connections使用curl访问127.0.0.1:920也是正常的,后来想到docker貌似没有配置桥接网络,两个docker可能无法互通,故把kibana.yaml里面的host改为主机的真实IP(内网172网段ip),然后问题就得到解决了。 收起阅读 »
log [17:39:09.058] [warning][licensing][plugins] License information could not be obtained from Elasticsearch due to Error: No Living connections error
log [17:39:09.635] [warning][admin][elasticsearch] Unable to revive connection: http://127.0.0.1:9200/
log [17:39:09.636] [warning][admin][elasticsearch] No living connections
log [17:39:12.137] [warning][admin][elasticsearch] Unable to revive connection: http://127.0.0.1:9200/
log [17:39:12.138] [warning][admin][elasticsearch] No living connections
log [17:39:14.640] [warning][admin][elasticsearch] Unable to revive connection: http://127.0.0.1:9200/
log [17:39:14.640] [warning][admin][elasticsearch] No living connections
log [17:39:17.143] [warning][admin][elasticsearch] Unable to revive connection: http://127.0.0.1:9200/
log [17:39:17.143] [warning][admin][elasticsearch] No living connections
log [17:39:19.645] [warning][admin][elasticsearch] Unable to revive connection: http://127.0.0.1:9200/
一条命令要python统一江湖
$alias python4=gcc python5=rustc python6=javac python7=node那好不送哈哈。
Have a reset then enjoy the next
Hopefully ~~
2020-06-29
2020-06-29
深圳住房公积金验证码 识别破解
http://gjj.sz.gov.cn/fzgn/zfcq/index.html
比较常规的验证码,使用keras全连接层,cv切割后每个字符只需要20个样本就达到准确率99%。
需要模型或者代码的私聊。 收起阅读 »

